

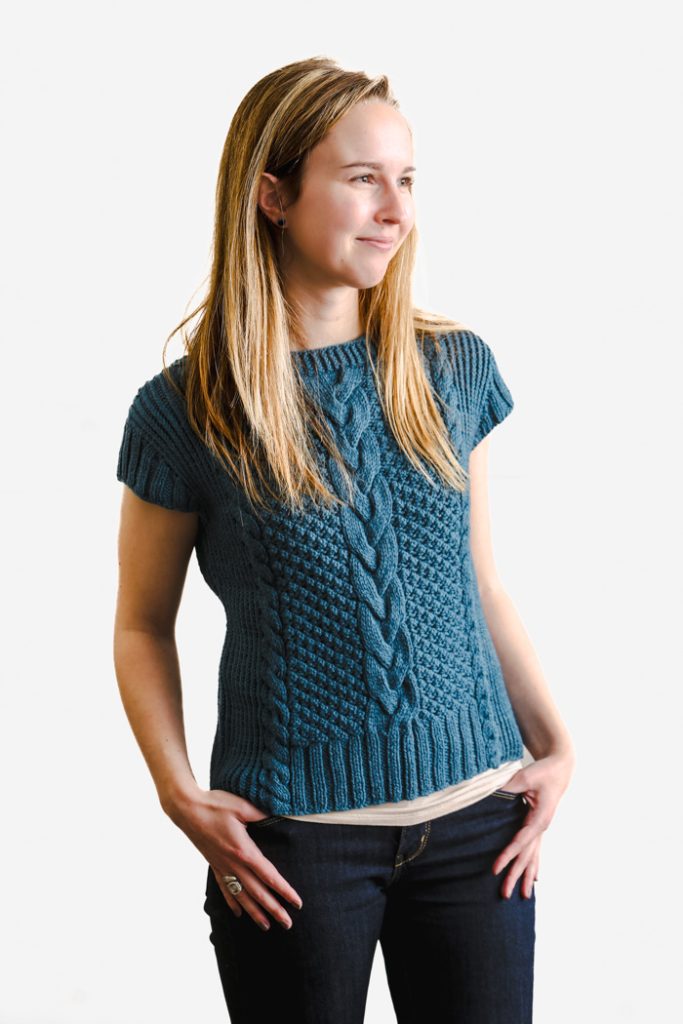
Elevate your wardrobe with the Blue Raspberry Tee, a sophisticated yet breezy design perfect for sunny days and warm evenings. This structured, short-sleeve top is worked bottom-up and features elegant intertwined cables that flow seamlessly into a textured raspberry stitch pattern. The combination of these intricate details adds dimension and charm, while the lightweight construction keeps you cool and comfortable. Knit in the serene “Moonlight” blue, this tee pairs beautifully with jeans, skirts, or shorts, making it a versatile choice for any warm weather occasion.
Skill Level: Intermediate
Size: XS (S, M, L, XL, XXL) to fit bust 30 (34, 38, 42, 46, 50)” / 76 (86, 96, 106, 117, 127); positive ease 2-4” (5-10см);
Gauge: 18 sts and 21 rows = 4” [10 cm] in Raspberry Stitch pattern, using US size 9 (5.5 mm) needles (blocked but not stretched)
Cable A and B = 1.2” [3 cm] width, using US 9 size (5.5mm) needles (blocked but not stretched)
Cable C = 2.4” [6 cm] width, using US size 9 (5.5mm) needles (blocked but not stretched)
24 sts and 22 rows = 4” [10cm] in 1×1 twisted rib, using US size 9 (5.5mm) needles, (blocked but not stretched)
Materials
 Yarn: Spud & Chloe Sweater (55% wool, 45% organic cotton; 160 yards [146 meters]/ 100 grams): #7507 Moonlight (5 (6, 6, 7, 7, 8) hanks)
Needles: US Size 9 (5.5 mm) straight needles, US Size 9 (5.5 mm) 16” circular, US size 7 (4.5mm) needles for hem ribbing, US size 6 (4.0 mm) needles for cast on
Notions: 3 stitch markers (1 different color to indicate start of rnd), tapestry needle
Pattern Notes
The vest is worked bottom up to the armholes, then is divided into front and back, and worked separately. Shoulders are shaped with short rows, and then joined together using 3-needle bind off method. Sleeves are picked up afterwards along the armholes.
Special Stitches
C8B: Place 4 sts on CN and hold to the back of work, k4 from LN, k4 from CN.
C8F: Place 4 sts on CN and hold in front of work, k4 from LN, k4 from CN.
C10B: Slip yo off the needle, place next 5 sts on CN and hold to the back of work, slip yo off the needle, k5 from LN, slip yo off the needle, k5 from CN.
C10F: Slip yo off the needle, place next 5 sts on CN and hold in front of work, slip yo off the needle, k5 from LN, slip yo off the needle, k5 from CN.
K1tbl: Knit 1 st through back loop (the knit st is twisted).
p1tbl: Purl 1 st through back loop (the purl st is twisted).
W&T: Bring working yarn to front of work, slip next st on RN, bring working yarn to back, “wrapping” this slipped stitch, slip stitch from RN back to LN, turn work.
3-Needle Bind Off: Insert tip of RN into 1st st on 1st needle, insert tip of RN into 1st st on 2nd needle, knit sts together, *insert tip of RN into 1st st on 1st needle, insert tip of RN into 1stt st on 2nd needle, knit sts together, pass 1st st over 2nd st on RN (1 st bound off); rep from * until all sts have been bound off.
Rep same for second shoulder.
Cable Chart A
(work over 8 sts)
Row 1 (RS): C8B
Rows 2 and 4 (WS): P8
Rows 3 and 5: K8
Row 6: P8
Rep Rows 1-6 for pattern
Cable Chart B
(work over 8 sts)
Row 1 (RS): C8F
Rows 2 and4: P8
Rows 3 and 5: K8
Row 6: P8
Rep Rows 1-8 for pattern
Central Cable Chart C
(work over 15 sts)
Row 1 (RS): K15
Rows 2 (WS): P15
Row 3: Same as Row 1
Row 4: (P5, yo) 3 times
Row 5: C10B, k5
Row 6: Same as Row 2
Row 7: Same as Row 1
Row 8: Same as Row 2
Row 9: Same as Row 1
Row 10: (Yo, p5) 3 times
Row 11: K5, C10F
Row 12: Same as Row 2
Rep Rows 1-12 for pattern.
Raspberry Stitch Chart
(multiple of 4 sts + 2)
Row 1 (RS): Purl.
Row 2 (WS): K1, *(k1, p1, k1) into next st, p3tog; rep from * to last st, k1.
Row 3: Purl.
Row 4: K1, *p3tog, (k1, p1, k1) into next st; rep from * to last st, k1.
Rep Rows 1-4 for pattern.
Pattern
Back – Ribbed Hem
With US size 6 (4 mm) needles and using cable cast-on method, CO 98 (106, 118, 126, 138, 146) sts, leaving a tail about 50 cm long for sewing up Front and Back.
Change to US size 7 (4.5 mm) needles.
Set-up Row 1 (RS): K1, (k1tbl, p1) 10 (10, 13, 13, 14, 14) times, k8, p1, (k2, p2) 9 (11, 11, 13, 15, 17) times, k2, p1, k8, (p1, k1tbl) 10 (10, 13, 13, 14, 14) times, p1.
Set-up Row 2 (WS): K1, (p1tbl, k1) 10 (10, 13, 13, 14, 14) times, p8, k1, (p2, k2) 9 (11, 11, 13, 15, 17) times, p2, k1, p8, (k1, p1tbl) 10 (10, 13, 13, 14, 14) times, p1.
You have set up the stitches for further knitting. You will knit two cables (cable chart A and cable chart B) with 2×2 rib between them and twisted 1×1 rib on both sides of a detail. Remember to work twisted knit sts on WS as p1tbl.
Row 3: K1, (k1tbl, p1) 10 (10, 13, 13, 14, 14) times, PM, work Cable Chart A, PM, p1, (k2, p2) 9 (11, 11, 13, 15, 17) times, k2, p1, PM, work Cable Chart B, PM, (p1, k1tbl) 10 (10, 13, 13, 14, 14) times, p1.
Row 4: Work the sts as they look, working twisted k sts as p1tbl.
Work straight in pattern as established until piece measures 3.25’’ (8 cm), ending with a RS row, placing 2 markers to separate central 10 sts.
Next Row (WS): K1, (p1tbl, k1) to marker, sm, p8, sm, k1, (p2, k2) to 6 sts to marker, p2, kfb, k1, p2, sm, kfb, k1, (p2, k2) twice, sm, p2, k1, kfb, (p2, k2) to 3 st to marker, p2, k1, sm, p8, sm, (k1, p1tbl) to 1 st to end of row, p1. (3 sts inc’d; 101 (109, 121, 129, 141, 149) sts on the needles)
Body
Change to US size 9 (5.5mm) needles.
Set-up Row 1 (RS): Work in twisted rib to marker, sm, work Cable Chart A, sm, p to 2 sts before marker, move next marker here, work Central Cable Chart C, removing next marker, PM, p to marker, work Cable Chart B, sm, work in twisted rib to end of row.
Set-up Row 2 (WS): Work in twisted rib to marker, work next row of Cable Chart B, k1, work Row 2 of Raspberry Stitch Chart to 1 st before next marker, k1, sm, work next row of Central Cable Chart C, sm, k1, work Row 2 of Raspberry Stitch Chart to 1 st before next marker, k1, sm, work next row of Cable Chart A, sm, work in twisted rib to the end of row.
Next Row (RS): Work in twisted rib to marker, work next row of Cable Chart A, p1, work next row of Raspberry Stitch Chart to 1 st before next marker, p1, sm, work next row of Central Cable Chart C, sm, p1, work next row of Raspberry Stitch Chart to 1 st before next marker, p1, sm, work next row of Cable Chart B, sm, work in twisted rib to the end of row.
Next Row (WS): Work in twisted rib to marker, work next row of Cable Chart B, k1, work next row of Raspberry Stitch Chart to 1 st before next marker, k1, sm, work next row of Central Cable Chart C, sm, k1, work next row of Raspberry Stitch Chart to 1 st before next marker, k1, sm, work next row of Cable Chart A, sm, work in twisted rib to the end of row.
Rep last 2 rows until piece meas 11.75 (12, 12, 12, 12.25, 12.5)” [30 (30.5, 30.5, 30.5, 31, 32) cm] from the CO edge.
Armholes
Main test pattern, BO 2 (3, 3, 4, 4, 5) sts at the beg of next 2 rows.
BO 1 st at the beg of next 6 (6, 8, 8, 10, 10) rows.
Place markers to indicate the 1st and the last sts of last row (these markers will be used when knitting the sleeves, so, don’t move them). (91 (97, 107, 113, 123, 129) sts on needles)
***
Work straight in pattern until piece meas 19.2 (19.4, 19.7, 19.9, 20.5, 21.25)” [48 (49, 50, 50.5, 52, 54) cm] from CO edge.
REMEMBER the number of rows you’ve made from last decrease row to shoulder shaping – you will need this exact number when knitting the front piece.
Shoulder Shaping
You will shape shoulders using short-rows. Please, look through ABBREVIATIONS section to clarify some details about W&T and “wrapped st” BEFORE you proceed with the pattern.
Row 1 (RS): Work in pattern to 6 (7, 6, 7, 6, 7) sts before end of row, W&T.
Row 2 (WS): Same as Row 1.
Row 3: Work in pattern to 6 (6, 6, 6, 6, 6) sts before “wrapped st”, W&T.
Row 4: Same as Row 3.
Row 5: Work in pattern to 4 (6, 6, 6, 6, 6) sts before “wrapped st”, W&T.
Row 6: Same as Row 5.
Row 7: Work in pattern to 4 (4, 6, 4, 6, 4) sts before “wrapped st”, W&T.
Row 8: Same as Row 7.
NOTE: Don’t make any Central Cable Chart C cable crossings on Row 9. However, if you need to cross cables for Cable Chart A or Cable Chart B, make it.
Row 9: Work in pattern to end of row, working “wrapped sts” together with wraps.
Row 10: Work in pattern to marker, remove marker, p8, remove marker, (BO pwise sts to marker, remove marker) 3 times, p8, remove marker, work in pattern to end of row.
Place 24 (23, 28, 27, 28, 27) live Shoulder sts of both shoulders on stich holders.
Front
Work as for Back to ***.
Work straight in pattern for 6 rows less than for Back before shoulder shaping.
Next Row (RS): Work in pattern to 2nd marker, p7, BO center 29 (37, 45, 53, 59) sts, p to marker, work in pattern to end of row.
Right Front Shaping
Row 1 (WS): Work in pattern to end of row.
Row 2 (Neckline Dec): BO 2 sts, work in pattern to end of row.
Row 3: Work in pattern to end.
Rep last 2 rows once more.
Row 6 (Neckline Dec and Shoulder Shaping): BO 1 st, work in pattern to 6 (7, 6, 7, 6, 7) sts before end of row, W&T.
Row 7: Work in pattern to end of row.
Row 8 (Shoulder Shaping): Work in pattern to 6 (6, 6, 6, 6, 6) sts before “wrapped st”, W&T.
Row 9: Work in pattern to end.
Row 10 (Neckline Dec and Shoulder Shaping): BO 1 st, work in pattern to 4 (6, 6, 6, 6, 6) sts before “wrapped st”, W&T.
Row 11: Work in pattern to end of row
Row 12 (Shoulder Shaping): Work in pattern to 4 (4, 6, 4, 6, 4) sts before “wrapped st”, W&T.
Row 13: Work in pattern to end of row.
Row 14: Work in pattern to end of row, working “wrapped sts” together with wraps.
Row 15: Work in pattern to 2 sts before end of row, remove markers, k2tog.
Place 24 (23, 28, 27, 28, 27) live Shoulder sts on a stich holder.
Left Front
Join a new ball of yarn.
Row 1 (Neckline Dec): BO 2 sts, work in pattern to end of row.
Row 2 (RS): Work in pattern to end of row.
Rep last 2 rows once more.
Row 5 (Neckline Dec and Shoulder Shaping): BO 1 st, work in pattern to 6 (7, 6, 7, 6, 7) sts to end, W&T.
Row 6: Work in pattern to end of row
Row 7 (Shoulder Shaping): Work in pattern to 6 (6, 6, 6, 6, 6) sts to “wrapped st”, W&T,
Row 8: Work in pattern to end of row.
Row 9 (Neckline Dec and Shoulder Shaping): BO 1 st, work in pattern to 4 (6, 6, 6, 6, 6) sts to “wrapped st”, W&T.
Row 10: Work in pattern to end of row.
Row 11 (Shoulder Shaping): Work in pattern to 4 (4, 6, 4, 6, 4) sts to “wrapped st”, W&T.
Row 12: Work in pattern to end of row.
Row 13: Work in pattern to end of row, working “wrapped sts” together with wraps.
Row 14: Work in pattern to 2 sts before end of row, remove markers, k2tog.
Place 24 (23, 28, 27, 28, 27) live shoulder sts on a stich holder.
Shoulder Joining
Transfer Right Back Shoulder sts and Right Front Shoulder sts on two 5 mm needles. With WS facing and needles held parallel with tips facing right, BO the sts using 3-needle bind off method, as follows:
Neckline Binding
With US size 7 (4.5mm) needles and beg at Right Shoulder seam, pick up and k43 (51, 51, 59, 67, 75) sts along Back Neckline, pick up and k10 sts along Left Front slope, pick up and k29 (37, 45, 53, 59) sts along center stitches to right slope, then 10 sts along the right slope, PM.
Work in 1×1 twisted rib for 5 rnds.
BO in pattern.
Sew side seams using mattress stitch.
Sleeves
With US 7 (4.5 mm) 16” circular needles, beg at the side seam, pick up and k5 (6, 7, 8, 9, 10) sts to marker, pick up and k25 (28, 29, 30, 33, 34) sts along the armhole to shoulder seam, pick up and k25 (28, 29, 30, 33, 34) sts to next marker, pick up and k5 (6, 7, 8, 9, 10) sts to side seam. PM and join for working in the rnd. Remove markers. (60 (68, 72, 76, 84, 88) sts on the needles)
Place 2 markers counting 8 (8, 10, 10, 12, 12) sts on both sides of the beg of rnd.
Short-row 1 (RS): (K2, p2) 11 (12, 13, 14, 16, 17) times, W&T.
Short-row 2 (WS): Work in k2, p2 rib for 28 (28, 32, 36, 44, 48) sts, W&T.
Next Short-Row: Cont working in k2, p2 rib, work to last “wrapped” st, work it together with a wrap, work 1 more st in pattern, W&T.
Next Short-Row (WS): Cont working in k2, p2 rib, work to last “wrapped” st, work it together with a wrap, work 1 more st in pattern, W&T.
Rep last 2 rows until you get to markers, ending with a WS row.
Next Rnd (RS): Work in k2, p2 rib to end of rnd.
Work one more rnd in k2, p2 rib, working “wrapped” sts together with wraps.
BO in pattern.
Rep for the second sleeve.
Finishing
Weave in ends. Wet block to measurements.