

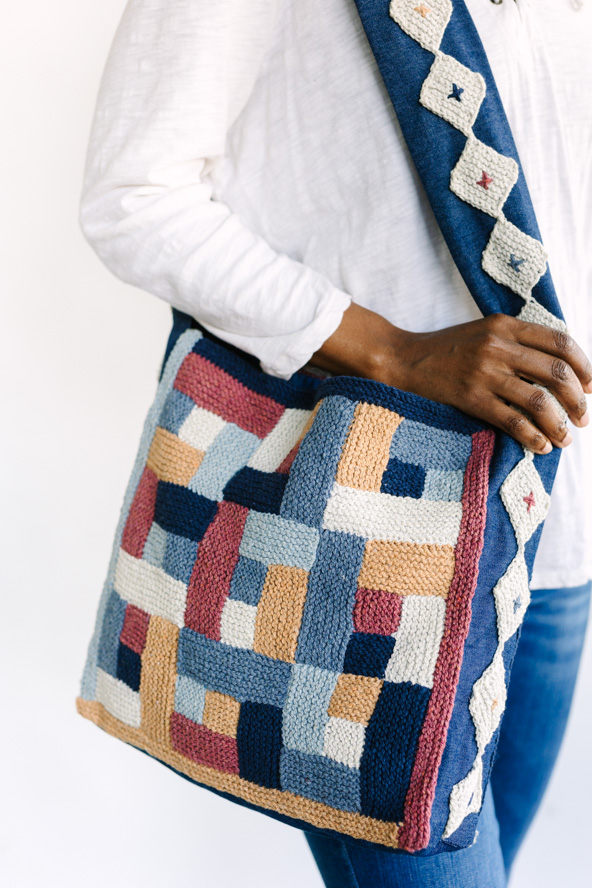
Enjoy the timeless appeal of log cabin knitting, with this easy-to-knit messenger bag. With a double fabric lining and thick embellished strap, this tote is perfect for school, shopping, or as your new go-to project bag.
Time: Week Project
Skill Level: Easy
Size: 13” x 13” x 3.5” with 39” shoulder strap
Gauge: 20 sts and 44 rows = 4” [10 cm] in Garter Stitch
Materials
 Yarn: Rowan Denim Revive (95% Cotton 5% Other Fibers; 109 yards [100 meters]/50 grams): #210 Cream (MC, 2 skeins), #211 Bluewash (CC1, 1 skein), #212 Airforce (CC2, 1 skein), #213 Night (CC3, 1 skein), #214 Lipstick (CC4, 1 skein), #218 Sand (CC5, 1 skein)
Hook/Needles: US size 4 (3.5mm) straight needles
Notions: scissors, tapestry needle, 1 yd denim fabric and matching sewing thread
Abbreviations
K2togtbl = knit 2 stitches together through the back loops (1 st decreased)
Pattern Notes
The front and back panels of the bag are made up of 9 log cabin squares each, which are stitched together and finished with a seamless 4-color border. The knitted panels are attached to the fabric inner bag, then the project is finished off with a simple knitted rick-rack, knit in one piece and embellished with embroidery stitches.
Pattern
Front Panel
Log Cabin Squares (make 9)
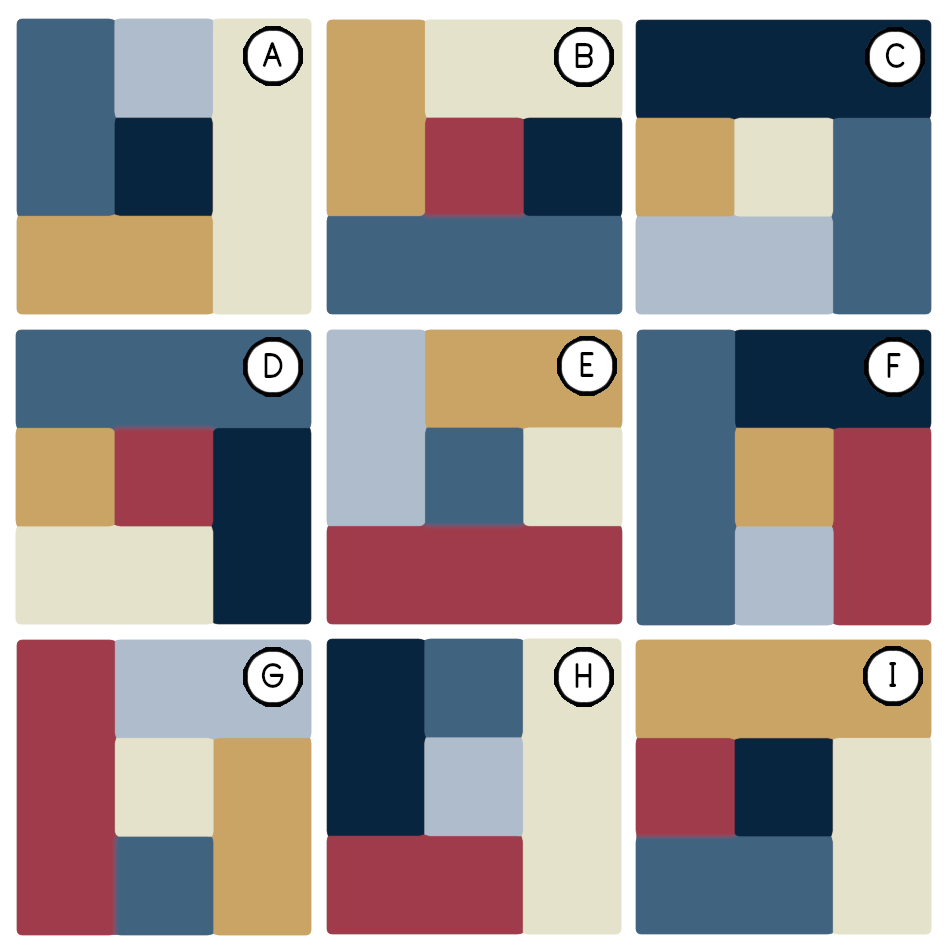
Note: Each square is made using 5 colors of yarn. You can mix and match your colors however you like, or, to match the sample shown, use the color chart below. Note that if you do not use the recommended color sequences, you may change the amount of yarn you need for each color.
Using the first color, cast on 7 sts.
Note: Even numbered rows will be RS rows
Rows 1-13: Knit
Cast off 5 sts. You should have 2 sts remaining on your needles. Move them both to the left needle. Cut the 1st color and join the 2nd color. K2togtbl. You should now have 1 st remaining.
Row 14: Turn the piece 90° clockwise. Pick up and knit 6 sts along the left side of the work. (7 sts total on the needles)
Rows 15-27: Knit
Cast off 5 sts. You should have 2 sts remaining on your needles. Move them both to the left needle. Cut the 2nd color and join the 3rd color. K2togtbl. You should now have 1 st remaining.
Row 28: Turn the piece 90° clockwise. Pick up and knit 13 sts along the left side of the work. (14 sts total on the needles)
Rows 29-41: Knit
Cast off 12 sts. You should have 2 sts remaining on your needles. Move them both to the left needle. Cut the 3rd color and join the 4th color. K2togtbl. You should now have 1 st remaining.
Row 42: Turn the piece 90° clockwise. Pick up and knit 13 sts along the left side of the work. (14 sts total on the needles)
Rows 43-55: Knit
Cast off 12 sts. You should have 2 sts remaining on your needles. Move them both to the left needle. Cut the 4th color and join the 5th color. K2togtbl. You should now have 1 st remaining.
Row 56: Turn the piece 90° clockwise. Pick up and knit 20 sts along the left side of the work. (21 sts total on the needles)
Rows 57-69: Knit
Cast off all stitches and weave in yarn ends. Make 8 more squares, so you have 9 total. If you are following the color recommendations below, mark each square with its designated letter, so you can assemble the squares as shown in the pattern
Color Recommendations Chart
| 1st Color | 2nd Color | 3rd Color | 4th Color | 5th Color | |
| SQUARE A | CC3 | CC1 | CC2 | CC5 | MC |
| SQUARE B | CC4 | CC3 | MC | CC5 | CC1 |
| SQUARE C | MC | CC5 | CC1 | CC2 | CC3 |
| SQUARE D | CC4 | CC5 | MC | CC3 | CC2 |
| SQUARE E | CC2 | MC | CC5 | CC1 | CC4 |
| SQUARE F | CC5 | CC1 | CC4 | CC3 | CC2 |
| SQUARE G | MC | CC2 | CC5 | CC1 | CC4 |
| SQUARE H | CC1 | CC2 | CC3 | CC4 | MC |
| SQUARE I | CC3 | CC4 | CC2 | MC | CC5 |
Assemble Squares
Arrange the squares RS up in a 3×3 grid, using the assembly diagram, or in your desired arrangement. Using heavy thread or a length of one of your yarns; stitch the squares together into a single panel. Note that to make the panel as shown in the pattern, not all the squares will be oriented in the same direction. Make note of the orientation on the assembly diagram below.
Border
Using CC4, with the RS facing you; pick up 63 stitches from left to right across the top of the panel. Then cast on an additional 5 stitches. (68 sts)
Rows 1-6: Knit
Cast off until 2 sts remain on left needle. Cut CC4 and join CC3. K2togtbl.
Turn the piece 90° clockwise. Pick up 66 sts along the left side of the work.
Rows 2-12: Knit
Cast off until 2 sts remain on left needle. Cut CC3 and join CC1. K2togtbl.
Turn the piece 90° clockwise. Pick up 66 sts along the left side of the work.
Rows 13-18: Knit
Cast off until 2 sts remain on left needle. Cut CC1 and join CC5. K2togtbl.
Turn the piece 90° clockwise. Pick up 66 sts along the left side of the work.
Rows 19-24: Knit
Cast off all stitches, leaving a short tail. Use the tail to seam the two corners of the border together, then weave in yarn ends.
If needed, block the panel once more to new measurements; 13” x 13”.
Back Panel
Make another panel, identical to the front and block to finished measurements; 13” x 13”.
Rick Rack for Bag Strap
Using MC, cast on 10 stitches.
*Rows 1-17: Slip 1 purlwise wyif, K to end
Cast off 9 sts. Cast on 9 stitches.**
Repeat from * to ** 24 more times, or until the rick-rack measures 65 inches (or the length of your strap).
At the end of the last repeat, cast off all stitches and weave in yarn ends.
Using the pictures as a guide and lengths of CC2, CC3, CC4 and CC5 (or any colors with enough contrast to stand out against the MC rick-rack); embroider a small X stitch in the center of each square. Because the rick-rack will be stitched onto the fabric strap, there is no need to weave in the yarn tails from the embroidery. Simply insert your tapestry needle to begin the stitch, leaving a short tail on the WS of the rick-rack. Work your stitch, then cut the yarn, leaving another short tail on the WS. Tie the two tails together into a secure double-knot and trim the ends.
Repeat this for all 25 squares, alternating your colors as you go.
If desired, you can block your rick-rack before continuing to the finishing.
Fabric Bag
Note: The fabric bag will be double-layered, so both the inside and outside will show the right-sides of your fabric.
To begin the fabric inner bag, cut your pieces of fabric as follows:
4 – 14” x 14” (for front and back)
2 – 14” x 4.5” (for bottom)
1 – 66” x 8” (for strap/sides)
Note: When sewing the fabric bag, you will always be using 0.5-inch seam allowances.
Fold the 66” x 8” strap piece in half lengthwise, with right sides touching. Seam along the long edge to form a tube, then turn right-side-out. Lay the strap down with the seam facing up and centered. Iron the tube in this orientation, so the strap is flat and the seam line is in the center on one side. You will be covering this seam line with the knitted rick-rack later on. Or, if you wish to omit the rick rack from your bag, you can make the seam side the underside of the strap.
Set the strap aside.
Place two of the 14” x 14” squares together with right sides touching. Seam around all four sides, leaving an opening large enough to turn the piece right-side out. Once right-side out, seam the hole closed and iron the piece flat.
Seam and iron the other two 14” x 14” together the same. You should now have two 13” x 13” double-sided squares. These will be the front and back pieces of the bag.
Place the two 14” x 4.5” pieces together with right sides touching and seam around, then turn right-side out, close the hole and seam flat. (This will be the bottom of the bag).
By hand, or machine, stitch one side of the first 13” x 13” square to a long side of the bottom piece. Stitch one side of the other 13” x 13” square to the other long side of the bottom piece. Stitch one end of the strap to one short end of the bottom piece. Stitch the other end of the strap to the other short end of the bottom piece. Then seam up all four sides, to finish the inner bag. You should now have a fully formed inner bag.
Finishing
Pin the knitted front panel to one side of the fabric bag, in the orientation shown in the Square Assembly Diagram. Using a needle and thread, hand stitch the knitted panel in place. When attaching the knitted panels, choose your thread color to blend with the fabric, rather than the knitting. The stitches can be hidden within the bumps of the garter stitch, so they are not visible on the knitted panel, regardless of the thread color.
Then pin the knitted back panel to the other side of the fabric bag, turning it 90° clockwise, so the CC3 border is at the top of the bag. This will give the front and back of the bag a slightly different appearance.
Arrange your knitted rick-rack over the bag strap (making sure it’s centered), beginning at the bottom of one side of the bag, going over the top of the strap and coming down to the bottom of the other side. Pin in place and use a needle and thread to stitch into place. Your rick-rack should be long enough to go around the entire fabric strap piece, but not the underside of the bag.