

That moment as the sun kisses the horizon and the sky is illuminated in calming shades of pink, gray, ivory and a hint of peach is captured perfectly in this yarn.
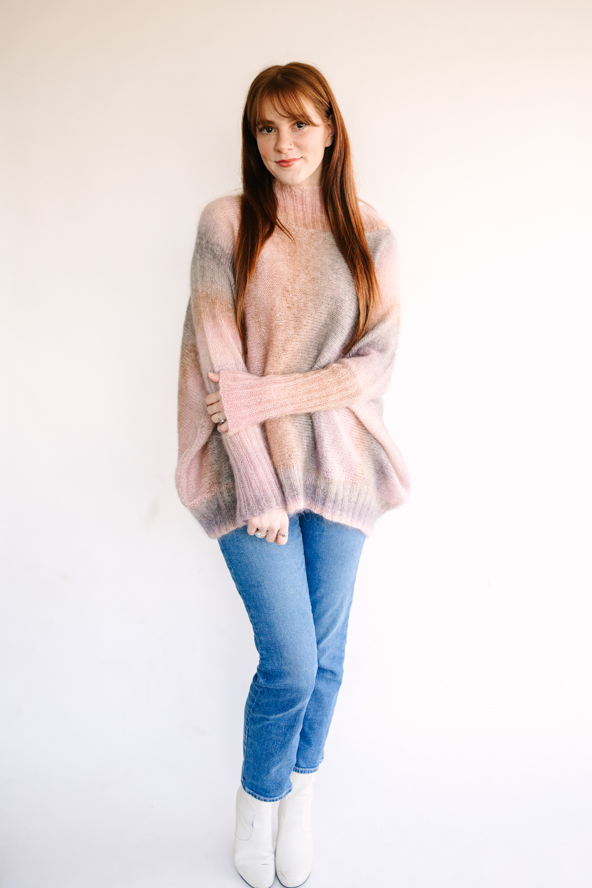
Ethereal is the most fitting way to describe this poncho.The incredibly soft and lightweight fabric is knit from side to side, devoid of seams, to mar the incredible beauty of this yarn as it gracefully drapes over the person lucky enough to wear it. For a cold weather version, add the funnel neck, bottom hem rib and sleeves as presented. For a version suitable for those fireside chats at the beach, skip the extras and just go with the flow of the poncho itself. Written to allow you to make changes along the way, this poncho will surely become a wardrobe staple.
Skill Level: Easy
Size: 54″ wide from cuff to cuff, each cuff is 10″, the bodice is 34″, height is 23″ from hem to shoulder, optional collar is 4″ high x 10″ wide when flat, steam blocked
Gauge: 20 sts and 28 rows = 4″ [10 cm] in stockinette square two strands held double on US 7/4.5mm knit flat, before blocking, 17 sts x 28 rows – 4″ [10 cm] after blocking
Materials
 Yarn: Universal Yarn Rico Designs Essentials Super Kid Mohair Loves Silk Print (70% Mohair, 30% Silk; 410 yards [375 meters]/50 grams): Color 009 (3 balls)
Universal Yarn Rico Designs Essentials Super Kid Mohair Loves Silk (70% Mohair, 30% Silk; 218 yards [200 meters]/25 grams: Color 044 (6 balls)
Needle: US size 7 (4.5 mm) 30″ circular for bodice US size 6 (4.00 mm) for ribbing 9″ (23 cm) circular and 24″ (61 cm) circulars or DPNs and US size 5 (3.5 mm) for seed stitch 9″ (23 cm) and 24″ (61 cm) circulars or DPNs
Notions: Tapestry needle, 12 locking stitch markers to denote the increases and decreases in the shoulders, 1 marker to mark the mid-point of the work, four locking stitch markers to denote the neckline; stitch holder or spare cable with removeable end caps, blocking wires and blocking board with pins (optional)
Pattern Notes
Knit flat from side to side this poncho can stand alone without the funnel neck, cuffs and band at the hem for a free flowing version, perfect for those cozy coastal bonfires.
For a more cozy version, add the cuffs, hem and funnel neck as shown or make it your own adding only the elements you feel you’ll need.
If a very light version is desired, the yarn need not be doubled. If a heavier version is desired, it may be tripled.
For visual interest and to prevent the edge from rolling, seed stitch is used for the first and last four rows of the work. If the work is going to be joined and the cuffs added instead of leaving the piece open, these rows may be replaced with stockinette for a smoother seam when finished.
If no visible seam is desired along the bodice, use a provisional cast on and Kitchener stitch rather than mattress stitch when finishing the seams. As presented, the piece was seamed with the mattress stitch for additional visual interest.
Worked side to side this piece can be custom sized to suit.
The bodice is designed to fit from elbow to elbow with the arms at rest aligned with the body. For additional ease, increase the number of rows knit between shoulder increases and decreases or between the neckline markers.
If desired, the number of rows between the neckline markers may be increased. If this is done and a funnel neck is desired, the number of stitches picked up on the neckline needs to be increased as well.
Pattern
Using both colors held together, CO 180 sts. Place mid-point marker to denote the middle of the cast on row, between stitches 90 and 91. Place a locking stitch marker in the same position of the cast on row, leave this one in place as the piece is worked. It is used to aid in folding the piece later and casting on for the cuffs.
Rows 1- 3: *K1, p1, rep from * to end of row.
Row 4 (WS): P2, k1, purl to three stitches from end of row, k1, p2.
Row 5 (RS): K2, p1, knit to three stitches from end of row, p1, k2.
Work rows 4-5 a total of ten times, repeat row 4 one additional time.
Increases from elbow to first shoulder
Row 1 (RS): K2, p1, knit to m, m1l, sm, m1r, knit to three stitches from end of row, p1, k2. (2 sts inc)
Row 2, 4, 6, 8 (WS): P2, k1, purl to three stitches from end of row, k1, p2.
Row 3, 5, 7 (RS): K2, p1, knit to three stitches from end of row, p1, k2.
Work rows 1 – 8 a total of seven times (14 sts inc) then continue without additional increases rows 2 – 3 a total of three times. (194 sts)
First shoulder Neckline
Front
Row 1 (RS): K2, p1, knit to 10 sts from the mid-point marker. PM to denote last stitch worked. Turn work. (87 sts worked) Place remaining 107 sts on stitch holder.
Row 2 (WS): Purl to last three stitches from the end of row, k1, p2, turn work.
Row 3 (RS): K2, p1, knit to marker placed in Row 1, turn work.
Repeat rows 2 – 3 until distance from marker placed in row 1 is 10″ (25 cm) or desired neck width, ending with a RS row. Break yarn leaving 4″ (10 cm) tail. Transition these 87 sts to stitch holder.
Continue working with the RS facing and remaining 107 Back stitches as follows:
Back
Bind off 20 sts. Place locking marker to denote last stitch bound off.
Row 1 (RS): Knit to last three stitches, p1, k2, turn work.(87 sts remain)
Row 2 (WS): P2, k1, purl to marker placed at the end of the last section where the stitches were bound off.
Row 3 (RS): Knit to last three stitches, p1, k2.
Row 4 (WS): P2, k1, purl to end of row.
Repeat rows 3 – 4 until Back is the same length as the Front, ending with a RS row.
Second shoulder Neckline
Row 1 (WS): P2, k1, purl to end of row, using cable cast on, cast on 20 sts, continue across row incorporating Front stitches from stitch holder. (194 sts)
Row 2, 4 (RS): P2, k1, purl to three stitches from end of row, k1, p2.
Row 3, 5 (WS): K2, p1, knit to three stitches from end of row, p1, k2.
Second shoulder to second elbow
Row 1 (RS): K2, p1, knit to m, ssk, sm, k2tog, knit to three stitches from end of row, p1, k2. (2 sts dec)
Row 2, 4, 6, 8 (WS): P2, k1, purl to three stitches from end of row, k1, p2.
Row 3, 5, 7 (RS): K2, p1, knit to three stitches from end of row, p1, k2.
Work rows 1 – 8 a total of seven times (14 sts dec) then continue without additional increases rows 2 – 3 a total of ten times. (180 sts)
Work three rows of seed stitch, *k1, p1, rep from * to end of row.
Bind off work leaving 4″ (10 cm) tail. Use a locking stitch marker to denote the midpoint in the last row. This will be useful when folding the poncho and working the optional cuffs.
Holding the piece so the work presents as a rectangle with the WS facing and the neck opening in the middle, fold the top down to meet the bottom hem. Using steam lightly block the piece. Weave in ends.
At this point the poncho is complete. Remove markers if optional features are not desired and proceed to Finishing. If cuff, hem and or collar are desired, continue as follows:
Optional features shown
Funnel Neck
Using the 24″ circular needle in the middle needle size, beginning at one of the markers on the back of the neck, pick up along the neckline 136 sts. At the markers placed while working the Bodice, pick up an extra stitch or two to keep the neckline flowing at gauge as it rounds the corners formed where stitches were cast on and bound off while working the bodice of the poncho. P and join in the round. If necessary, work one round increasing or decreasing by up to three stitches so the total number on the needle is a multiple of four stitches.
Work 30 rounds in a k2, p2 rib.
Bind off in pattern leaving a 4-inch (10-cm) tail. Weave in ends.
Hem
Along lower selvedge edge pick up 228 stitches using the middle size circular needle, pm and join in the round. If a few extra were picked up, work one round increasing or decreasing as necessary to get to the desired 228 or another multiple of four.
Work 30 rounds in a k2, p2 rib.
Bind off in pattern leaving a 4-inch (10-cm) tail. Weave in ends.
Cuffs
With RS facing along the cast on edge, using DPNs or 9″ circular in the middle size needle, pick up 26 stitches along either side of the mid-point marker.
Work in rounds in a k2, p2 rib until cuff measures 9.5″ (24 cm) or 0.5″ (1.25 cm) shorter than desired length.
On the next round, transition stitches to smallest needle and work three rounds in seed stitch.
Bind off in pattern leaving a 4-inch (10-cm) tail.
Weave in ends.
Repeat for second sleeve along the bind off edge.
Finishing
Remove all markers. Using steam or wet blocking if preferred, gently block the garment.
Use blocking pins and board to manipulate the piece to the desired dimensions.
Allow to air dry.
Weave in any ends which may still be visible.
Optional Seams
Note: Prior to seaming the piece, steam block it to relax the stitches into the desired width and length.
The remaining stitches of the bind off and cast on edges may be seamed from the lower hem up to the cuff or if cuffs were not desired, seam to within 4.5″ (11 cm).
With RS facing, using the tapestry needle and a length of yarn to suit, mattress stitch along the bind off and cast on edges as shown on the sample, or if stitches are live, use Kitchener to create a smooth seamless finish.