

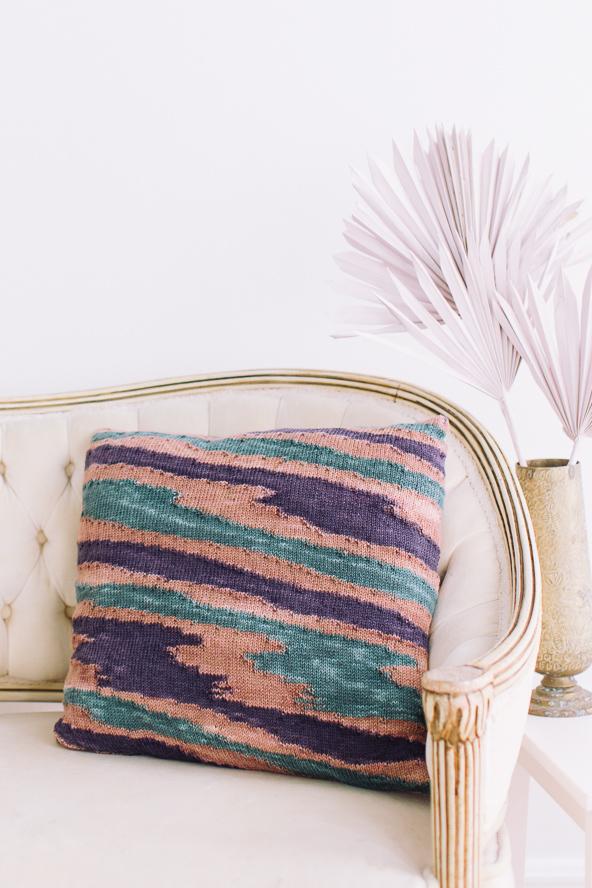
Dip your toes into planned pooling with this easy throw pillow project. Worked in one piece, with seamless grafted edges and a sprinkling of textured purl stitches, the result is reminiscent of swatches of painted colors on a canvas and like an artist’s watercolor: no two pieces will ever be the same!
Time: Week Project
Skill Level: Intermediate
Size: varies by project (sample shown is 17” x 17”)
Gauge: 26 sts and 36 rounds = 4” [10 cm] in Stockinette Stitch
Materials
 Yarn: Miss Babs Yummy 2-Ply (100% Superwash Merino Wool; 400 yards [365 meters]/110 grams): color High Steppin (MC, 2 hanks)
Hook/Needles: 16” circular needle in size needed to obtain a good gauge, as explained below and a circular needle one size larger [sample shown used sizes US 2 (2.75mm) and US 3 (3.25mm)]
Notions: scissors, scrap yarn, tapestry needle, stitch marker, pillow stuffing, 0.5-yd cotton fabric and matching thread
Pattern Notes
This pattern is designed specifically for use with hand dyed yarns that allow for planned pooling. Using a solid color yarn will result in a plain Stockinette Stitch pillow with no patterning. You can use regular variegated yarns for this pattern as well, but the finished result will be different. To achieve the large areas of ‘pooled’ color, you will need to choose a hand dyed yarn that has distinct repeating color sections around the hank. When choosing yarn, look for yarns labeled ‘Space Dyed’, or ask the dyer which of their yarns would work well for planned pooling.
Determining Your Gauge & Needle Size
To begin your planned pooling project, you will need to determine the gauge for your yarn.
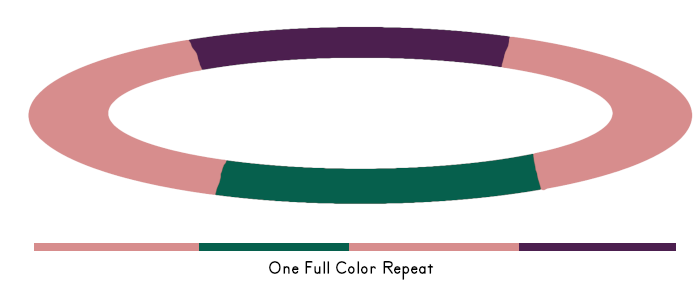
1) Pick a circular needle in a size that matches your yarn. Cast on a full repeat of your color sequence – for the sample shown, there are 4 color sections around the hank, as shown below. A full color repeat would be Pink-Green-Pink-Purple.
2) Once you’ve cast on a full repeat, count the number of stitches on your needles. This number is A. For the sample shown, we cast on 110 stitches (A).
3) Join to begin working in the round and knit enough rounds in Stockinette Stitch to establish gauge.
4) Measure your gauge to determine the number of stitches per inch. For the sample shown, our gauge was 6.5 stitches / inch. This number is B.
5) Now calculate the circumference of your work by dividing A ÷ B = C. For the sample shown, C is 16.9 inches. C will be the width of your finished pillow. For this pattern, we want to achieve a finished pillow width of approximately 16-18 inches. If you are happy with the finished pillow size your C measurement indicates, then you’re ready to begin. If not, adjust as follows: if C is larger than the pillow size you’re trying to achieve; choose a smaller circular needle and repeat the process again. If your C measurement is smaller than the size you want; choose a larger circular needle and repeat the process.
Once you are happy with your C measurement, continue as follows:
6) Multiply A x 2 = D [for the sample shown, we multiplied 110 x 2 = 220 (D)]
Pattern
Pillow
Using scrap yarn and a needle 1 size larger than your project needle (US 3 for sample shown), cast on D stitches (220 for sample shown) using a Provisional Cast On and leaving a long tail for grafting later on.
Place a marker and join to begin working in the round.
Note: This cast on will use 2 full color repeats (twice around your hank).
Move your stitches to the smaller needle (US 2 for sample shown), then begin:
PATTERN ROUND: Knit around, purling only the first stitch of each new color section. (For example, if after knitting 20 pink stitches, the color changes to purple; you will purl the first purple stitch, then continue knitting until you reach the end of the purple section. Then you will purl the first stitch of the next color, etc.)
Note: After working the first few rounds, you will want to evaluate your fabric and be sure you are happy with the way the colors are pooling. If your colors are not stacking up properly, you may need to add or subtract a few stitches to adjust your pooling.
Continue to repeat the Pattern Round, until your fabric measures C (17 inches for sample shown). Your fabric will be primarily Stockinette Stitch, with scattered purl bumps, creating a gentle textured effect on the fabric.
Once you’ve reached the final length; do not cast off. Cut yarn, leaving a long tail for grafting, then set the work aside and make your pillow form, before going to Finishing.
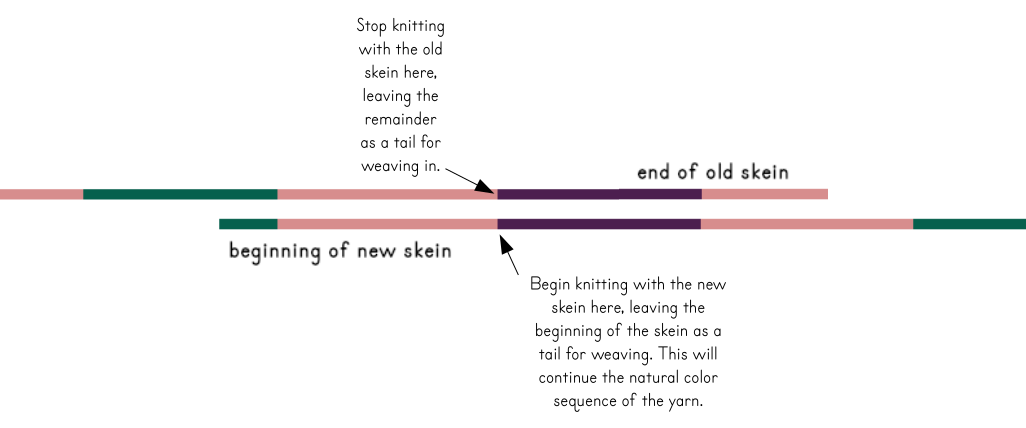
A Note on Changing Skeins: If your pillow requires more than one skein of yarn, it’s important to be sure you join the new skein in color sequence with the previous skein. If you join the end of the old skein directly to the beginning of the new skein, you will disrupt the pooling pattern, as shown in the example below, where the old skein ends with a partial section of pink and the new skein begins with a partial section of green.

To correctly change skeins, join as follows: when you are close to the end of the old skein, pull out the beginning of the new skein and set them side by side, aligning the color sequences, as shown below. In the example below, you would knit with the old skein until you reach the end of the pink section, then stop. Instead of continuing to knit into the purple section, you will join and work the purple section from the new skein, so there is no disruption in your color sequence and your pooling pattern will continue uninterrupted.
Pillow Form
Measure the size of your finished pillowcase (sample shown is 17” x 17”). Cut two squares of fabric 0.5” larger than your pillow size. With right sides touching; seam together using a 0.25-inch seam allowance and leaving a large enough hole for stuffing. Turn the pillow right-side-out and stuff to the desired firmness, then close the stuffing hole.
Finishing
Weave in all loose yarn ends, except the starting and finishing tails for grafting. Move the live stitches onto a length of scrap yarn. Remove the Provisional Cast on and place the cast on stitches on another length of scrap yarn. With both sets of live stitches on scrap yarn; slide the knitted tube over the pillow form and twist around, until you like the positioning of the pooled colors. Once you’ve determined your desired orientation, place the front half of your cast on stitches on one needle and the back half on another needle. Graft the two sets of stitches together using Kitchener Stitch, or the grafting method of your choice. Divide the second set of live stitches in half onto two needles the same way and graft together, being sure your stitches are divided the same as the bottom stitches, so your knitting is not twisted. Weave in all yarn ends.