

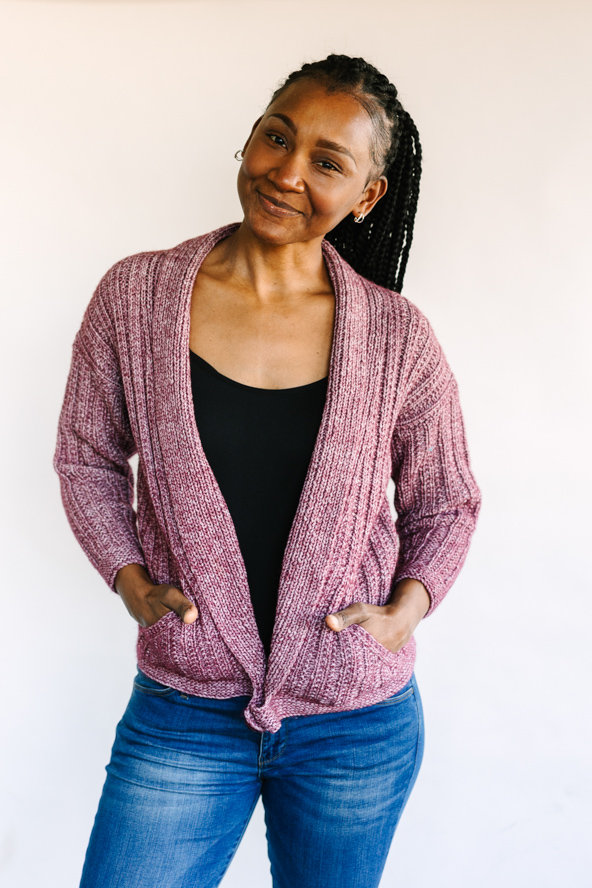
The Eliza Shawl Collar Cardigan is a cozy and stylish knitting pattern that will become a beloved addition to your wardrobe. This chunky cardigan is designed with comfort in mind, providing warmth and a touch of elegance. The cardigan features a roomy shawl collar that adds a sophisticated twist to the classic cardigan design. Whether you choose to layer it over a casual outfit or dress it up for a more formal occasion, the Eliza Shawl Collar Cardigan will undoubtedly become a cherished garment in your collection.
Time: 4 – 6 weeks depending upon the size.
Skill Level: Intermediate
Size: Finished Bust Size 36.75 (40.75, 43.25, 48.75, 52.75) (56.75, 59.25, 64.75, 68.75)”, to fit bust 28 (32, 36, 40, 44) (48, 52, 56, 60)”, 7-9” of ease recommended. Shown in size 32” (40.75” finished bust)
Gauge: 18 sts and 26 rows = 4” [10 cm] in twin rib stitch.
Materials
 Yarn: Cascade CANTATA (70% Cotton/30% Merino Wool, 218 yds [200m], 3.5oz/100g): 38 Maroon 6 (6, 7, 7, 8) (9, 9, 10, 10) skeins.
Needles: 2 US size 7 (4.5mm) circular needles at least 24” long for sizes XS-L and at least 36” long for sizes XL-5X.
Notions: 1” button or toggle, 4 Stitch Markers, Waste yarn or stitch holders, tapestry needle.
Abbreviations
Kfpb: K into the front and p into the back of the st.
Pfkb: P into the front and k into the back of the st.
Special Stitches
Twin Rib (multiple of six stitches plus 3)
Row 1: P3, *k3, p3 rep from *
Row 2: K1, *p1, k1, rep from *
Pattern Notes
This sweater is knit flat, but because of the number of stitches in the body, I recommend using a circular needle. Not only can you get one long enough to accommodate all those stitches, the weight of the project does not end up on your wrists.
The edges that create the collar and pocket are always slipped when beginning a row. Take care to keep this edge neat and continuous and do not change yarn balls near these edges. Try to add new yarn balls when needed in the body section of the sweater.
Pattern
Button Band
CO 175 (193, 205, 229, 247) (265, 277, 301, 319) sts. K6 rows, always slipping the first stitch pwise.
Make buttonhole
RS: Sl1, k2, yfwd, sl1 st pwise, yarn back, *sl next st pwise and pull the previously slipped stitch over. Rep from * twice more then place the last slipped st back on the left-hand needle. Turn work. [Place the right-hand needle from back to front between the two left sts, wrap as if to make a st, pull the loop and place it kwise on the left needle] four times. Turn work. Slip the last stitch made to the left and knit it together with the next st on the needle, k to end of row.
K 4 rows, always slipping the first stitch pwise.
WS: BO 5 sts, k to end of row.
RS: BO 5 sts, k 40 (40, 40, 40, 46) (46, 46, 46, 46) sts, and slip these sts onto a holder for right collar and pocket. K the next 85 (103, 115, 139, 145) (163, 175, 199, 217) sts and slip these sts onto a holder, K 40 (40, 40, 40, 46) (46, 46, 46, 46) sts for left front and pocket.
Left collar and pocket
The 3 outside sts will create the collar, the remaining 37 (37, 37, 37, 43) (43, 43, 43, 43) inside sts will make the pocket.
Setup row WS: Sl1, k2, place marker, k 34 (34, 34, 34, 40) (40, 40, 40, 40), pm, k3.
Left Collar Increase Row 1 (RS): Sl1, k2, sl marker, k1, work twin rib pattern to marker, sl marker, pfkb, *p1, k1, rep from * to end of row.
Left Collar Increase Row 2 (WS): Sl1, k1 *(p1, k1) rep from * to marker, work twin rib to 1 st before marker, p1, sl marker, K3.
Left Collar increase Row 3: Sl1, k2, sl marker, k1, work twin rib pattern as set to marker, sl marker, kfpb, p1, *(k1, p1) rep from * to end of row.
Left Collar increase Row 4: Sl1, *(k1, p1) to marker, sl marker, work twin rib pattern to st before marker, p1, sl marker, K3.
42 (42, 42, 42, 48) (48, 48, 48, 48) sts, of which 5 are collar sts and 37 (37, 37, 37, 43) (43, 43, 43, 43) body sts.
For sizes XS, S, M, and L: Repeat rows 1-4. (7 collar sts)
For sizes 1X, 2X, 3X, 4X and 5X: Repeats rows 1-4 twice (9 collar sts)
Left Collar increase/pocket decrease row 1 (RS): Sl1, k2, slip marker, ssk, continue in twin rib pattern as established, work to marker. Sl marker pfkb, *(p1 k1) rep from * to end of row.
Left Collar increase/pocket decrease row 2 (WS): Sl1, k1 *(p1, k1) rep from * to marker, work twin rib to st before marker, p1, sl marker, k3.
Left Collar increase/pocket decrease row 3: Sl1, k2, sl marker, ssk, work twin rib pattern to marker, sl marker, kfpb, k1, *(p1, k1) rep from * to end of row. Updated 1/25/24
Left Collar increase/pocket decrease row 4: Sl1, *(k1, p1) to marker, sl marker, work twin rib pattern to st before marker, p1, sl marker, k3.
Repeat these 4 rows 10 (10, 10, 10, 13) (13,13, 13, 13) more times. (15 pocket sts, 29 (29, 29, 29, 37) (37, 37, 37, 37) collar sts)
Cut yarn, leaving a 10” tail to sew up pocket lining. Place these sts on a holder.
Right collar and pocket
Slip the 40 (40, 40, 40, 46) [46, 46, 46, 46] stitches for the right collar and pocket onto a double sided needle. The 37 (37, 37, 37, 43) [43, 43, 43, 43] inside sts will make the pocket, the three outer sts will become the collar. Add a new ball of yarn. Updated 1/25/24
Setup row WS: Sl1, k2, place marker, k 34 (34, 34, 34, 40) (40, 40, 40, 40), pm, k3.
Right Collar Increase row 1 (RS): Sl1, k1, pfkb, sl marker, work in twin rib to marker, ending with k1, sl marker, k3.
Right Collar Increase row 2 (WS): Sl1, k2, sl marker, p1, work twin rib pattern to marker, *(k1, p1) rep from * to end of row.
Right Collar Increase row 3: Sl1, *(k1, p1) rep from * to st before marker, kfpb, sl marker, work twin rib pattern to marker, sl marker, k3.
Right Collar Increase row 4: Sl1, k2, sl marker, p1, work twin rib pattern to marker, p1 *(k1, p1) rep from * to end of row.
Right Collar Increase row 5: Sl1, k1, *(p1, k1) rep from * to st before marker, pfkb, sl marker, work twin rib pattern to marker, sl marker, k3.
For sizes XS, S, M, and L: Repeat rows 2, 3, and 4. (7 collar sts)
For sizes 1X, 2X, 3X, 4X and 5X: Repeats rows 2-5 once and rows 2, 3, and 4 once more. (9 collar sts)
Right Collar increase/pocket decrease row 1 (RS): Sl1, k1, *(p1, k1) rep from * to st before marker, pfkb, sl marker, work twin rib pattern to st before marker, two sts before the marker, k2tog, sl marker, k3.
Right Collar increase/pocket decrease row 2 (WS): Sl1, k2, sl marker, p1, continue in twin rib as set to marker, sl marker, *(p1, k1) rep from * to end of row.
Right Collar increase/pocket decrease row 3: Sl1, *(k1, p1) rep from * to st before marker, kfpb, sl marker, work twin rib pattern to two sts before the marker, k2tog, sl marker, k3.
Right Collar increase/pocket decrease row 4: Sl1, k2, sl marker, p1, work twin rib pattern as set to marker, p1 *(k1, p1) rep from * to end of row.
Repeat these 4 rows another 10 (10, 10, 10, 13) (13,13, 13, 13) more times. (15 pocket sts, 29 (29, 29, 29, 37) (37, 37, 37, 37) collar sts.)
Do not cut yarn. Place these sts on a holder.
Pocket Lining and body
Slip the 85 (103, 121, 139, 145) (163, 181, 199, 217) sts not yet worked onto a circular needle.
RS: With second circular needle and a new ball of yarn, leave a 10” tail, on the back of the right-hand side of the sweater, pick up and knit 37 (37, 37, 37, 43) (43, 43, 43, 43) sts beginning with the purl “frown” under the first twin rib st. This is the right-side pocket liner. K the 85 (103, 115, 139, 145) (163, 175, 199, 217) sts off of the circular needle, pickup 37 (37, 37, 37, 43) (43, 43, 43, 43) for the right pocket liner in the same manner the left pocket liner sts were picked up. (159 (177, 189, 213, 231) (249, 261, 285, 303) sts) The tail will be used to sew the pocket lining seam on the right side.
WS: K1, (p1, k1) to end of row.
RS: Begin twin rib pattern. Work 48 (48, 48 48, 56) (56, 56, 56, 56) rows to match pockets. Cut yarn leaving a 12” tail to be used to sew up right pocket lining.
Join the pockets and lining stitches
Slide right collar and pocket sts to a circular needle.
RS: Beginning with the right collar, work 29 (29, 29, 29, 37) (37, 37, 37, 37) collar sts, sm, in twin rib as set, work the next 15 pocket sts together with corresponding stitch from lining and remove marker from pocket edge. Work 129 (147, 159, 183, 201) (219, 231, 255, 273) sts of body in twin rib. At this point, rearrange sts so that one of the circular needles is free of stitches if needed. Slip the remaining left pocket and collar sts to the empty circular needle and work the 15 pocket sts together with the lining stitches maintaining twin rib pattern and removing the marker from the pocket edge, sm, work left collar sts as set, to end of row. ((29 (29, 29, 29, 37) (37, 37, 37, 37) right collar sts, 159 (177, 189, 213, 231) (249, 261, 285, 303) body sts, 29 (29, 29, 29, 37) (37, 37, 37, 37) left collar sts)
Place markers for armhole separation
WS: Sl 1, work left collar sts to marker as set, sl marker, work 39 (42, 48, 51, 57) (60, 66, 69, 75) st for front right, pm, work 81 (93, 99, 111, 117) (129, 135, 147, 153) body sts in twin rib pattern, pm, work 39 (42, 48, 51, 57) (60, 66, 69, 75) sts for left front, sl marker, work right collar sts as set.
Maker Note: At this point the collar increases are complete and the pockets and body are joined into a single piece. Neck decreases and length vary for each size so place markers now for the armhole separation.
Neck Decreases
Continue to work collar sts as set and begin neck decreases
Neck edge decrease row (RS): Sl1, work collar sts as set, sl marker, p1, ssk, continue in twin rib as set until 3 sts before the marker for the left collar sts, k2tog, p1, sl marker, work collar sts as set to end of row.
Remaining WS rows: Sl1, work collar sts as set, sl marker, k1, p1, continue in twin rib as set to 2 sts before right collar marker, p1, k1, sl marker, work collar sts as set.
Remaining RS rows when not decreasing: Sl1, work collar sts as set, p1, k1, work twin rib as set to 2 sts before marker, k1, p1, sl marker, work collar sts as set.
Repeat the neck edge decrease row every RS row 0 (0, 0, 0, 0) (0, 0, 0, 1) times, every 4th row 1 (0, 3, 5, 19) (12, 13, 13, 20) times, every 6th row 12 (13, 11, 10, 0) (5, 4, 5, 0) times.
Separate for armholes
When body measures 13 (13, 12.75, 12.375, 12.25) (12, 11.5, 11.375, 11)”, end with WS row.
RS: Work collar sts in ribbing as set, sl marker, make neck edge decrease if directed for this row, work in twin rib as set to armhole marker, remove marker and BO 3 sts, work to 3 sts before next marker in twin rib as set, remove marker and BO 3 sts, work remaining sts for left front in twin rib as set, making neck edge decrease if directed for this row, sl marker, work left collar sts in ribbing as set.
Place the sts for the back and right front on a holder or waste yarn.
Left front
Continue working neck decreases until complete, slipping the first st at the neck edge but working the first st of the armhole edge. When the neck decreases are complete 52 (58, 60, 65, 77) (82, 85, 90, 39) sts remain.
Continue each section as set until the body measures 21.5 (22, 22.25, 22.5, 22.75) (23, 23, 23.5, 23.5)”, ending with a WS row.
Shoulder Shaping
Next RS Row, BO 9 (10, 11, 12, 13) (15, 16, 17, 18) sts, work as set to neck edge.
Remaining RS rows, sl1, work collar and front in patterns as set.
Next RS row, BO 9 (10, 10, 12, 13) (14, 15, 17, 18) sts, work as set to neck edge
Next RS row, BO 8 (9, 10, 12, 12) (14, 15, 17, 18) sts, remove marker, work collar ribbing as set.
Continue to work collar ribbing, slipping the first st of each WS row until ribbing measures 3.25 (3.25, 3.5, 3.75, 4) (4.25, 4.25, 4.5, 4.5)”, put sts on a holder or waste yarn.
Right front
Slip sts for right front onto your needle.
Beginning with a WS row, add a new ball of yarn and continue working neck decreases as set until complete, slipping the first st at the neck edge but working the first st of the armhole edge. When the neck decreases are complete 52 (58, 60, 65, 77) (82, 85, 90, 39) sts remain.
Continue each section as set until the body measures 21.5 (22, 22.25, 22.5, 22.75) (23, 23, 23.5, 23.5)”, ending with a RS row.
Shoulder Shaping
Next WS Row, BO 9 (10, 11, 12, 13) (15, 16, 17, 18) sts, work as set to neck edge.
Remaining RS rows: Sl1, work collar and front in patterns as set.
Next WS row, BO 9 (10, 10, 12, 13) (14, 15, 17, 18) sts, work as set to neck edge
Next RS row, BO 8 (9, 10, 12, 12) (14, 15, 17, 18) sts, remove marker, work collar ribbing as set. Continue to work collar ribbing, slipping the first st of each RS row until ribbing measures 3.25 (3.25, 3.5, 3.75, 4) (4.25, 4.25, 4.5, 4.5)”. Put sts on a holder or waste yarn.
Back
Slip remaining body sts onto your needle. Beginning with a WS row continue twin rib as set until back measures 20.5 (21, 21.25, 21.5, 21.75) (22, 22, 22.5, 22.5)”
Shape back neck
Work 29 (32, 34, 39, 41) (46, 49, 54, 57) sts, add a new ball of yarn and BO 23 (23, 25, 27, 29) (31, 31, 33, 33) sts, continue to end of row.
Shape back left shoulder
WS: Work in twin rib to neck edge.
Next three RS rows: K1, ssk, work in twin rib to end of row.
Next WS row: BO 9 (10, 11, 12, 13) (15, 16, 17, 18) sts, work in twin rib to neck edge.
Next WS row: BO 9 (10, 10, 12, 13) (14, 15, 17, 18) sts, work in twin rib to neck edge.
Next WS row: BO remaining 8 (9, 10, 12, 12) (14, 15, 17, 18) sts.
Shape back right shoulder
Next three WS rows: P1, p2tog, work in twin rib to end of row
Next RS row: BO 9 (10, 11, 12, 13) (15, 16, 17, 18) st work in twin rib to neck edge.
Next RS row: BO 9 (10, 10, 12, 13) (14, 15, 17, 18) sts, work in twin rib to neck edge
Next RS row: BO remaining 8 (9, 10, 12, 12) (14, 15, 17, 18) sts
Sleeves (Make 2)
CO 39 (39, 45, 51, 51) (57, 57, 63, 69) sts. Work in garter st for 1.5”, ending with a WS row. Begin twin rib pattern AND increase one st each side every 4th row 20 (22, 21, 21, 23) (22, 24, 24, 23) times. (79 (83, 87, 93, 97) (101, 105, 111, 115) sts)
When sleeve measures 14.25 (14.75, 15.25, 15.5, 15.25) (15.75, 16.25, 16.75, 16.75)” BO.
Finishing
Graft back of neck sts in rib.
Sew back of neck sts to body.
Sew sleeves to body and sew seam of sleeves.
Sew open section of pocket lining to the body.
Weave in ends and block.
I want to see other patterns
Hi Suzanne, let me know what kinds of patterns interest you and I can make suggestions. – Nicola, Editor
i don’t understand the twin rib instructions. Row 2 says ki p1 but row 1 is k3 p3 –
this does not make a rib pattern- i’m confused- to make a rib pattern shuldn’t it be row 1 k3 ps
row 2 p3 k3?
please help
sioux harris
I think I am a gold member., so why can’t I download the schematic?
This should be fixed now, please let me know if you are still experiencing issues. – Nicola, Editor