

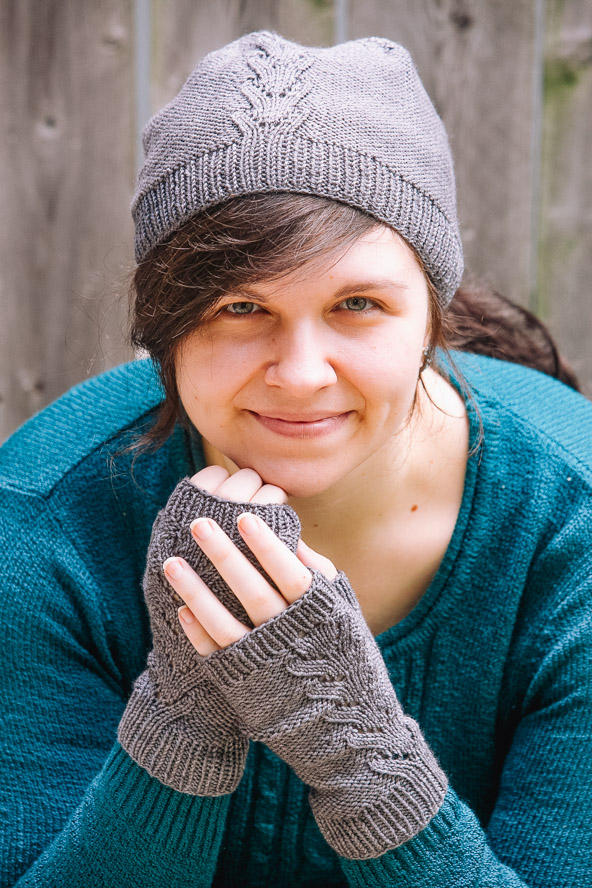
This gorgeous Branch Hat features reverse stockinette stitching and a contrasting lace stitch pattern down the front. Paired with the coordinating Branch Mitts, this set is the perfect addition to any fall-friendly wardrobe.
Skill Level: Easy
Size: Hat: 21”, to fit head sizes from 20”-22”; Mitts: 6” circumference stretches to fit larger hands
Gauge: 24 sts x 34 rows = 4” on larger needles
Materials
Yarn:
![]() Swan’s Island Washable Wool (100% merino wool; 180 yards [164 meters]/50 grams): Graphite (1 skein)
Swan’s Island Washable Wool (100% merino wool; 180 yards [164 meters]/50 grams): Graphite (1 skein)
Needles: US size 5 (3.75 mm) and size 6 (4.0 mm) 16” circular needle, US size 6 (4.0 mm) DPNs
Notions: Markers, tapestry needle, scrap yarn or stitch holder
Abbreviations
K2tog: Knit two together
P2tog: Purl two together
Ssk: Slip slip knit
Ssp: Slip slip purl
Special Stitches
Stitch Pattern
Rnd 1: P4, k5, p4.
Rnd 2: P4, k5, p4.
Rnd 3: P2tog, p2, k2, yo, k1, yo, p2, ssp.
Rnd 4: P3, k7, p3.
Rnd 5: P2tog, p1, k2, yo, k3, yo, k2, p1, ssp.
Rnd 6: P2, k9, p2.
Rnd 7: P2, k2, yo, k5, yo, k2, p2.
Rnd 8: P2, k11, p2.
Rnd 9: P2, ssk, k7, k2tog, p2.
Stitch Pattern Decrease
Rnd 1: P1, k2tog, p1, k11, p2, ssk, p1. (2 sts dec)
Rnd 2: P3, ssk, k7, k2tog, p2tog, p2. (1 st dec)
Rnd 3: P1, k2tog, p2, k5, p2, ssk, p1. (2 sts dec)
Rnd 4: P4, ssk, yo, k1, yo, k2tog, p4.
Rnd 5: P1, k2tog, p1, k5, p1, ssk, p1. (2 sts dec)
Rnd 6: P3, ssk, k1, k2tog, p3. (2 sts dec)
Rnd 7: P1, k2tog, k3, ssk, p1. (2 sts dec)
Rnd 8: P2, k3, p2.
Rnd 9: P1, k2tog, k1, ssk, p1. (2 sts dec)
Hat Pattern
With smaller circular needle, CO 130 sts, PM, and join to work in the rnd, being careful not to twist sts.
Next rnd: K1, p1 over 78 sts, PM, k2, p1, k2, p1; k1, p1 to end of rnd. Cont working in rib patt as established til piece meas 1 1/2” from CO edge.
Switch to larger circular needle, and begin working body of hat.
Next rnd: P to 4 sts from M, move M, begin St Patt with Rw 1, p to end of rnd. Cont working St Patt after M, and Rev St st on body of hat til piece meas 6.5” from CO edge, ending with a rw 8 of Patt.
Begin Crown Decreases
Place markers: P32, PM, p32, PM, p to M, work rw 9 of St Patt, p to 32 sts from end, PM.
Dec rnd: *P1, k2tog, p26, ssk, p1; rep from * 1 time more, p1, k2tog, p to M, work St Patt, p to 3 sts from M, ssk, p1, p1, k2tog, p to 3 sts from M, ssk, p1. (8 sts dec)
Nxt rnd: P to St Patt M, work St Patt, p to end.
Work these 2 rws 7 times more. (56 sts dec, 66 sts rem)
Set Up New Decrease Pattern
Dec rnd: *P1, k2tog, p to 3 sts from M, ssk, p1; rep from * 1 time more, work St Patt Dec between 2nd and 3rd M, p1, k2tog, p to 3 sts from M, ssk, p1. (8 sts dec)
Next rnd: P to 2nd M, work St Patt Dec between 2nd and 3rd M, p to end.
Work these 2 rnds until 23 sts rem, ending with Rnd 9 of St Patt Dec.
Next rnd: K2tog 7 times, k1, k2tog 4 times. (11 sts dec)
Finishing
Break yarn and thread through remaining 12 sts. Pull snug and fasten off to inside of hat. Work in all ends, and steam or wet block hat to finished measurements.
Mitts Pattern
Left Mitt
With smaller needles, CO 40 sts, PM, and join to work in the rnd, being careful not to twist sts.
Next rnd: K1, p1, over 28 sts, PM, k2, p1, k2, p1; k1, p1 to end. Cont to work in rib patt as established til piece meas 1 1/2” from CO edge.
Switch to larger needles and begin working body of mitt.
Next rnd: P19, move M, work Rnd 1 of St Patt, p to end of rnd. Cont to work as established, ending with Rnd 9 of St Patt.
Inc rnd: P19, PM, m1R, p2, m1L, PM, work to end of rnd-2 sts inc. Work 2 rnds even, purling across newly made sts.
Inc rnd: P to M, m1R, p to M, m1L, work to end of rnd-2 sts inc. Work inc rnd every 3rd rnd 6 times more-18 sts between markers, 56 sts on needles. Work 2 rnds even.
Set Aside Thumb Stitches
Next rnd: P to M, place 18 sts on scrap yarn, work to end of rnd-38 sts rem. Cont to work even on 38 sts, working St Patt at M, til piece meas 7” from CO edge, ending with Rnd 2 of St Patt.
Next rnd: P to and remove M, p4, PM, ssk, yo, k1, yo, k2tog, p to end of rnd. Change to smaller needles, and begin rib patt.
Next rnd: K1, p1 to M, k2, p1, k2, p1, k1 p1 to end of rnd. Work in rib patt 3/4”, BO all sts in patt.
Pick Up and Work Thumb
Place thumb sts on smaller needle, join yarn and pick up 2 sts in gap between thumb sts and body of mitt, and PM for BOR.
Next rnd: K1, p1 to end of rnd. Cont to work in rib patt 3/4”; BO all sts in patt.
Right Mitt
With smaller needles, CO 40 sts, PM, and join to work in the rnd, being careful not to twist sts.
Next rnd: K1, p1 over 8 sts, PM, k2, p1, k2, p1; k1, p1 to end of rnd. Cont to work in rib patt as established til piece meas 1 1/2” from CO edge.
Switch to larger needles and begin working body of mitt.
Next rnd: P4, move M, work Rnd 1 of St Patt, p to end of rnd. Cont to work as established, ending with Rnd 9 of St Patt.
Inc rnd: P4, work Rnd 1 of St Patt, p3, PM, m1R, p2, m1L, p to end of rnd-2 sts inc. Work 2 rnds even, purling across newly made sts.
Inc rnd: Work to thumb M, m1R, p to M, m1L, p to end of rnd-2 sts inc. Cont to work inc rnd every 3rd rnd 6 times more-18 sts between markers, 56 sts on needles. Work 2 rnds even.
Set Aside Thumb Stitches
Next rnd: Work to thumb M, place 18 sts on scrap yarn, work to end of rnd-38 sts rem. Cont to work even on 38 sts, working St Patt at M, til piece meas 7” from CO edge, ending with Rnd 2 of St Patt.
Nxt rnd: P to and remove M, p4, PM, ssk, yo, k1, yo, k2tog, p to end of rnd. Change to smaller needles, and begin rib patt.
Nxt rnd: K1, p1 to M, k2, p1, k2, p1, k1 p1 to end of rnd. Work in rib patt 3/4”, BO all sts in patt.
Work thumb instructions same as for Left Mitt.
Finishing
Weave in all loose ends, paying special attention to joint between thumb and body of mitt. Steam or wet block piece to finished measurements.