

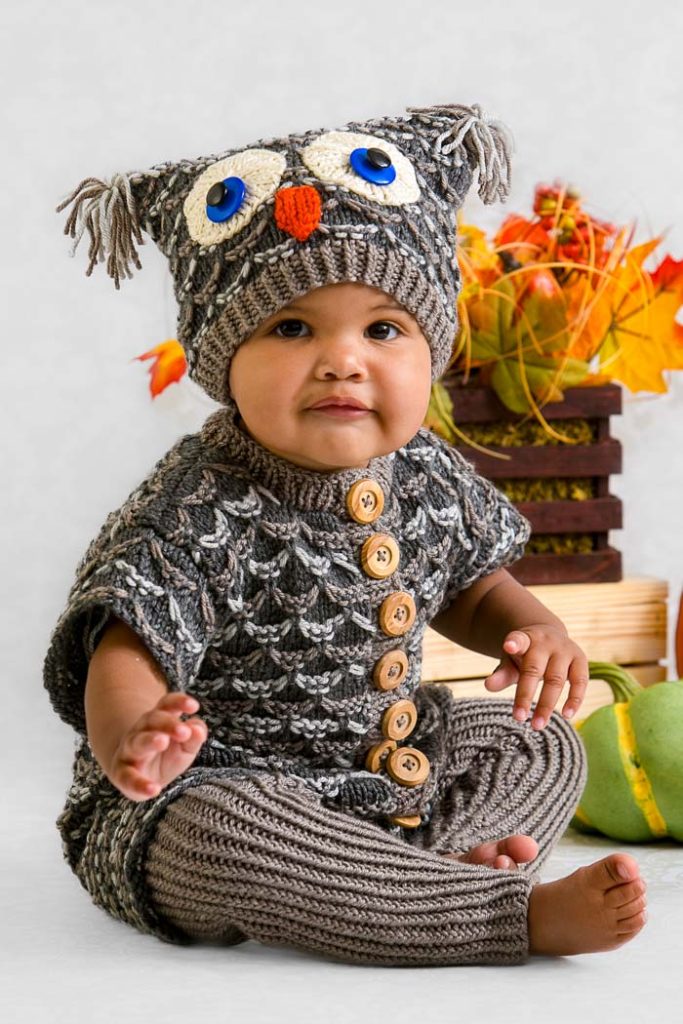
Indulge your little one with this fun to knit owl outfit. The feathers are formed by working an easy slip stitch pattern, and a simple ribbing pattern forms both legs. Don’t forget to knit the cozy owl hat to complete the look!
Skill Level: Intermediate
Size: Newborn-3 mo (6-12 mo, 18-24 mo, 4-6 yr); Chest = 19 3/4 (22 1/4, 25, 27 3/4)”; Hat Circumference = 15 (16 1/4, 17 1/2, 19)”
Gauge: 18 sts x 32 rows = 4” [10 cm] in Feather Slip Stitch patt using middle needle after wet blocking.
Materials
Yarn:
 Universal Yarn Uptown Worsted (100% anti-pilling acrylic; 180 yards [165 meters]/100 grams): #354 Granite (MC, 2 (2, 3, 3) balls), #351 Latte (CC1, 1 (2, 2, 2) balls), #353 Donahue (CC2, 1 ball all sizes), #303 Cream (CC3, 1 ball, all sizes), #306 Pumpkin (CC4, 1 ball, all sizes)
Needles: US size 7 (4.5 mm) set of dpns, 16-24” circular, straight, US size 5 (3.75 mm) set of dpns, straight, or sizes needed to obtain gauge
Notions: Markers, tapestry needle, stitch holders, 6 (7, 8, 9) buttons, sewing thread and needle, two 5/8” black buttons and two 11/8” blue buttons for eyes
Pattern Notes
The length of this piece is easily adjusted in the body section. Add more or fewer rounds to customize fit.
The Feather Slip Stitch pattern is worked using only one color per row. Carry unused colors up the side of the work, wrapping MC around at the end of every WS row to wrap CC floats.
Pattern
Right Leg
With CC1 and smaller dpns, cast on 26 (30, 34, 38) sts. PM and join to work in the rnd.
Cuff
Rnds 1-4: * K1 tbl, p1; rep from * to end. Switch to larger ndls.
Note: Maintain inc’d sts in rib patt.
Inc rnd: K1, m1, work in est’d rib to last 2 sts, m1, k1, p1. (2 sts inc’d)
Rep Inc rnd every 4 (4, 5, 5) rnds, 10 (11, 12, 13) more times. (48 (54, 60, 66) sts)
Work even in rib until piece meas 71/4 (83/4, 101/2, 12)” from cast on edge. Break yarn, place sts on holder.
Leg Feathers
With MC, cast on 48 (54, 60, 66) sts. PM and join to work in the rnd. Work Rnds 1-11 of Feather Slip Stitch patt, 2 times.
Join Main Leg and Leg Feathers
Place Main Leg sts on spare dpns or circ ndl. Slip Main Leg sts inside Leg Feathers sts.
Joining Rnd: With MC and circ ndl, * knit 1 st from each ndl tog; rep from * to end – both sets of sts have been joined. Work Rnds 1-5 of Feather Slip Stitch patt. Slip the last 4 sts of the rnd and the first 2 sts of the rnd to waste yarn. (42 (48, 54, 60) sts rem)
Left Leg
Work as for Right Leg.
Join Legs for Body
Slip first st of Right Leg to the Right Leg’s ndl.
Rnd 1: Working onto circ ndl, work Row 12 of Feather Slip Stitch patt over Right Leg sts, work Row 12 of patt over Left Leg sts. PM and join to work in the rnd. Rep Rows 1-11 of patt.
Separate for Front Opening
Next rnd: With MC, knit to last 4 sts, bind off next 5 sts, work Row 1 of patt to end – 79 (91, 103, 115) sts rem.
Work will now be done in rows.
Next row (WS): Work Row 2 of patt to end. Cont in patt until piece meas 8 (91/2, 101/2, 113/4)” from leg joining, ending with RS row 5 or 11 of patt.
Separate Fronts and Back
Next row (WS): P17 (20, 23, 26) Left Front sts, bind off 2 sts for underarm, p41 (47, 53, 59) Back sts, bind off 2 sts for underarm, purl across Right Front sts to end. Place Left Front sts on holder, place Back sts on separate holder.
Right Front
Work even in patt keeping 1 st each edge in St st on RS rows and slipped on WS rows for 24 (24, 30, 36) rows, ending with WS row 6 or 12 of patt.
Shape Neck
Next row (RS): Bind off 5 (6, 7, 8) sts, work in patt to end – 12 (14, 16, 18) sts rem. Work even in patt for 11 more rows ending with WS row 6 or 12 of patt. Bind off all sts.
Back
Return sts to ndl. Work even in patt keeping 1 st each edge in St st on RS rows and slipped on WS rows until the same number of rows have been worked as for Right Front. Bind off all sts.
Left Front
Return sts to ndl. Work even in patt keeping 1 st each edge in St st on RS rows and slipped on WS rows until piece meas 31/4 (31/2, 4, 41/2)” from Front & Back separation, ending with RS row 5 or 11 of patt.
Shape Neck
Next row (RS): Bind off 5 (6, 7, 8) sts, work in patt to end – 12 (14, 16, 18) sts rem. Work even in patt for 12 more rows ending with WS row 6 or 12 of patt. Bind off all sts.
Sleeves
With MC and larger straight ndl, cast on 43 (43, 49, 55) sts. Work Rows 1-12 of Feather Slip Stitch patt, 1 time, then rep Rows 1-6, 1 more time. Bind off all sts.
Hat
With CC1 and smaller straight ndl, cast on 67 (73, 79, 85) sts.
Brim
Row 1 (RS): K1, p1, [k1 tbl, p1] to last st, k1.
Row 2 (WS): P1, [k1, p1 tbl] to last 2 sts, k1, p1.
Rows 3-4: Rep Rows 1-2.
Row 5: Rep Row 1.
Hat Body
Switch to larger ndl. Beg with WS Row 6, work in Feather Slip Stitch patt until piece meas 61/2 (7, 71/2, 8)” from cast on edge, ending with Row 6 or 12 of patt. Bind off all sts.
Finishing
Weave in ends and block. Join held leg sts using 3 ndl bind off. Sew Shoulder seams. Sew bind-off edge of Sleeves to Armholes. Sew sides of Sleeves tog.
Buttonband
With CC1, smaller ndl, and RS facing, pick up and knit 49 (57, 65, 73) sts evenly along Left Front.
Row 1 (WS): * P1, k1; rep from * to last st, p1.
Rows 2-4: Cont in k1, p1 ribbing.
Bind off all sts pwise over the next WS row.
Buttonhole Band
With CC1, smaller ndl, and RS facing, pick up and knit 49 (57, 65, 73) sts evenly along Right Front.
Row 1 (WS): * P1, k1; rep from * to last st, p1.
Row 2: [K1, p1] 4 times, k1, * bind off 2 sts, [p1, k1] 3 times; rep from * to last 8 sts, bind off 2 sts, work in ribbing to end. (5 (6, 7, 8) buttonholes)
Row 3 (WS): Cont in k1, p1 ribbing, casting on 2 sts over each 2-st bind off using the knitted cast on.
Row 4: Cont in k1, p1 ribbing.
Bind off all sts pwise over the next WS row.
Neck Edging
With CC1, smaller ndl, and RS facing, pick up and knit 4 sts along side of Buttonhole Band, 5 (6, 7, 8) sts along Right Neck bind off edge, 7 sts up Right Neck, 17 (19, 21, 23) sts along Back Neck, 7 sts down Left Neck, 5 (6, 7, 8) sts along Left Neck bind off edge, and 4 sts along Buttonband. (49 (53, 57, 61) sts)
Row 1 (WS): * P1, k1; rep from * to last st, p1.
Row 2: K1, p1, bind off 2, work in rib to end.
Row 3: Work in rib, casting on 2 sts over the 2-st bind off using the knitted cast on.
Row 4: Cont in k1, p1 ribbing.
Bind off all sts pwise over the next WS row.
Steam Neck Edging, Buttonband and Buttonhole Band. Sew buttons to Buttonband and Neck Edging opposite Buttonholes.
Hat
Sew sides of Hat tog. Fold Hat so that side seam is in back, fold in half. Sew bind off edge tog forming top of Hat.
Eyes (Make Two)
With CC3 and larger dpns, cast on 32 sts. PM and join to work in the rnd.
Rnd 1: Knit.
Rnd 2: [K2, k2tog] to end. (24 sts rem)
Rnd 3: Knit.
Rnd 4: [K1, k2tog] to end. (16 sts rem)
Rnd 5: Knit.
Rnd 6: [K2tog] to end. (8 sts rem)
Break yarn leaving 8” tail. Pass tail through rem live sts, pull taut, fasten off.
Sew eyes to Front of Hat using sewing needle and thread. Layer a 5/8” black button over a 11/8” blue button. Sew to center of each eye.
Nose
With CC4 and larger ndl, cast on 5 sts.
Row 1 (WS): Purl.
Row 2: Knit.
Row 3: Purl.
Row 4: Knit
Row 5: Purl.
Row 6: Ssk, k1, k2tog. (3 sts rem)
Row 7: P3tog. Fasten off last st. With sewing ndl and thread, sew Nose to Hat centered below Eyes.
Ear “Feathers” (Make Two)
Holding CC1 and CC2 tog, wrap around a 2” piece of cardboard, 8 times. Cut a separate 8” piece of CC1. Wrap the 8” piece through one end of the wrapped yarn. Cut the wrapped yarn at one end to free from cardboard, forming a tassel. Secure a tassel to the corner of each ear, or corner of Hat.
What does PM mean?
Hello! PM stands for Place Marker. Hope that helps! – Nicola
Joann. don. Double. Point. Needles. Usuallly comes in sets of 4. Used when kinning socks. Or round area where there is no seam. Lorrainr
Why can’t the pattern be downloaded? That would make it much easier
Have started but puzzled how I can keep the ribbed pattern after the increases on the leg?
Not sure what dpns means for the needles? Can you help?
Double point needles
What is CC1 and dpns? Can ‘t find downloadable charts below image.
There is nothing below the main image on this page.
Hi Joan,
There should be a link that says Oliver the Owl Onesie Charts directly below the project images. If you scroll past all four images, there’s a “Downloads” section with two clickable links, one is a charts image and one is a schematic. The charts one is what you’re looking for.
Thanks,
Julia Wiatr, editor
I have researched the feather slip stitch……..must be your creation. Could you detail the steps for me to knit? Thanks
Hi Nancy,
The Feather Slip Stitch is detailed in the downloadable charts below the main images.
Thank you!
Julia Wiatr, editor
what is a feather slip stitch?
I can’t wait to get started on this