

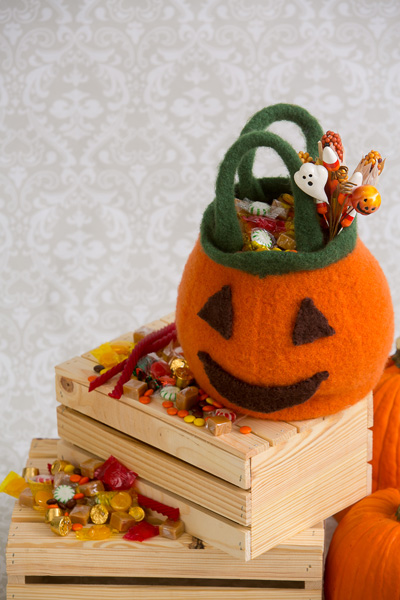
This felted Pumpkin Treat Bag is essential for Halloween trick-or-treating. The easy stitch pattern works up quickly, and the felting process adds strength to the design in order to hold as much candy as possible. Plus, the base of the pumpkin is set in so the pumpkin can be set on a post or sit flat on a step, perfect leaving candy out on the porch.
Skill Level: Easy
Size: Before felting: 14” wide x 18” high (not including the handles)
Gauge: 3 ½ sts x 1” in stockinette stitch with yarn held double; 14 stitches x 16 rows = 4 x 4” swatch; precise gauge not important as the project will be felted
Materials
Yarn:
![]() Universal Yarn Deluxe Worsted (100% wool; 220 yards [201 meters]/100 grams): #14002 Pumpkin (MC, 3 skeins), #12296 Green Leaf (C2, 1 skein), #12299 Chocolate Brown (C3, 1 skein)
Universal Yarn Deluxe Worsted (100% wool; 220 yards [201 meters]/100 grams): #14002 Pumpkin (MC, 3 skeins), #12296 Green Leaf (C2, 1 skein), #12299 Chocolate Brown (C3, 1 skein)
Needles: US size 10 ½ 16” circular and 24” circular needles
Notions: Stitch marker, row counter, scissors or a sharp knitting needle, darning needle, 4 stitch holders, small scraps of yarn, fabric glue, 10 buttons
Pattern
Prep Work
Divide C2 into two separate balls.
Divide C3 into two separate balls.
Divide 1 skein MC into two separate balls.
Pumpkin
Using two strands held together and 16” circular needles, cast on 12.
Knit 10 rows.
Cast off. At this point you may prefer to use a set of DPNs rather than a 16” circular as the first few rounds will be difficult to negotiate.
On short side pick up 6 stitches.
On the first long side pick up 9 stitches skipping corners.
On second short side pick up 6 stitches.
On the second long side pick up 9 stitches skipping corners, place marker to form the round.
Thirty stitches on the needles which will have six sections as you proceed to make the pumpkin, these six sections are separated by purl stitches added in pattern beginning on the third round.
Rnd 1: Knit one round.
Rnd 2: *Kfb, k4, repeat from *.
Rnd 3: *P2, k4, repeat from *.
Rnd 4: *P2, k1, kfb, K2, repeat from *.
Rnd 5: *P2, k5, repeat from *.
Rnd 6: *P2, k3, kfb, k1, repeat from *.
Rnd 7: *P2, k6, repeat from *.
Rnd 8: *P2, k3, kfb, k2, repeat from *.
Rnd 9: *P2, k7, repeat from *.
Rnd 10: *P2, k4, kfb, k2, repeat from *.
Rnd 11: *P2, k8, repeat from *.
Rnd 12: *P2, k5, kfb k2, repeat from *.
Rnd 13: *P2, k9, repeat from *.
Rnd 14: *P2, k4, kfb, k4, repeat from *.
Rnd 15: *P2, k10, repeat from *.
Rnd 16: *P2, k4, kfb, k5, repeat from *.
Rnd 17: *P2, k11, repeat from *.
Rnd 18: *P2, k5, kfb, k5, repeat from *.
Rnd 19: *P2, k12, repeat from *.
Rnd 20: *P2, k5, kfb, k6, repeat from *.
Rnd 21: *P2, k13, repeat from *.
Rnds 22-29: *P2, k13, repeat from *.
Rnd 30: *P1, m1, p1, k13, repeat from *.
Rnds 31-38: *P3, k13, repeat from *.
Rnd 39: *P3, kfb, k11, kfb, repeat from *.
Rnds 40-47: *P3, k15, repeat from *.
Rnd 48: *P3, k1, m1, k13, m1, k1, repeat from *.
Rnds 49-59: *P3, k17, repeat from *.
Rnd 60: *P3, SSK, k13, k2tog, repeat from *.
Rnds 61-68: *P3, k15, repeat from *.
Rnd 69: *P3, SSK, k11, k2tog, repeat from *.
Rnds 70-75: *P3, k13, repeat from *.
Rnd 76: *P1, p2tog, k13, repeat from *.
Rnd 77: *P2, SSk, K9, K2tog, repeat from *.
Rnds 78-83: *P2, K11, repeat from *. (72 sts)
Rnd 84: * P2, SSK, K7, K2TOG, repeat from *.
Rnds 85-91: * P2, K9, repeat from *. (66)
Rnd 92: Using double strand C2, K2TOG, k31, K2tog, K31 around.
Rnd 93: K4, kfb7, k10, kfb7, k8, kfb7, K10, Kfb7, K4.
Rnd 94: Knit 1 round, as you come to the knit front and backs slip 1 stitch to a stitch marker, knit the next, and leave the stitch marker holding the 7 stitches on the inside of the work. There will be four of these stitch markers when you complete the round.
Rnds 95-98: Knit.
Rnds 99-102: Purl.
Rnd 103: *K2tog, K6, repeat from *.
Rnd 104: Knit around.
Rnd 105: Bind off.
Pick up the seven stitches from the first stitch holder, in stockinette, knit 54 rows. Cast off by using a three needle bind off with the stitches on the second holder. Repeat using the third and fourth stitch holders.
Facial Features
The facial features are created using color 3.
Cast on 40 stitches.
Row 1: K20.
Row 2: P20.
Repeat rows 1 and 2 until work measures approximately 10 inches. The facial features will be cut from this piece of felted material. These pieces may be buttoned to the pumpkin so they may be removed after Halloween or set with fabric glue for a more permanent look. If buttons are used, the buttonholes are made using a sharp scissor. By making small incisions you can ensure the face can be removed and the buttonholes brushed out so the pumpkin may be used through Thanksgiving and recycled year-to-year using different cut outs for the facial expression.
Leaves to complement the pumpkin may be made from a 20 stitch x 20 row swatch of the green, two strands held together, cut the form out and stitched on later.
Notes on Felting
Prior to felting weave in ends.
Felt in top loading washer with an agitator and a few pairs of sneakers in zippered or knotted off bags to prevent them from directly touching the yarn. Set the washing machine for the longest wash cycle on hot water with the smallest water requirement. Use detergent to aid in the process of felting. The amount of time and number of cycles to felt the knitted items will vary, do not leave it unattended too long and check it often. 