

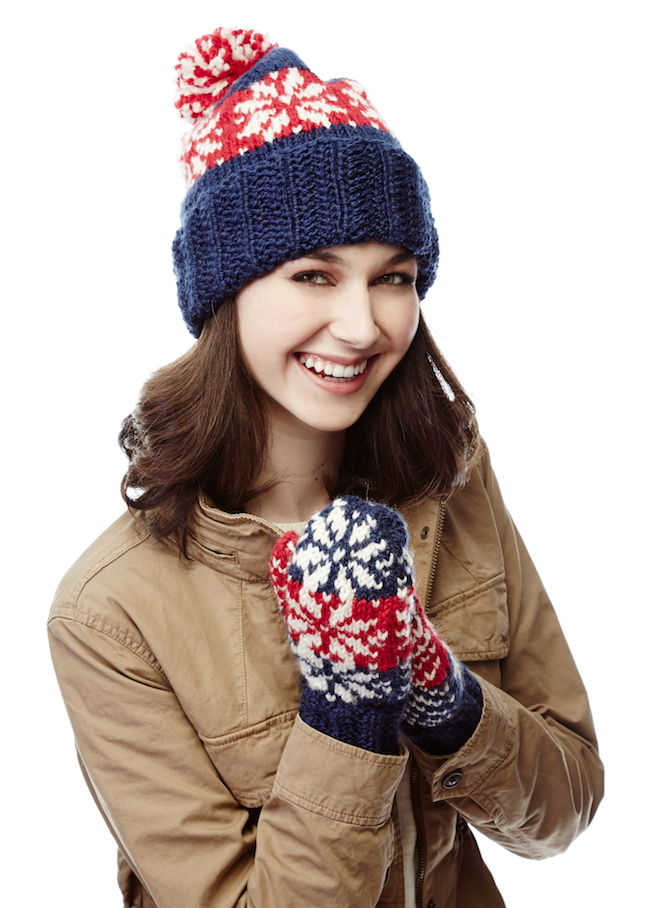
Fight off chilly weather with this super cozy hat-and-mitten set. Featuring giant snowflakes and bold red and blue hues, this classic design will leave your friends asking, “where do I get the pattern?”
Skill Level: Intermediate
Size: One size fits most
Gauge: Mittens: 17 sts and 23 rows = 4” [10 cm] with US 8 (5 mm) needles in St st after wet blocking; Hat: 15 sts and 20 rows = 4” [10 cm] with US 10 (6 mm) needles in St st after wet blocking
Materials
Yarn: Patons Shetland Chunky (75% acrylic, 25% wool; 148 yards [136 meters]/100 grams): #78108 Medium Blue (MC, 1 ball), #78008 Aran (A, 1 ball), #78705 Red Robin (B, 1 ball)
Needles: Mittens: US size 7 (4.5 mm) and US size 8 (5.0 mm) double pointed needles; Hat: US size 9 (5.5 mm) and US size 10 (6.0 mm) double pointed knitting needles
Abbreviations
Kfb: Increase 1 stitch by knitting into front and back of next stitch
Pm: Place marker
Slm: Slip marker
Ssk: Slip next 2 stitches knitwise one at a time. Pass them back onto left-hand needle, then knit through back loops together
Pattern Notes
When working from charts, carry color not in use loosely across WS of work, but never over more than 5 sts. When it must pass over more than 5 sts, weave it loosely over and under color in use on WS.
Pattern
Right Mitten
**With MC and set of smaller needles, cast on 32 sts, divide sts evenly onto 3 needles, join in rnd, placing marker on first st.
Rnd 1: *K1, p2, k1, rep from * around.
Rnd 2: *P2, k2, rep from * around.
Rep last 2 rnds for “Mistake” Ribbing Pat for 3” [7.5 cm].
Next Rnd: Knit, inc 2 sts evenly around – 34 sts.**
Change to larger needles and work Chart I, reading rnds from right to left until 6th row of chart is complete.
Shape Thumb Gusset
Rnd 1: Work Row 7 of chart across first 18 sts, pm, kfb in each of next 2 sts, pm, work chart to end of rnd.
Rnd 2: Work Chart I to first marker, slm, work Row 1 of Chart III, slm, work Chart I to end of rnd.
Rnd 3: Work Chart I to first marker, slm, kfb in next st, work Row 2 of Chart III, kfb in next st, slm, work Chart I to end of rnd.
Charts I and III are now in position.
Rnd 4: Work even in pat.
Keeping cont of charts, rep last 2 rnds to 10 sts between markers.
***Next Rnd: Pat to first marker, Slip next 10 sts onto st holder (thumb sts) removing all markers, cast on 2 sts, pat to end of rnd – 34 sts rem.
Cont working Chart I until Row 33 of chart is complete.
Rearrange sts as follows: 17 sts on 1st needle, 8 sts on 2nd needle, 9 sts on 3rd needle.
Shape Top
Rnd 1: 1st needle: K1, ssk, pat to last 3 sts, k2tog, k1; 2nd needle: K1, ssk, pat to end of needle; 3rd needle: Pat to last 3 sts, k2tog, k1.
Rep last rnd until 14 sts rem, Chart I is complete, break yarn leaving a long end, graft 2 sets of 7 sts tog.
Thumb
Beg with Row 9 of Chart III, pat across 10 sts from st holder, pick up and knit 2 sts at base of thumb, divide these 12 sts evenly onto 3 needles, join in rnd, placing marker at first st.
Work Chart III until Row 19 of chart is complete, break A.
Next Rnd: With B, (k2tog) 6 times. (6 sts)
Next Rnd: (K2tog) 3 times, break yarn leaving a long end, thread end through rem 3 sts, draw up tightly and fasten securely. ***
Left Mitten
Work from ** to ** as given for Right Mitten.
Change to larger needles and work Chart II, reading rnds from right to left until 6th row of chart is complete.
Shape Thumb Gusset
Rnd 1: Work Row 7 of Chart II across first 14 sts, pm, kfb in each of next 2 sts, pm, work Chart II to end of rnd.
Rnd 2: Work Chart II to first marker, slm, work Row 1 of Chart III, slm, work Chart II to end of rnd.
Rnd 3: Work Chart II to first marker, slm, kfb in next st, work Row 2 of Chart III, kfb in next st, slm, work Chart II to end of rnd.
Charts III and II are now in position.
Rnd 4: Work even in pat.
Keeping cont of charts , rep last 2 rnds to 10 sts between markers.
Work from *** to *** as given for Right Mitten, working Chart II as established.
Hat
With MC and smaller needles, cast on 72 sts, divide sts evenly onto 3 needles, join in rnd, placing marker at first st.
Rnd 1: *K1, p2, k1, rep from * around.
Rnd 2: *P2, k2, rep from * around.
Rep last 2 rnds for “Mistake” Ribbing Pat for 5” [12.5 cm].
Change to larger needles and knit in rnds for 3” [7.5 cm], inc 3 sts evenly across last rnd. (75 sts)
Knit Chart IV to end of chart, reading rnds from right to left and noting 15-st rep will be worked 5 times, break A and B.
Next Rnd: With MC, knit, dec 3 sts evenly around. (72 sts)
Shape Top
Rnd 1: *K2tog, k14, ssk, rep from * around. (64 sts)
Knit 2 rnds even.
Next rnd: *K2tog, k12, ssk, rep from * around. (56 sts)
Knit 2 rnds even.
Next rnd: *K2tog, k10, ssk, rep from * around. (48 sts)
Knit 2 rnds even.
Next rnd: *K2tog, k8, ssk, rep from * around. (40 sts)
Knit 2 rnds even.
Next rnd: *K2tog, k6, ssk, rep from * around. (32 sts)
Knit 2 rnds even.
Next rnd: *K2tog, k4, ssk, rep from * around. (24 sts)
Knit 2 rnds even.
Next rnd: *K2tog, k2, ssk, rep from * around. (16 sts)
Break MC, leaving a long end, thread end through rem sts and fasten securely.
Pom-Pom
Wind A and B tog around 4 fingers 50 times, tie tightly in the middle and leave a long end for attaching to Hat, cut loops at both ends and trim to smooth round shape, sew pom-pom to top of Hat. 
reference to a chart but no chart. please send it to me. thanks
Hi Jean,
You’ll find all the charts you need for this pattern in the downloads section to the right of the pattern. Let me know if you have any trouble accessing.
Thanks!
Caitlin
Thank you so very much! I’ve been looking for a pattern like this and I couldn’t find one but I’ve come across this one and for Free! Wow! May the Lord Bless you really good!!! Thank you ever so much! Alix
I’m almost good enough to try these… I have printed the pattern and will give it a go after I finish the two cable scarves that I’m partway through.
I have been looking for a set such as this…thank you…..
You sent a free pattern on Dec 22nd , It expired on Dec 5th. very disappointing. It was a nice pattern.
Thank you for beautiful things. This looks very easy and nice to wear. In Australia it would be good for Christmas in July, when Winter is with us here. I love it and may try it next year.
Where is the chart?
Hi Carole,
You’ll find all the charts you need for this pattern in the downloads section to the right of the pattern. Let me know if you have any trouble accessing.
Thanks!
Caitlin