

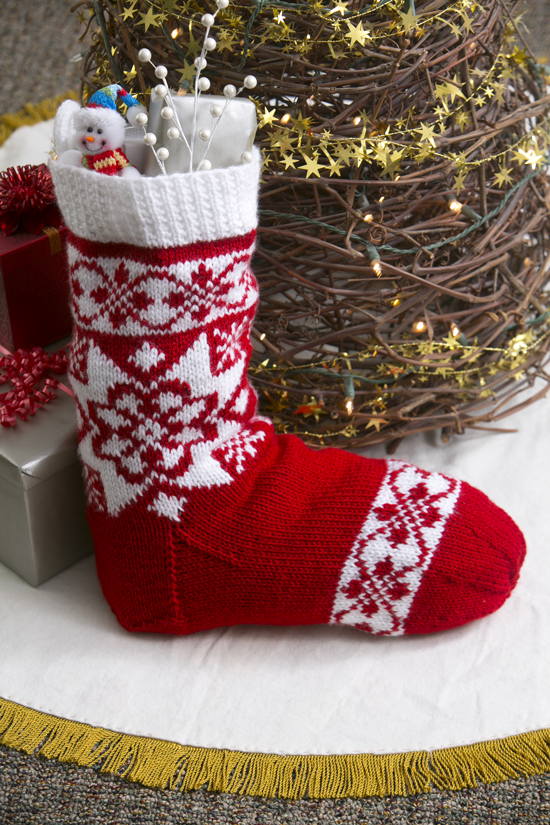
Imagine chestnuts roasting on an open fire with this beautiful fair isle stocking hanging just below the mantel. Beautiful, isn’t it? Create your own picture perfect Christmas by knitting up this classic piece of home decor.
Skill Level: Intermediate
Size: About 8” wide x 24” from top to toe
Gauge: 17.5 sts = 4 inches; gauge is not critical
Materials
Yarn: Hobby Lobby I Love this Yarn (100% acrylic; 355 yards [325 meters]/198 grams): #40 Red (1 skein), #10 White (1 skein)
Needles: US size 8 circular needles (16”), US size 8 double pointed needles or size to give you gauge
Special Stitches
Broken Rib:
Rnd 1: *K1, p1; rep from *.
Rnd 2: Knit.
Rep rnds 1-2 for pattern.
Abbreviations
sl 1kw: Slip one stitch knitwise as if to knit
sl 1pw: Slip one stitch purlwise as if to purl
skp: Slip one stitch as if to knit, knit the next stitch, pass the slipped stitch over the stitch that you just knit
Pattern Notes
When working the charts some of the changes from one color to the other will be long. To keep the floats on the inside from catching on your stocking stuffers you can twist or catch your yarns every 4-5 stitches. Keep the floats loose so they don’t bunch up the stitching or show through.
Line this stocking if you are worried about your presents getting caught on the floats. You can use new fabric or even an old T-shirt. Lay the stocking as flat as you can over your fabric. Trace around it and cut 2 layers of fabric. Using a 1/4” seam, sew fabric pieces with right sides together. Leave top edge open. Turn top edge down to match bottom edge of ribbing. Insert into stocking with wrong sides of fabric facing inside of stocking. Whip stitch fold of fabric to the inside of stocking purl bumps of the first stockinette row.
Pattern
Leg
CO 72 sts in CC using 16” circular needle. Join being careful not to twist stitches. Switch the first and last stitches to the opposite needles for an almost invisible join. Place a marker between the first and last stitches. This will be the center back of the leg and heel.
Work 15 rounds of Broken Rib pattern for cuff ending with round 1.
Change to MC. Knit 4 rows.
Adding in CC, work chart A, continuing to knit all sts. Read chart right to left from bottom to top. (12 stitches of chart will be repeated 6 times around the stocking)
Work chart B (36 sts repeated twice). It may help to keep your place if you add a marker after stitch #36.
Heel
Rnd 1: Using MC only, knit 18, turn.
Note: you may change to CC for the heel if you wish.
Rnd 2: Slip 1 purlwise, p35, turn. (36 stitches are working the other 36 are resting)
Rnds 3-22: Knit every odd row, turn and purl back on even rows. (Slip first stitch knitwise on knit rows and purlwise on purl rows)
Heel Turn
Row 1: Sl 1kw, k20, skp, k1, turn.
Row 2: Sl 1pw, p7, p2tog, p1, turn.
Row 3: Sl 1kw, k8, skp, k1, turn.
Row 4: Sl 1pw, p9, p2tog, p1, turn.
Continue to work in this manner, decreasing over the gap, until all of the side stitches have been worked. You should end on a purl row. Knit across, marking center stitch.
Gusset
Pick up stitches in each of the slipped stitches along the side of the heel, picking up an extra one in the stitch below the first instep stitch to close any gap that might form there. Make sure you are placing your needle under both loops of the slipped stitches, then wrap as if to knit and pull the new stitch through. Place marker. Knit across the instep stitches that have been resting. Place marker. Pick up stitches in same manner as before on second side of heel, picking up first stitch in the stitch 2 rows below the last stitch on the right needle. Continue knitting to center heel marker.
Change back to MC if you made the heel in your CC.
Rnd 1: Knit around to center of heel again.
Rnd 2: Knit to 3 stitches before next marker, k2tog, k1, slip marker, knit 36 instep stitches, slip marker, k1, skp, knit to center of heel.
Repeat rounds 1 and 2 until you have 18 stitches in each of the heel sections between center back and side markers keeping the original 36 stitches for the instep.
Foot
You may remove side markers now, keeping just the center back marked. Knit around until the foot measures (5”) from picked up stitches at edge of heel flap.
Repeat Chart A using both colors. Drop CC when finished with chart.
Toe Shaping
Note: Change to double pointed needles when circle gets too small for the 16 inch circular.
With MC: K 7, k2tog, repeat around. (64 sts)
Knit 5 rows plain stockinette.
K6, k2tog, repeat around. (56 sts)
Knit 4 rows.
K5, k2tog, repeat around. (48 sts)
Knit 3 rows.
K4, k2tog, repeat around. (40 sts)
Knit 2 rows.
K3, k2tog, repeat around. (32 sts)
Knit 1 row.
K2, k2tog, repeat around. (24 sts)
K1, k2tog, repeat around. (16 sts)
K2tog around. (8 sts)
Cut yarn leaving a tail. Using a tapestry needle, thread yarn through stitches and pull tight. Weave in all ends.
Hanging Loop
Make an I-cord about 9 inches long or braid or twist several strands together and attach securely to ribbing section at top of stocking.
I-cord: With dpn, CO 4 stitches. *Without turning the needle, slide stitches to other end of needle, pull yarn around back, and knit the sts as usual; rep from * for 9 inches or desired length. 
Where is the rest of the chart for this stocking????
Hi Annes, Thanks for letting us know! We re-uploaded the second portion of the chart. It should be available under the Downloads section on the right side of the site. Please let us know if you have any trouble accessing. Thank you, Caitlin, Managing Editor of I Like Knitting