

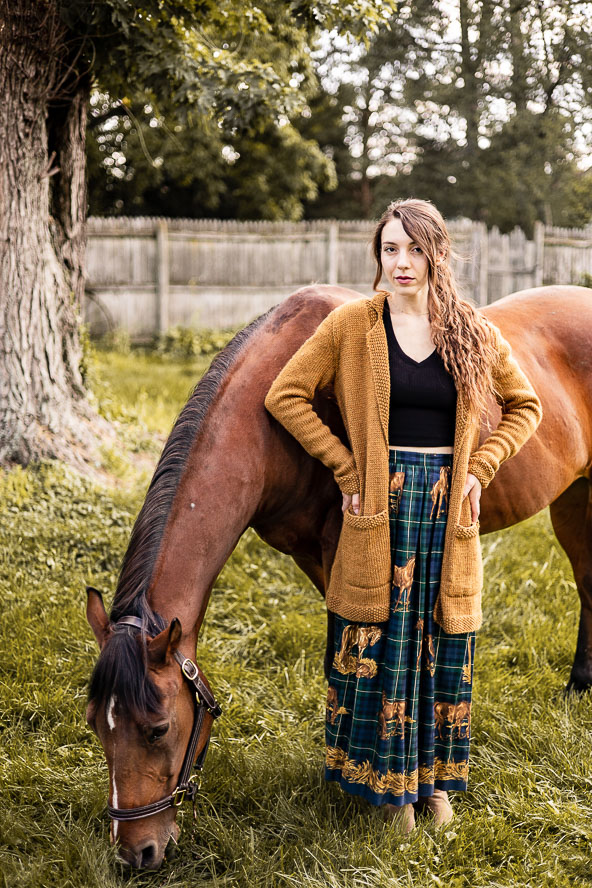
Blending the structured elegance of a blazer with the cozy comfort of a cardigan, the Tawny Sweater Blazer is the perfect layering piece for any season. Designed with knitted lapels for a polished touch, this versatile piece has a relaxed, oversized fit that makes it as warm as it is stylish. Whether worn open for a casual, draped effect or belted at the waist for a more refined, work-ready look, this sweater blazer transitions effortlessly from day to night.
Crafted with a plush, bulky-weight yarn, the Tawny Sweater Blazer provides warmth without sacrificing sophistication. Its seamless blend of structure and softness ensures that you’ll stay comfortable while looking effortlessly put together. Whether you’re heading to the office, running errands, or cozying up at home, this knit blazer is your go-to for chic, all-season layering.
Time: Two-Week Project
Skill Level: Easy
Size: Finished Bust Size 30 (34, 38, 42, 46, 50, 54)” to fit bust 28 (32, 36, 40, 44, 48, 52)”
2-4” positive ease recommended.
Shown in size 42”
Gauge: 16 sts and 21 rows = 4” [10 cm] in St st after wet blocking
Materials
 Yarn: Berroco Vintage Chunky (52% Acrylic, 40% Wool, 8% Nylon; 136 yards [125 meters]/100 grams): 6192 Chana Dal 6 (7, 8, 9, 10, 12, 13) balls)
Hook/Needles: US size 10 (6.0 mm) 24” circular needles and set of double-pointed needles
Notions: Markers, stitch holders, tapestry needle
Pattern Notes
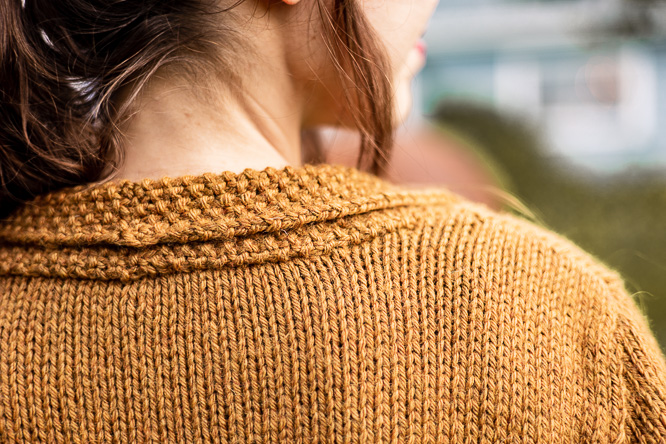
This sweater is worked from the bottom up in pieces, then seamed. The edgings are all worked with the pieces, so there is no picking up and knitting at the end. Seed stitch lapels and collar give the sweater a blazer look and feel. Generous patch pockets at the hips keep your hands cozy and make great gauge swatches.
Special Stitches
M1: Make one stitch by using the left needle to pick up the strand between the last stitch you knit and the one you’re about to knit, bringing the needle from front to back. Leave the strand on the left needle. Insert the tip of the right needle knitwise into the back leg of the strand and knit as usual.
M1R: Make one stitch by using the left needle to pick up the strand between the last stitch you knit and the one you’re about to knit, bringing the needle from back to front. Leave the strand on the left needle. Insert the tip of the right needle knitwise into the front leg of the strand and knit as usual.
M1L: Make one stitch by using the left needle to pick up the strand between the last stitch you knit and the one you’re about to knit, bringing the needle from front to back. Leave the strand on the left needle. Insert the tip of the right needle knitwise into the back leg of the strand and knit as usual.
Seed Stitch: Worked over an even number of stitches.
Row 1: *K1, p1; rep from * to end.
Rep Row 1 for pattern.
Pattern
Pockets (Make 2)
CO 32. Beginning with a WS row, work in St st for 8”, ending after a WS row.
Next Row (RS): K1, *k1, p1* to last st, k1.
Next Row (WS): P1, *p1, k1* to last st, p1.
Rep the last two rows twice, then BO all sts.
Back
CO 70 (78, 86, 94, 102, 110, 118). Work in Seed Stitch (see Special Stitches) for 1.5”, ending after a WS row. Switch to St st and work even until piece measures 6”.
Dec Row: K2, SSK, k to 4 sts from end, k2tog, k2.
Rep Dec Row every 4” four more times—60 (68, 76, 84, 92, 100, 108) sts rem.
Work even until piece measures 25” from CO edge.
Armhole Shaping: BO 2 (3, 3, 3, 4, 4, 5) sts at the beg of the next 4 rows.—52 (56, 64, 72, 76, 84, 88) sts rem.
Dec Row (RS): K1, SSK, k to 3 sts from end, k2tog, k1.
Rep Dec Row every RS row 1 (1, 2, 3, 3, 4, 4) more times— 48 (52, 58, 64, 68, 74, 78) sts rem. Work even until armhole measures 7 (7, 7.25, 7.5, 7.75, 8, 8.25)”, ending after a WS row.
Next Row: K 15 (16, 17, 18, 19, 20, 21) sts, BO 18 (20, 24, 28, 30, 34, 36) sts, K to end. Place first 15 (16, 17, 18, 19, 20, 21) sts on holder for Right Shoulder.
Left Shoulder
Row 1 (WS): BO 4 (4, 4, 5, 5, 5, 6) p to end.—11 (12, 13, 13, 14, 15, 15) sts rem.
Row 2 (RS): BO 2, k to end.
Row 3: BO 4 (4, 5, 5, 5, 6, 6), p to end.
Row 4: SSK, k to end.
BO rem 4 (5, 5, 5, 6, 6, 6) sts.
Right Shoulder
Join yarn to RS of Right Shoulder. Place held sts back on needle.
Row 1: BO 4 (4, 4, 5, 5, 5, 6), k to end—11 (12, 13, 13, 14, 15, 15) sts rem.
Row 2: BO 2, p to end.
Row 3: BO 4 (4, 5, 5, 5, 6, 6), k to end.
Row 4: P2togtbl, p to end.
BO rem 4 (5, 5, 5, 6, 6, 6) sts.
Measure the length of the back neck from shoulder to shoulder, along the curve of the back neck, and divide it in half. Write it down for when you knit the collar.
Right Front
CO 40 (44, 48, 52, 56, 60, 64) sts.
Row 1 (WS): P1, [k1, p1] to last st, p1.
Row 2 (RS): K1, [p1, k1] to last st, k1.
Cont. as established for 1.5”, ending after a WS row.
Next Row (RS): K1, [p1, k1] three times, pm, k to end.
Next Row: P to m, sm, [p1, k1] to last st, p1.
Cont. as established until piece measures 6” from CO edge, ending after a WS row.
Dec Row: K1, [p1, k1] to m, sm, k to last 3 sts, k2tog, k1.
Rep Dec Row every 4” four more times—35 (39, 43, 47, 51, 59) sts rem.
AT THE SAME TIME, when piece measures 15” from CO edge, begin neck and lapel shaping as follows:
Shaping Row (RS): Work as established to m, M1, sm, k1, ssk, k to end. St count remains the same.
Rep Shaping Row every 9 (8, 7, 6, 5, 5, 5)th row 9 (10, 12, 14, 15, 17, 18) more times, working new lapel sts into Seed St pattern.
ALSO AT THE SAME TIME, when piece measures 25” from CO edge, ending after a RS row, begin armhole shaping as follows:
Next Row (WS): BO 2 (3, 3, 3, 4, 4, 5), work as established to end.
Work one RS row.
Next Row (WS): BO 2 (3, 3, 3, 4, 4, 5), work as established to end.
Shaping Row (RS): *K1, p1* to m, k to last 3 sts, k2tog, k1.
Rep Shaping Row every RS row 1 (1, 2, 3, 3, 4, 4) more times.
Work even, maintaining neck and lapel shaping, until armhole measures 5 (5, 5.25, 5.5, 5.75, 6, 6.25)”, ending after a WS row. The next two rows establish the lapel and collar points.
Next Row: BO 10, work as established to end.
Next Row: Work as established to end, turn work and use the cable cast on to CO 5 sts. *K1, p1* to m, sm, k to end.
Work as established until armhole measures 7 (7, 7.25, 7.5, 7.75, 8, 8.25)”, ending after a RS row.
Next Row (WS): BO 4 (4, 4, 5, 5, 5, 6), work as established to end.
Next Row: Work to last 2 sts, ssk.
Next Row: BO 4 (4, 5, 5, 5, 6, 6), work to end.
Rep the last two rows once. No shoulder sts remain.
Work back and forth on collar sts as follows:
RS Row: *K1, p1* to last st, k1.
WS Row: P1, *p1, k1* to last 2 sts, p2.
When collar measures half the back neck distance, as measured from the back piece earlier, place sts on holder.
Left Front
CO 40 (44, 48, 52, 56, 60, 64) sts.
Row 1 (WS): P1, *k1, p1* to last st, p1.
Row 2 (RS): K1, *p1, k1* to last st, k1.
Cont. as established for 1.5”, ending after a WS row.
Next Row (RS): K to last 7 sts, pm, *K1, *p1, k1* to end.
Next Row: P1, *k1, p1* to m, sm, p to end.
Cont. as established until piece measures 6” from CO edge, ending after a WS row.
Dec Row: K1, ssk, k to m, k1, *p1, k1* to end.
Rep Dec Row every 4” four more times.
AT THE SAME TIME, when piece measures 15” from CO edge, begin neck and lapel shaping as follows:
Shaping Row (RS): K to 3 sts before m, k2tog, k1, sm, M1, work in established Seed St to end. St count remains the same.
Rep Shaping Row every 9 (8, 7, 6, 5, 5, 5)th row 9 (10, 12, 14, 15, 17, 18) more times, working new lapel sts into Seed St pattern.
ALSO AT THE SAME TIME, when piece measures 25” from CO edge, ending after a WS row, begin armhole shaping as follows:
Next Row (RS): BO 2 (3, 3, 3, 4, 4, 5), work as established to end.
Work one WS row.
Next Row (RS): BO 2 (3, 3, 3, 4, 4, 5, work as established to end.
Work one WS row.
Shaping Row (RS): K1, ssk, k to m, sm, work in established Seed St to end.
Rep Shaping Row every RS row 1 (1, 2, 3, 3, 4, 4) more times.
Work even, maintaining neck and lapel shaping, until armhole measures 5 (5, 5.25, 5.5, 5.75, 6, 6.25)”, ending after a RS row. The next two rows establish the lapel and collar points.
Next Row (WS): BO 10, work as established to end.
Next Row: Work as established to end, turn work and use the cable cast on to CO 5 sts. P1, *p1, k1* to m, sm, p to end.
Work as established until armhole measures 7 (7, 7.25, 7.5, 7.75, 8, 8.25)”, ending after a RS row.
Next Row (RS): BO 4 (4, 4, 5, 5, 5, 6), work as established to end.
Next Row: Work to last 2 sts, p2togtbl.
Next Row: BO 4 (4, 5, 5, 5, 6, 6), work to end.
Rep the last two rows once. No shoulder sts remain.
Work back and forth on collar sts as follows:
RS Row: *K1, p1* to last st, k1.
WS Row: P1, *p1, k1* to last 2 sts, p2.
When collar measures half the back neck distance, as measured from the back piece earlier, place sts on holder.
Sleeves (Make 2)
Using double-pointed needles, CO 28 (28, 32, 32, 34, 36, 36). Join to work in the round.
Work in Seed St for 2.25”. K 2 rounds.
Inc Rnd: K1, M1L, k to last st, M1R, k1. 2 sts inc’d.
Rep Inc Rnd every 12 (9, 10, 9, 8, 6, 6) rnds 7 (9, 8, 9, 11, 13, 15) MORE times—44 (48, 50, 52, 58, 64, 68) sts.
Work even until sleeve measures 21”, or to desired length to underarm.
Next Rnd: K to 2 (3, 3, 3, 4, 4, 5) sts from end. BO 4 (6, 6, 6, 8, 8, 10) sts, k to end. Sleeve is now worked flat for sleeve cap. 36 (36, 38, 40, 42, 48, 48) sts.
BO 2 (3, 3, 3, 4, 4, 5) sts at beg of next 2 rows
P 1 row.
Dec Row: K1, SSK, k to last 3 sts, k2tog, k1.
Rep Dec Row every RS row 1 (1, 2, 3, 3, 4, 4) more times—32 (32, 32, 32, 34, 38, 38) sts rem.
Work 3 rows in St st.
Rep Dec Row.
Rep the last 4 rows 0 (1, 0, 0, 1, 1, 2) more times.
Rep Dec Row every RS row 7 (6, 7, 7, 7, 8, 7) more times—16 (16, 16, 16, 16, 18, 18) sts rem.
P 1 row.
BO 3 (3, 3, 3, 3, 4, 4), k to end.
BO 3 (3, 3, 3, 3, 4, 4), p to end.
BO rem 10 sts.
Finishing
Sew side seams. Sew shoulder seams. Set in sleeves. Graft two halves of collar together, being sure they are not twisted. Sew collar to back of neck. Sew on pockets at hip level. Wet block to measurements. Weave in ends.
Disappointed that stitch gauge is for wet blocking. Knitting for 40 years and have always used gauge suggested by the maker with excellent results. Can’t find anywhere else that wet blocking is suggested for this yarn. Have adjusted by using smaller needles but afraid that the finished garment my be too stiff.
Hi Gail,
Wet blocking is the standard for pattern writing. Also, wet blocking really is a necessary step in knitting. I’d suggest you give it a try.
Emily Ringelman