

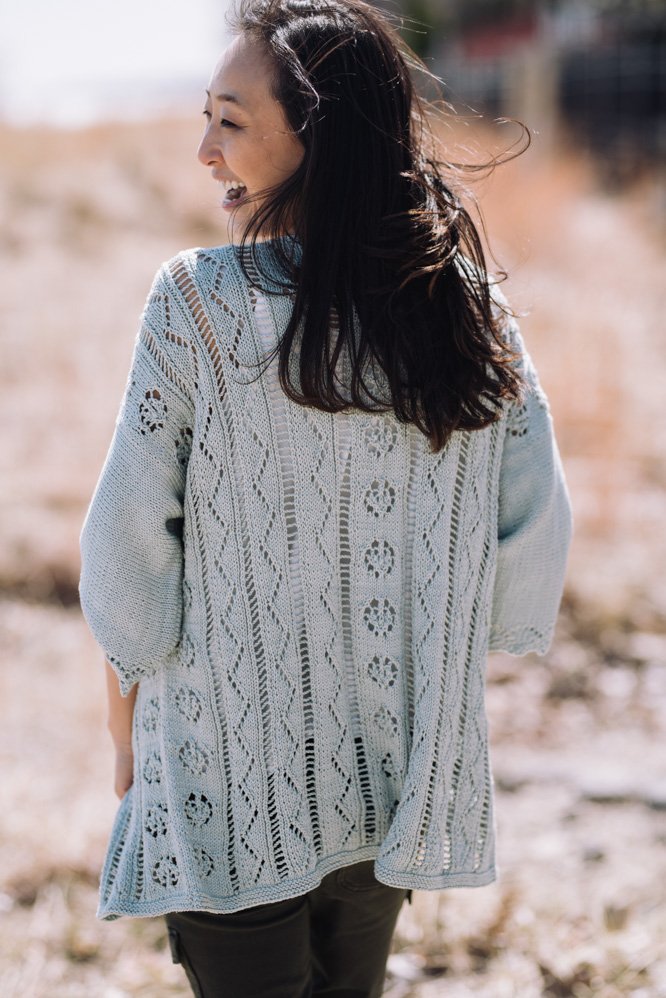
The Isla Cardigan is your go-to piece for light, breezy elegance. Designed with an all-over lace pattern, this long, kimono-style cardigan effortlessly combines comfort and style. Its flowing silhouette and delicate lacework create a flattering, feminine look that pairs beautifully with everything from casual jeans to evening dresses.
Perfect for layering over a summer outfit or adding a touch of texture to a layered look in cooler weather, the Isla Cardigan is as versatile as it is chic. Whether you’re headed out for a day at the beach or dressing up for a night out, this cardigan provides the perfect balance of cozy warmth and airy elegance. The kimono design, with its open front and wide sleeves, ensures freedom of movement and an effortlessly chic vibe.
This cardigan is an ideal addition to your wardrobe, offering a lightweight option for a variety of occasions, all while showcasing your knitting skills.
Time: 55 Hours Pattern
Skill level: Intermediate
Size: 32 (36, 40, 44, 48)” to fit bust 45.20 (47.40, 51.40, 55.40, 59.60)”, with 11″ ease.
Shown in size 36″
Gauge: 23 sts and 27.5 rows = 4″ [10 cm] in lace pattern, 20 sts and 28 rows = 4″ [10 cm] in St st, after wet blocking
Materials
 Yarn: Scheepjes Catona (100% Merecerised Cotton; 136 yards [125 meters]/50 grams): #402 Silver Green (9 (10, 11, 11, 12) balls).
Needles: US size 4 (3.5 mm) straight or circular needles
Hook: US size C/2 (2.75 mm)
Notions: Tapestry needle, stitch holder, locking stitch markers
Special Stitches
Double Selvage stitch (DS)
Row 1 (RS): Sl 1 wyib, k1; work in given stitch pattern to last 2 sts; sl 1 wyib, p1.
Row 2 (WS): Sl 1 wyib, p1; work in given stitch pattern to last 2 sts; sl 1 wyif, p1.
Rep these 2 rows.
Lace Pattern 1 (13-st rep)
Row 1 (RS): Knit.
Row 2 & all even rows: Work sts as they present themselves; p into yo; [p1, k1] into double yo.
Row 3: K3, k2tog, yo twice, sk2p, yo twice, ssk, k3.
Row 5: K1, k3tog, yo twice, k1-tbl, yo, s2kp2, yo, k1-tbl, yo twice, sk2p, k1.
Row 7: K1, ssk, yo, k1-tbl, ssk, yo, k1, yo, k2tog, k1-tbl, yo, k2tog, k1.
Row 9: K3, yo twice, sk2p, k1, k3tog, yo twice, k3.
Row 11: K5, yo, sk2p, yo, k5.
Rows 13 & 15: Knit.
Rep Rows 1-16 for pattern.
Lace Pattern 2 (7-st rep)
Row 1 (RS): K1, yo, ssk, k4.
Row 2 & all even rows: Work sts as they present themselves; p into yo.
Row 3: K2, yo, ssk, k3.
Row 5: K3, yo, ssk, k2.
Row 7: K4, yo, ssk, k1.
Row 9: K4, k2tog, yo, k1.
Row 11: K3, k2tog, yo, k2.
Row 13: K2, k2tog, yo, k3.
Row 15: K1, k2tog, yo, k4.
Rep Rows 1-16 for pattern.
Lace Pattern 3 (6-st rep)
Row 1 (RS): P1, ssk, yo twice, k2tog, p1.
Row 2 : Work sts as they present themselves; [p1, k1] into double yo.
Rep Rows 1-2 for pattern.
Lace edging
Row 1: K1, yo, k2tog, yo, k1, yo, ssk, k1. (8 sts)
Row 2 & all even rows: Purl all sts and yos.
Row 3: K1, yo, k2tog, yo, k3, yo, ssk. (9 sts)
Row 5: K1, yo, k1, k2tog, yo, k3, yo, ssk. (10 sts)
Row 7: Ssk, yo, sk2p, yo, k3, yo, ssk. (9 sts)
Row 9: Ssk, yo, k2tog, yo, s2kp2, yo, k2. (8 sts)
Row 11: Ssk, yo, sk2p, yo, k3. (7 sts)
Rep Rows 1-12 for pattern.
Pattern Notes
The fronts are worked separately and then joined together with casting on sts for the neckline and working the back top-down. The sleeves are worked separately and sideways and then sewn together.
Pattern
Right front
CO 49 (51, 57, 61, 65) sts.
Work 6 rows in garter st.
Cont in St st for 0 (2, 4, 0, 0) rows.
Set pattern
Work in lace pattern following charts 1, 2 & 3, or written instructions (see special stitches), as foll:
Next row (RS): DS, work 2 sts in St st, work [lace patt 3, lace patt 2] twice, lace patt 3, lace patt 1, finish with 0 (2, 8, 12, 16) sts in St st.
Continue in patt as established until piece measures 26.75 (27, 27.50, 28, 28)” and 184 (184, 184, 192, 192) rows of patt have been completed, finishing with a WS. CO 35 (35, 35, 37, 39) sts at the end of the row for back neck. (84 (86, 92, 98, 104) sts)
Cut yarn and leave sts on hold.
Left front
CO 49 (51, 57, 61, 65) sts.
Work 6 rows in garter st.
Cont in St st for 0 (2, 4, 0, 0) rows.
Set patt
Work in lace patt following charts 1, 2 & 3, or written instructions (see special stitches), as foll:
Next row (RS): Work 0 (2, 8, 12, 16) sts in St st, lace patt 1, [lace patt 3, lace patt 2] twice, lace patt 3, finish with 2 sts in St st, DS.
Continue in patt as established until piece measures 26.75 (27, 27.50, 28, 28)” and 184 (184, 184, 192, 192) rows of patt have been completed, finishing with a WS. Leave sts on hold. Do not cut yarn.
Back
With WS facing, bring back on needle the 84 (86, 92, 98, 104) stsof right front, and the 49 (51, 57, 61, 65) sts of left front. (133 (137, 149, 159, 169) sts)
Place a locking stitch marker at each side to mark shoulders for seaming.
Next row (RS): Working across right front, work 0 (2, 8, 12, 16) sts in St st, next row of lace patt 1, [lace patt 3, lace patt 2] 2 times, lace patt 3, 2 sts in St st, 2 sts in garter st, work 35 (35, 35, 37, 39) sts in garter st across CO back neck sts, then working across left front, work 2 sts in garter st, 2 sts in St st, next row of [lace patt 3, lace patt 2] 2 times, lace patt 3, lace patt 1, finish with 0 (2, 8, 12, 16) sts in St st.
Work 5 rows in patt as established to form the neckline border.
Then continue as foll, starting lace panels that replace garter sts with same row of patt as side panels:
Next row (RS): Work 0 (2, 8, 12, 16) sts in St st, next row of lace patt 1, [lace patt 3, lace patt 2] 2 times, lace patt 3, 2 (2, 2, 3, 4) sts in St st, lace patt 2, lace patt 3, lace patt 1, lace patt 3, lace patt 2, 2 (2, 2, 3, 4) sts in St st, [lace patt 3, lace patt 2] 2 times, lace patt 3, lace patt 1, finish with 0 (2, 8, 12, 16) sts in St st.
Continue in patt as established until piece measures 26.75 (27, 27.50, 28, 28)” and 184 (184, 184, 192, 192) rows rows of patt have been completed.
Cont in St st for 0 (2, 4, 0, 0) rows.
Work 6 rows in garter st.
BO all sts.
Sleeves (Make 2)
Note: The number of the sts increases and decreases from row to row, because of the edging. You may find it helpful to place a removable marker after the first 7 sts and move the marker up as work progresses, so you can easily identify the part of the edging.
CO 51 sts.
Work 0 (0, 4, 2, 0) rows in St st.
With RS facing, begin working first 7 sts in lace edging following chart, or written instructions (see special stitches), and the rem 44 sts in St st.
Continue in patt as established until 12 (12, 12, 13, 14) patt rep have been worked in height.
Work 0 (0, 4, 2, 0) rows in St st.
BO all sts.
Finishing
Block all pieces to finished measurements.
With crochet hook, work sc along back neck edging. Cut yarn and fasten off.
With yarn threaded on a tapestry needle, sew sleeves into armholes, matching the center of the sleeve to the shoulder marker and the edges 10 (10, 10.6, 11, 11.8)” from the shoulder seam.
Sew underarm and side seams
Weave in ends.
I absolutely LOVE this sweater! I made it for myself and in spite of having serious issues with the lase pattern 1 (that looks like a circle) it was so fun to make. Thanks so much for!!!
I absolutely LOVE the way y’all set up the above download! Thank you so much! When trying to download the regular parts of patterns each time, for some reason my iPhone and even my iPad load them weird. Those devices split the introduction vertically on separate pages, and any project photos you place down the right side from the directions, those won’t even load with the pages. I have to crop screenshots of the project detail photos, to help me see how the finished part should look. Your photos truly help! I send everything to my book app so I don’t have to print. I do all of that because our internet is shotty, so I can keep working on my project while reading it on my books app. Thank you again for loading the download in the above format! Thank you for your time and great projects in your magazines!
I want to down load the patterns and have not been able to ever. This is why I will
not renew my subscription you make everything so difficult. Very annoying.
Thank you for your feedback! We are aiming to add downloadable patterns as a feature in the near future, though it will take us time to add PDFs to all of our existing patterns. In the meantime, you can print or print-to-PDF in your browser.
This pattern is beautiful. But, I have one suggestion. The number of CO stitches should be 5 stitches less than the instructions state. Then, after the 6 rows of garter stitch, add the 5 stitches back. This prevented my hem from being ‘wavy’, wider than the body of the sweater.
Can’t wait until I am finished!
Where is the chart for the pattern?
thank you
Hi Susan! The charts can be found on the right hand side of the pattern underneath the photos. Here are the links to them as well:
https://www.ilikeknitting.com/wp-content/uploads/Isla-Cardigan-Charts.pdf
https://www.ilikeknitting.com/wp-content/uploads/Isla-Cardigan-Schematic.pdf
Happy knitting! – Nicola, Editor
I am going to make this beautiful sweater…hopefully to wear this summer