

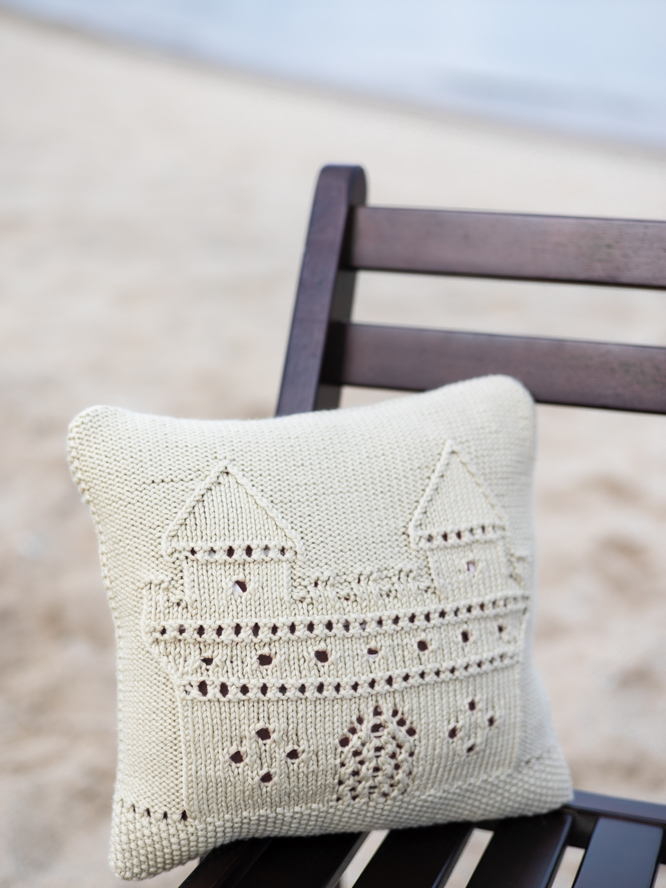
This summer pillow is a fun sampler of various knitting techniques, including seed stitch, stockinette, reverse stockinette, garter stitch, eyelets, and twisted traveling stitches. These techniques combine to create a sandcastle motif on the front of the cushion cover and a seashell motif bordered by wavy lines of eyelets and garter stitch on the back. In addition to featuring a wide variety of textural stitches, this design is also a great opportunity to gain experience at working from charts, because the pattern is fully charted.
Time: 1 Week Project
Skill Level: Intermediate
Size: 11″ [28 cm] wide and 11″ [28 cm] tall.
1″ [2.5 cm] negative ease recommended.
Gauge: 22 sts and 32 rnds = 4″ [10 cm] in St st, after blocking
Materials
 Yarn: Berroco Comfort Chunky (50% super fine acrylic, 50% super fine nylon; 150 yards [138 meters]/100 grams): 5703 Barley (2 skeins)
Needles: US size 7 [4.5 mm] 40″ [100 cm] or longer circular needles (for working in magic loop)
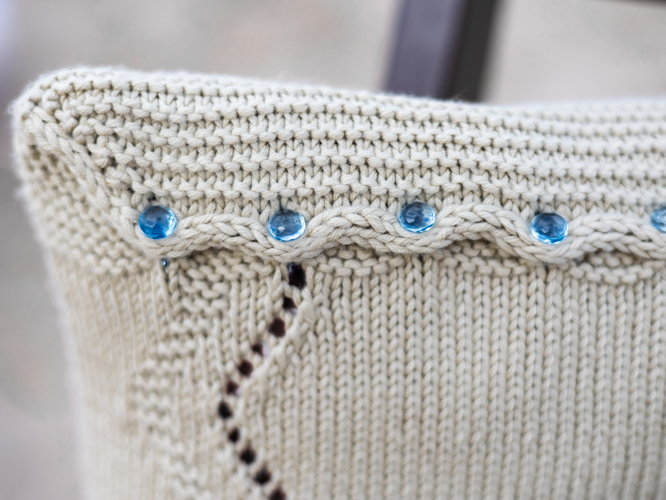
Notions: Cable needle, tapestry needle, seven 3/8″ [1 cm] buttons, 12″ [30 cm] square pillow insert
Downloads
- Sandcastle Sampler Pillow – Chart A (Pillow Front)
- Sandcastle Sampler Pillow – Chart A Key
- Sandcastle Sampler Pillow – Chart B (Pillow Back)
- Sandcastle Sampler Pillow – Chart B Key
- Sandcastle Sampler Pillow – Chart C (Pillow Flap)
- Sandcastle Sampler Pillow – Chart C Key
Special Stitches
See chart keys for all special stitches.
Pattern Notes
The pattern begins with Judy’s magic cast-on. The body of the pillow cover is worked seamlessly in the round from the bottom up. After the stitches of the back half of the cover are bound off, the remaining stitches are worked back and forth to create a flap for buttoning the cover closed.
The pattern is entirely charted. Every chart row is read from the right to the left.
The stitch count for Chart A changes slightly throughout the pattern depending on whether the motif needs to be centered over an odd or even number of stitches, as indicated by the grey “No stitch” boxes. The stitch count for Chart A also changes in Rnd 54 and Rnd 57 due to the yarn-over increases that are decreased in the respective following Rnd 55 and Rnd 58.
The stitch count for Chart B remains constant at 63 sts throughout.
Stuffing the finished cushion cover with a colorful pillow rather than a plain pillow insert is an easy way to elevate the design, because the eyelets in the pattern will allow the contrasting color of the inner pillow to show through. For example, using a light blue pillow will heighten the beachy theme of the project by suggesting water/waves. Matching the color of the buttons to the color of the inner pillowcase will tie these contrasting elements together.
The castle motif was inspired by “The Gingerbread Castle” from Barbara Walker’s A Second Treasury of Knitting Patterns, but it has been modified for this project to depict a beachy sandcastle instead.
Pattern
Body
Using Judy’s magic cast-on, CO 63 sts to each needle. (126 sts)
Work using magic loop with RS always facing.
Set-up rnd: K63, turn.
Rnd 1: Work Row 1 of Chart A, turn and work Row 1 of Chart B. (125 sts rem)
Rnds 2-88: Cont working from Charts A and B as established.
Rnd 89: Work Row 89 of Chart A, turn and BO pwise all sts of Chart B. Note that the final st of the rnd must be bound off over the first st of side A. (61 sts rem)
Flap
Rows 1-15: Work Chart C as charted, beg with Row 1 as a RS row.
Row 15 is to be worked as a 3-st I-cord BO, with the red sts on the chart indicating the placement of the buttonholes, which are created by binding off the indicated st without working it and working a corresponding rnd of detached I-cord.
Finishing
Cut yarn, leaving a 12″ [30 cm] tail. Use Kitchener st to graft the final 3 I-cord BO sts to the 3 rem selvedge sts for a smooth join.
Weave in all ends.
Block as needed.
Attach buttons to align with the buttonholes.
The Pillow is so very pretty, but sadly, I am unable to work from charts.
I’d have to write out the lines for the chart before I could attempt the pattern.
Maybe one day I will try.
I love this pattern, too, but I do not love charts. I wish there was a written pattern also.
Hi, I love this pattern but can’t see the charts for it. Am I missing something? Thanks, Jen
Hello! Charts are always on the far right side of the pattern page underneath the photos.
Thanks! – Nicola, Editor