

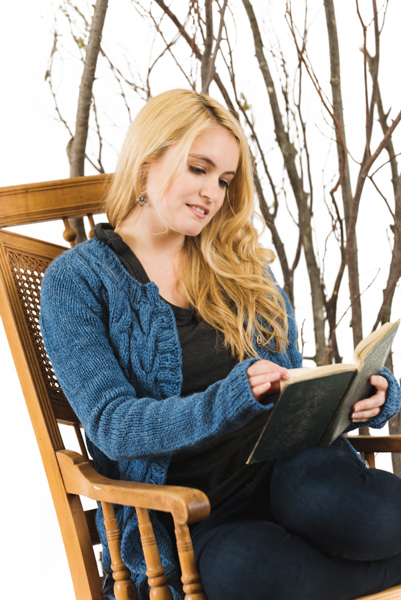
If you’re looking to add a dependable classic to your to-be-knit list, look no further than the extra bulk of this gorgeously cabled cardigan. Its usefulness is matched only by its style, which will be sure to dazzle at the same time that it keeps you warm.
Skill Level: Intermediate
Size: Finished Bust Size 34½ (36, 37½, 45, 48, 52, 53½)”
2” positive ease recommended.
Shown in size 36”
Gauge: 16 sts and 20 rows = 4” [10 cm] in St st with larger needles.
Materials
Yarn: Cascade Yarns Ecological Wool (100% Natural Peruvian Wool; 478 yards [437 meters]/250 grams): 9332 Sapphire, 2 (2, 3, 3, 4, 4, 5) skeins
Needles: US size 9 (5.5 mm): 32-40” circular and DPNs; US size 10 (6 mm): circular and DPNs
Notions: Stitch markers; stitch holder or waste yarn; tapestry needle; 6 (7, 7, 8, 8, 9, 9) 7/8” / (22 mm) buttons
Abbreviations
K – Knit
K2tog – Knit two stitches together at the same time.
P – Purl
PM – Place marker
P2tog – Purl two stitches together at the same time.
M1R (make one knit-wise right) – Pick up the strand running between the stitches, from back to front, and knit into the front.
M1L (make one knit-wise left) – Pick up the strand running between the stitches, from front to back, and knit into the back.
SM – Slip marker
Ssk – Slip two stitches, knit them together through the back loops.
Yo – Yarn over
Pattern Notes
Worked in one piece from the top down, this is a traditional raglan construction cardigan featuring all-over chunky cables. Straight body line adds to the straight-forward work. Cables are gradually worked at longer intervals for expansive cables.
Comfortable, cozy, a wardrobe staple for cold weather and cuddling.
Select the size with amount of ease desired.
Pattern
Body
With larger circular needle, CO 72 (72, 72, 90, 90, 108, 108) sts.
Set-up Row: P9, pm, p6 (6, 6, 8, 8, 10, 10), pm, p42 (42, 42, 56, 56, 70, 70), pm, p6 (6, 6, 8, 8, 10, 10), pm, p9.
Row 1 (Inc): K9, M1R, sm, k1, M1L, k to 1 before M, M1R, k1, sm, M1L, p1, (k12, p2) 2 (2, 2, 3, 3, 4, 4) times, k12, p1, M1R, sm, k1, M1L, k to 1 before M, M1R, k1, sm, M1L, k9 – 8 sts inc’d; 80 (80, 80, 98, 98, 116, 116) sts.
Row 2 (WS): Knit all k sts, purl all p sts across row.
Work Rows 1-2, following the 10-Row Cable Chart patt AT THE SAME TIME, incorporate cable chart as stitches are increased.
Rep Rows 1-2 until there are 46 (50, 58, 64, 72, 74, 76) sts across the Back, ending after the WS row. At the end of that WS row, CO 18 (18, 18, 32, 32, 46, 46) sts.
Next Row (RS): Work in patt as est, CO 18 (18, 18, 32, 32, 46, 46) sts at end of row.
Cont working Rows 1-2, working cable chart and incorporating 10-Row Cable Chart patt as est into the newly cast-on sts.
Cont as est until there are 56 (60, 68, 74, 80, 82, 84) sts across the Back, AT THE SAME TIME, work until there are 38 (40, 44, 48, 54, 62, 68) sts on Sleeves.
Work even until piece meas approx. 6½ (7, 7½, 8, 8½, 9, 9½)”.
After work reaches the desired length, on next RS Row *work to M, place Sleeve sts on holder or scrap yarn, removing markers, CO 4 sts for underarm; rep from * once more from – 132 (138, 144, 174, 186, 204, 208) st.
Cont working even as est, working new underarm sts as (p1, k2, p1).
Begin the 12-Row Cable Chart patt as soon as you have completed a full 10-Row Cable Chart patt AFTER separating Sleeves.
Cont working even as est until 3 (4, 4, 4, 5, 5, 5) full repeats of the 12-Row Cable Chart patt have been completed.
Begin the 14-Row Cable Chart patt and cont working even as est until 2 (3, 3, 3, 4, 4, 4) full repeats the 14-Row Cable Chart patt have been completed, ending after a WS row.
Switch to smaller needles for edging.
Next Row: K3, *p2, k2; rep from * to last st, k1.
Rep last row for 1½” or desired length.
BO all sts loosely in patt.
Left Side Ribbing
With RS facing and smaller circular needles, pick up and knit approximately 3 sts of every 4 sts along the side, ending with a multiple of 4 sts + 2.
Row 1 (WS): *P2, k2; rep from * to last 2 sts, p2.
Row 2 (RS): *K2, p2; rep from * to last 2 sts, k2.
Work in est ribbing for approximately 1½”
Right Side Ribbing
Work as for Left Side to start.
Row 1 (WS): *P2, k2; rep from * to last 2 sts, p2.
Row 2 (RS): *K2, p2; rep from * to last 2 sts, k2.
Row 3: *P2, k2; rep from * to last 2 sts, p2.
Buttonhole Row (RS): Work 5 sts, yo, *work 12 sts, yo; rep from * to end of row.
Note: The yarn overs worked will be the buttonholes.
Next Row (WS): Cont in ribbing patt as est, when reach a yo, k2tog or p2tog as appropriate (the yo will be incorporated into the ribbing at this point, maintaining the est K2, P2 ribbing pattern).
Rep Rows 2-3 once more.
BO all sts loosely in patt.
Sleeves (make 2)
Place Sleeve sts from holder on larger DPNs.
Rnd 1: Pick up and k2 sts on left side of underarm, k across Sleeve st, pick up and k2 sts on the right side of the underarm, PM and join to work in the round – 40 (42, 46, 50, 56, 64, 70) sts.
Rnd 2 (Dec): K1, ssk, k to last 3 sts, k2tog, k1 – 2 sts dec’d; 38 (40, 44, 48, 54, 62, 68) sts.
Rep Dec Rnd every 10 (10, 10, 10, 10, 8, 8) rnds 3 (4, 4, 4, 5, 5, 6) times more – 32 (32, 36, 40, 44, 52, 56) sts.
Work even until Sleeve meas 1½” less than desired length.
Switch to smaller needles.
Next Row: *K2, p2; rep from * around.
BO all sts loosely in patt.
Collar
With smaller circular needles, pick up and knit in every st, starting at the Right Front – approx. 130 (136, 142, 172, 184, 202, 206) sts.
Note: It’s okay if you do not get the exact st count listed above. Just make sure to end with an even number of sts.
Row 1 (WS): P1, *p2tog; rep from * across to last st, p1 – 66 (68, 72, 86, 92, 100, 102) sts.
Row 2 (RS): K3, *p2, k2; rep from * to last st, k1.
Work in ribbing as est for 5 more rows, ending after a WS.
BO all sts loosely in patt.
Finishing
Weave in ends and block lightly.
None of your patterns have schematics or charts visiable.
As per some comments I’ve looked below the photos and still can’t find them.
This is happening with every pattern I’ve checked.
Hello Carol! Charts are available for logged-in Gold Members at the bottom of the pattern and appear as a blue button to click and download. – Nicola, Editor
Rowan cotton with silk
I am looking for pattern written in English using Rowan yarn
Hi Audrey! Here are our patterns that use Rowan Yarn: https://www.ilikeknitting.com/tag/rowan/
Happy knitting! – Nicola, Editor
This pattern doesn’t make any sense. In row 1, if you knit 8 at the beginning and make a stitch, the directions no longer match the number of stitches before the marker. You need to fix it.
Thank you for your comment. I’ve reached out to the designer for clarification. Please see the update. I hope this helps