

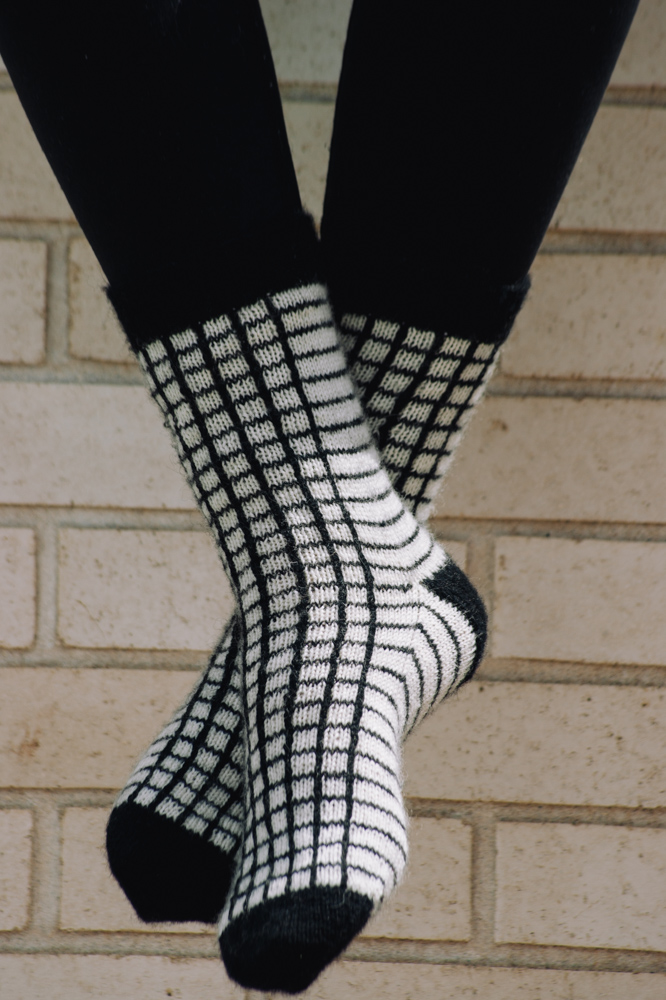
Black and white checks never go out of style, and these playful socks bring the timeless pattern to your feet with an easy-to-create design. Using a simple technique of surface crochet or chain-stitch embroidery, you can achieve a bold and graphic look with minimal effort. Perfect for adding a touch of vintage charm or modern edge to your wardrobe, these socks are both eye-catching and fun to make!
Time: 2 weeks pattern
Skill Level: Easy
Size: Finished Sock Circumference 5.25 (6.25, 7.25, 8.25, 9.25, 10.25, 11.25)”
1” negative ease recommended.
Shown in size 8.25”
Gauge: 32 sts and 44 rounds = 4” [10 cm] in St st after wet blocking
Materials
 Yarn: Garnstudio Drops Fabel Uni Colour (75% Wool, 25% Polyamide; 224 yards [205 meters]/50 grams): 100 Off-white (MC, 1 (1, 1, 2, 2, 2, 2) balls), 400 Black (CC, 1 (1, 1, 1, 2, 2, 2) balls)
Needles: US size 1.5 (2.5 mm) DPNs or circular at least 32” (80 cm) in length or circular 9” (22.5 cm) in length
Notions: Markers (7), tapestry needle, US size 1.5 (2.5 mm) crochet hook (optional)
Special Stitches
1 x 1 Rib
Rnd 1: *K1, p1; rep from * to end.
Rep Rnd 1 for patt.
Stripe Sequence
Rnds 1-4: MC.
Rnd 5: CC.
Rep Rnds 1-5 for patt.
Carry yarn not in use up the inside of the sock.
Check Pattern
Rnd 1: [P1, k3] 3 (3, 4, 5, 6, 7, 8) times, p1.
Rep Rnd 1 for patt.
Pattern Notes
The socks are knitted from the cuff down, starting with a 1 x 1 ribbed cuff in black.
The socks are knitted using a 5-row stripe sequence with purl columns that are surface crocheted or embroidered over at the end to add the vertical stripes.
The socks have a heel-flap and gusset construction with a slipped stitch texture on the heel flap for reinforcement.
The toe is Kitchener-free and is knitted in black.
The socks are knitted from the top down using a standard heel flap and gusset construction. The foot length of the socks is adjustable to fit.
The pattern is written to be needle-neutral and can be knitted using either the magic-loop technique, short circulars, or DPNs, depending on your individual preference.
Pattern
Work both socks the same.
Using CC, CO 42 (50, 58, 66, 74, 82, 90) sts, join to work in the rnd, being careful not to twist the cast-on edge. Pm (BOR) to mark beg of rnd. Unless otherwise stated, this marker should be slipped at the end of each rnd.
Cuff
Work 10 (12, 14, 16, 18, 20, 22) rnds in 1 x 1 Rib. The cuff will measure approximately 1 (1, 1.25, 1.5, 1.75, 1.75, 2)”.
Leg
Join MC (do not break CC).
Following Stripe sequence, work the leg as follows:
Rnd 1: K4 (6, 6, 6, 6, 6, 6), pm, work Check Pattern, pm, k to end.
Rnd 2: K to m, sm, work Check Pattern to m, sm, k to end.
Rep Rnd 2 until leg measures 4 (5, 6, 7, 8, 9, 9)”, ending after a Rnd 4 of the Stripe Sequence.
Make a note of the number of rnds you have worked for the leg. This will help ensure you make socks that match.
Break MC.
Next Rnd (partial rnd): Using CC, k4 (6, 6, 6, 6, 6, 6), pm, work Check Pattern, pm, k4 (6, 6, 6, 6, 6, 6). (20 (24, 28, 32, 36, 40, 44) sts)
Heel flap
Work the heel flap back and forth, turning at the end of each row; leave the instep sts on hold.
Use CC for the Heel flap.
Row 1 (RS): [Sl1 pwise wyib, k1] 10 (12, 14, 16, 18, 20, 22) times, k1. 21 (25, 29, 33, 37, 41, 45) heel flap sts
Row 2: Sl1 pwise wyif, p20 (24, 28, 32, 36, 40, 44).
Rep Rows 1-2 another 10 (12, 14, 16, 18, 20, 22) times.
Heel turn
The heel turn is worked back and forth using short rows; all other sts remain on hold throughout.
Use CC for the Heel turn.
Row 1 (RS): Sl1 pwise wyib, k12 (14, 16, 18, 20, 22, 24), ssk, k1, turn.
Row 2: Sl1 pwise wyif, p6, p2tog, p1, turn.
Row 3: Sl1 pwise wyib, k to 1 st before gap, ssk, k1, turn.
Row 4: Sl1 pwise wyif, p to 1 st before gap, p2tog, p1, turn.
Work Rows 3-4 another 1 (2, 3, 4, 5, 6, 7) times.
Row 5: Sl1 pwise wyib, k to 1 st before gap, ssk, turn.
Row 6: Sl1 pwise wyif, p to 1 st before gap, p2tog, turn. (13 (15, 17, 19, 21, 23, 25) heel sts)
Break CC.
Not sure where ‘the gap’ is? When you turn your work midway through a row, a small space appears between the sts at that point. This is what you’re looking for.
Gusset
Return to working in the rnd and in Stripe Sequence, beg with Rnd 3.
Rnd 1 (RS): Sl6 (7, 8, 9, 10, 11, 12) pwise wyib, pm (BOR), k to end of heel flap, pm (A), PU and k13 (15, 17, 19, 21, 23, 25) sts along edge of heel flap (PU and k 1 st per slipped st down the edge of the heel flap and 2 sts in the space between the heel flap and the instep sts; the 2 extra sts prevent gaps forming), pm, k to m, sm, work Check Pattern to m, sm, k4 (6, 6, 6, 6, 6, 6), pm, PU and k13 (15, 17, 19, 21, 23, 25) sts along edge of heel flap (PU and k 2 sts in the space between the heel flap and the instep sts, and 1 st per slipped st down the edge of the heel flap row; the 2 extra sts prevent gaps forming), pm (B), k to m (BOR). (60 (70, 80, 90, 100, 110, 120) sts)
Rnd 2: Sl1 pwise wyib, k to m (A), remove m (A), ktbl to m, sm, k to m, sm, work Check Pattern to m, sm, k to m, sm, ktbl to m (B), remove m (B), k to m (BOR).
Rnd 3: K to 3 sts before m, k2tog, k1, sm, k to m, sm, work Check Pattern to m, sm, k to m, sm, k1, ssk, k to m (BOR). (2 sts dec’d; 58 (68, 78, 88, 98, 108, 118) sts)
Rnd 4: K to m, sm, k to m, sm, work Check pattern to m, sm, k to m, sm, k to m (BOR).
Rep Rnds 3-4, 8 (9, 10, 11, 12, 13, 14) more times. (21 (25, 29, 33, 37, 41, 45) instep sts; 21 (25, 29, 33, 37, 41, 45) sole sts; 42 (50, 58, 66, 74, 82, 90) sts total)
Foot
Cont in Stripe Sequence.
Rnd 1: K to m, sm, k to m, sm, work Check Pattern to m, sm, k to m, sm, k to m (BOR).
Rep Rnd 1 until the foot measures 1.5 (1.75, 2.25, 2.5, 2.75, 3, 3.25)” / [4 (5, 5.5, 6.5, 7, 7.5, 8.5) cm] less than the recipient’s foot length (this includes (0.5”) / [1.5 cm] negative ease), ending after Rnd 4 of the Stripe sequence.
Break MC.
If after you have worked a Rnd 4 of the Stitch Sequence you are slightly short of the desired length, change to CC and knit a few plain rnds to make up the length.
Make a note of the patt rnd you finish the foot on; this will help you make socks that match.
Toe
Work toe in CC.
Rnd 1: [K to 3 sts before m, k2tog, k1, sm, k1, ssk] twice, k to end. (4 sts dec’d; 38 (46, 54, 62, 70, 78, 86) sts)
Rnd 2: Knit.
Rep Rnds 1-2, 3 (4, 5, 6, 7, 8, 9) more times. (26 (30, 34, 38, 42, 46, 50) sts)
Rnd 3: [K to 3 sts before m, k2tog, k1, sm, k1, ssk] twice, k to end. (4 sts dec’d; 22 (26, 30, 34, 38, 42, 46) sts)
Rep Rnd 3 another 3 (4, 5, 6, 7, 8, 9) times. (10 sts)
Break yarn and thread through rem sts. Pull tight to fasten.
Finishing
Weave in all ends.
Add Vertical Stripes
Crochet Option
Using a crochet hook and CC, work vertical stripes down the purl troughs as follows: Starting at the cuff end of the sock at the transition between the cuff and the main sock, put the working yarn at the back of the work and insert the crochet hook through the work at the top of the ‘ladder’ created by the purl sts. Pull the working yarn through the fabric to create a loop.
*Keeping the loop on the hook, insert the crochet hook into the next ‘rung’ of the ladder from the front of the work to the back of the work to create another loop that secures the previous loop. Rep from * to the end of the purl trough.
When you have worked the final loop, pull the working yarn through the loop to secure the sts, break the working yarn, then pass the yarn tail to the inside of the sock, securing the final loop and weave the end in place.
Repeat for all the purl troughs on each sock.
You may find you need to roll the cuff of the sock down as you work the crochet lines.
Weave in the ends from each vertical line before you start the next vertical line.
Sewn Option
Using a tapestry needle and a length of CC (approximately 1 meter in length), work vertical stripes down the purl troughs as follows: Starting at the cuff end of the sock at the transition between the cuff and the main sock, use the needle to bring the working yarn through the work at the top of the ‘ladder’ created by the purl sts. Leaving a tail at the back of the work to weave in later, return the working yarn to the back of the work through the same hole you came up through, creating a loop of working yarn.
*From the back of the work, bring the needle up through the next ‘rung’ of the ladder from the front of the work to the back of the work to secure the previous loop, then return the working yarn to the back of the work through the same hole you came up through, creating a loop of working yarn.
Rep from * to the end of the purl trough.
When you have worked the final loop, pull the working yarn through from the back of the work through the loop to secure the sts, break the working yarn, then pass the yarn tail to the inside of the sock, securing the final loop and weave the end in place.
Repeat for all the purl troughs on each sock.
You may find you need to roll the cuff of the sock down as you work the sewn lines.
Weave in the ends from each vertical line before you start the next vertical line.
Blocking
Wash the socks according to the instructions given on the ball band.
Lay the socks out to dry to the dimensions given. You may wish to dry the socks on sock blockers.
Can you knit these as 2 at a time toe up just by reversing the pattern> Like… Starting with the toe then working up to the Ribbed cuffs and then BO?
Thanks Brenda
Yes, you can. You won’t be able to follow the instructions exactly in reverse, but you can work the socks from the toe up and work your favourite heel in place of the one given in the pattern. So lovely to hear from another toe up fan! Toe up is usually my preference!
Sounds interesting. Great opportunity to use different colors for vertical stripes.