

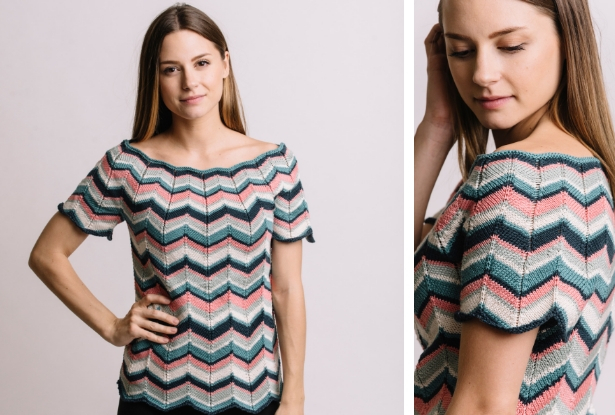
Vivian uses a deceptively simple stripe pattern to create the illusion of randomness. Worked in the round from the bottom up, this tee looks to be straight out of a vintage pattern book. Have fun playing around with your favorite colorways to create a look that’s uniquely you.
Skill Level: Intermediate
Size: Finished Bust Size 32.5 (35.75, 39, 42.25, 45.5, 48.75, 52) to fit bust 30.5 (33.75, 37, 40.25, 43.5, 46.75, 50)”
2” positive ease recommended.
Shown in size 32.5”
Gauge: 1 repeat = 3.25” and 29 rows = 4” [10 cm] in Chevron pattern after wet blocking
Materials
 Yarn: Cascade Yarns Ultra Pima Fine (100% Cotton; 136 yards [125 meters]/50 grams): #3837 (CC1, 2 (2, 2, 3, 3, 3, 3) skeins), #3797 (CC2, 2 (2, 2, 2, 3, 3, 3) skeins), #3718 (CC3, 2 (2, 2, 3, 3, 3, 3) skeins), #3757 (CC4, 2 (2, 2, 3, 3, 3, 3) skeins), #3811 (CC5, 2 (2, 2, 2, 2, 3, 3) skeins)
Needles: US size 3 (3.75 mm) 16” circular, US size 3 (3.75 mm) 32” circular
Notions Markers, stitch holders, tapestry needle, six or seven 5/8” buttons, spare needle for 3-needle BO
Special Stitches
LLI (Left lifted increase)
Insert your right needle from back to front underneath stitch two stitches below the next stitch on the right needle, then place this stitch on the left needle. Knit this stitch and slip it off the needle.
RLI (Right lifted increase)
Use your right needle to pull the stitch one row below the first stitch on your right needle, then place the stitch on the left needle, taking care to ensure it doesn’t slip over the stitch next to it. Then knit the stitch and slip it off the needle.
Pattern Notes
This pattern is worked in the round from the bottom up. The stripe pattern looks more complicated than it is, the stripes always go in order 1-5, and the thicknesses alternate 4 rows-2 rows-6 rows-2 rows.
Pattern
Body
With CC1, 240 (288, 288, 336, 336, 336, 384) sts purlwise, pm. Join in the rnd, being careful not to twist work.
Rnd 1 and all odd Rnds: Knit.
Rnd 2: Purl.
Begin Stripe pattern
Rnd 4 and all even Rnds: [K1, LLI, k9, ssk, k2tog, k9, RLI, k1] around.
Work through Row 70 of Stripe Pattern once, then Rows 1-37 (41, 45, 49, 53, 55, 59) once more.
Next Rnd: [Place 24 (24, 24, 24, 24, 24, 48) sts on holder for underarm, 96 (120, 120, 144, 144, 144, 144) sts on holder for Front, place 24 (24, 24, 24, 24, 24, 48) sts on holder for underarm, place 96 (120, 120, 144, 144, 144, 144) sts on holder for back.
Sleeves (make 2)
With CC5 (2, 2, 3, 4, 5, 1), 96 (120, 120, 120, 120, 144, 168) sts purlwise, pm. Join in the round, being careful not to twist work.
Rnd 1 and all odd Rnds: Knit.
Rnd 2: Purl.
Begin Stripe Pattern with Row 17 (21, 23, 27, 31, 33, 37).
Rnd 4 and all even Rnds: [K1, LLI, k9, ssk, k2tog, k9, RLI, k1] around.
Continue in pattern through Row 37 (41, 45, 49, 53, 55, 59) of Stripe Pattern.
Next Rnd: Place 24 (24, 24, 24, 24, 24, 48) sts on holder for underarm. (72 (96, 96, 96, 96, 120, 120) sts)
Yoke
Place Front sts on needles, then Sleeve sts, then Back sts, then Sleeve sts. (336 (432, 432, 480, 480, 528, 528) sts, 14 (18, 18, 20, 20, 22, 22) repeats)
Begin Stripe Pattern with Row 38 (42, 46, 50, 54, 56, 60).
Decrease Section 1
Rnd 1: [Work Row 1 of Yoke Chart] around.
Rnd 2: [Work Row 2 of Yoke Chart] around.
Rep last 2 rnds 3 (3, 3, 3, 4, 3, 4) times more.
Next Rnd: [Work Row 3 of Yoke Chart] around.
Next Rnd: [Work Row 4 of Yoke Chart] around. (308 (396, 396, 440, 440, 484, 484) sts)
Decrease Section 2
Rnd 1: [Work Row 5 of Yoke Chart] around.
Rnd 2: [Work Row 6 of Yoke Chart] around.
Rep last 2 rnds 3 times more.
Next Rnd: [Work Row 7 of Yoke Chart] around.
Next Rnd: [Work Row 8 of Yoke Chart] around. (280 (360, 360, 400, 400, 440, 440) sts)
Decrease Section 3
Rnd 1: [Work Row 9 of Yoke Chart] around.
Rnd 2: [Work Row 10 of Yoke Chart] around.
Rep last 2 rounds 3 (3, 3, 3, 3, 2, 3) times more.
Next Rnd: [Work Row 11 of Yoke Chart] around.
Next Rnd: [Work Row 12 of Yoke Chart] around. (252 (324, 324, 360, 360, 396, 396) sts)
Decrease Section 4
Rnd 1: [Work Row 13 of Yoke Chart] around.
Rnd 2: [Work Row 14 of Yoke Chart] around.
Rep last 2 rounds 3 (2, 3, 3, 3, 2, 3) times more.
Next Rnd: [Work Row 15 of Yoke Chart] around.
Next Rnd: [Work Row 16 of Yoke Chart] around. (224 (288, 288, 320, 320, 352, 352) sts)
Decrease Section 5
Rnd 1: [Work Row 17 of Yoke Chart] around.
Rnd 2: [Work Row 18 of Yoke Chart] around.
Repeat last 2 rounds 3 (2, 2, 3, 3, 2, 3) times more.
Next Rnd: [Work Row 19 of Yoke Chart] around.
Next Rnd: [Work Row 20 of Yoke Chart] around. (196 (252, 252, 280, 280, 308, 308) sts)
Sizes 35.75 (39, 42.25, 45.5, 48.75, 52) Only
Decrease Section 6
Rnd 1: [Work Row 21 of Yoke Chart] around.
Rnd 2: [Work Row 22 of Yoke Chart] around.
Repeat last 2 rounds 2 (2, 2, 3, 2, 3) times more.
Next Rnd: [Work Row 23 of Yoke Chart] around.
Next Rnd: [Work Row 24 of Yoke Chart] around. (216 (216, 240, 240, 264, 264) sts)
Sizes 48 (52)” Only
Decrease Section 7
Rnd 1: [Work Row 25 of Yoke Chart] around.
Rnd 2: [Work Row 26 of Yoke Chart] around.
Rep last 2 rnds 2 (3) times more.
Next Rnd: [Work Row 27 of Yoke Chart] around.
Next Rnd: [Work Row 28 of Yoke Chart] around. (220 (220) sts)
All Sizes
Garter Band
Next Rnd: With CC2 (4, 1, 3, 5, 2), knit around.
Next Rnd: Purl.
Next Rnd: Knit.
BO purlwise.
Finishing
Using 3-needle BO, attach underarms.
Block to schematic measurements.
Weave in ends.
Hello there!
As far as I can see you are not quick to answer the questions. But I still need to ask for some clarification. First of all I saw this pattern without being a subscriber but it doesn’t seem to be full. That was the reason I decided to pay for the membership to get the full access but unfortunately I got the same version of the description.
So far my biggest question is about the pattern itself. How many stitches are in the pattern? It seems the last 1k is not needed. What I can see on the photo seems more as a singular vertical row of a knit stich.
My next question. How may times does the pattern repeat in a row?
Looking forward to hearing your answers asap
Regards, Tanja
Hello! I’ve reached out to the designer for advice and she or I will reply as soon as possible. Thanks! – Dana, Editor
Hi Tanja, I’ve heard back from the designer and she’s confirmed the math is correct:
The cast on is correct, there are 24 sts in each repeat.
There are 10 (11, 12, 13, 14, 15, 16) repeats in the sweater.
If needed, you could check YouTube for tutorials on LLI, RLI which might help! Good luck! -Dana, Editor
question: i’d like a higher neck – ideas?
I would too, but it doesn’t looks as if you have received and answer.
Hello Mary and Laura! We’ve reached out to the designer for advice and she or I will reply as soon as possible. Thanks! – Nicola
Sorry for the late reply. A higher neckline would be pretty easy, actually. Just continue the decrease pattern until the the neck is the desired length.
this looks like fun! i have some pretty stash yarns… none really enough to do a sweater in solid colors… so can go look and see! thanks!