

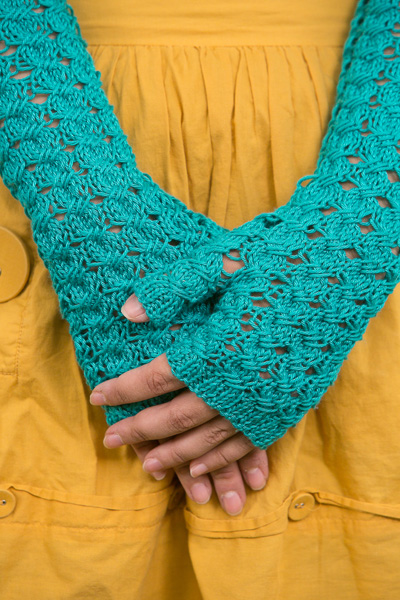
This fingerless mitts design was inspired by an interest in reinventing stitches and working in new directions. Azure Dreams features a repeating stitch pattern to create an airy but still warm fingerless mitts pattern that’s perfect for apple and pumpkin picking.
Skill Level: Intermediate
Size: One size
Gauge: St St on larger needle knit flat 20 sts x 28 rows on a 4” x 4” square; St St on smaller needle, 24 sts x 30 rows on a 4” x 4” square
Materials
Yarn:
![]() Cascade Ultra Pima (100% pima cotton; 220 yards [201 meters]/100 grams): Jade (1 skein)
Cascade Ultra Pima (100% pima cotton; 220 yards [201 meters]/100 grams): Jade (1 skein)
Needles: US size 5 (3.75 mm) 9” circular needle, US size 3 9” circular needle
Notions: Three stitch markers, darning needle, measuring tape, scissors, cable needle
Pattern Notes
Knit from the top down in the round these mitts are designed with minimal shaping and no seaming required except for a small section near the thumb should the knitter elect to knit the thumb flat before incorporating it into the work.
The thumb is knit from the top down first then put aside while the body of the mitt is worked from the top down.
The body and thumb are then joined and knit to the wrist where the knitter may elect to begin decreasing in pattern by moving down a needle size at a time to the conclusion of the mitt.
Special Stitches
Pattern Stitch
Rnd 1: Knit.
Rnd 2: *K1 YO*.
Rnd 3: *dropping yarn overs as you slip the next 6 stitches from the left to the right needle, slip the same 6 stitches back to the left needle, using the right needle pick up the 4th stitch on the left needle and pull it over the first three on the left needle then knit it to the right needle, take the 5th stitch on the left needle and pass it over the first three on the left needle then knit the 5th to the right needle, take the 6th stitch from the left needle and pass it over the first three on the left needle and knit the 6th stitch, knit the first stitch on the left needle to the right, knit the second stitch on the left needle to the right, knit the 3rd stitch from the left needle to the right*.
Rnds 4-5: Repeat Round 1.
Pattern
To begin, divide the yarn into two balls. This will allow you to use up all the yarn. If using a yarn with a distinct pattern, divide and rewind the balls so the patterns match up. If one ball is heavier than the other, start with the lighter one.
Thumb
Using smaller needle, cast on 13 stitches for the thumb, place a marker after the first stitch. This extra stitch will be used when seaming up the thumb.
Row 1: K1 SM *K2 P1*.
Row 2: *K1 P2* SM K1.
Row 3: repeat row 1.
Row 4: repeat row 2.
Change to larger needle and begin pattern,
Row 1: K1 SM*YO P1*.
Row 2: K1 SM *dropping yarn overs as you slip the next 6 stitches from the left to the right needle, slip the same 6 stitches back to the left needle, using the right needle pick up the 4th stitch on the left needle and pull it over the first three on the left needle then knit it to the right needle, take the 5th stitch on the left needle and pass it over the first three on the left needle then knit the 5th to the right needle, take the 6th stitch from the left needle and pass it over the first three on the left needle and knit the 6th stitch, knit the first stitch on the left needle to the right, knit the second stitch on the left needle to the right, knit the 3rd stitch from the left needle to the right* .
Row 3: Purl.
Row 4: Knit.
Row 5: Repeat Row 1.
Row 6: Repeat Row 2.
Row 7: Repeat Row 3.
Put thumb onto stitch holder which will be used to knit the stitches from when joining to the body of the mitt or slip to a cable needle.
Cast on 48,
Join in the round, PM, this will be the first marker.
Rnd 1: *K2 P1*.
Rnds 2-4: Repeat Round 1.
Change to larger needle and begin in pattern for 17 rows adding the thumb stitches back in at the end of row 17.
Rnd 1: Knit.
Rnd 2: *K1 YO*.
Rnd 3: *dropping yarn overs as you slip the next 6 stitches from the left to the right needle, slip the same 6 stitches back to the left needle, using the right needle pick up the 4th stitch on the left needle and pull it over the first three on the left needle then knit it to the right needle, take the 5th stitch on the left needle and pass it over the first three on the left needle then knit the 5th to the right needle, take the 6th stitch from the left needle and pass it over the first three on the left needle and knit the 6th stitch, knit the first stitch on the left needle to the right, knit the second stitch on the left needle to the right, knit the 3rd stitch from the left needle to the right*.
Rnds 4-5: Repeat Round 1.
Rnd 6: Repeat Round 2.
Rnd 7: Repeat Round 3.
Rnds 8-9: Repeat Round 1.
Rnd 10: Repeat Round 2.
Rnd 11: Repeat Round 3.
Rnds 12-13: Repeat Round 1.
Rnd 14: Repeat Round 2.
Rnd 15: Repeat Round 3.
Rnd 16: Repeat Round 1.
Rnd 17: Knit to marker, slip marker, knit stitches from thumb onto right needle as follows: K2TOG, K12, PM.
Working the thumb and body of the mitt as one for the duration of the project, the thumb gore will be created between the two markers as the pattern continues. The thumb core is being created from the top down therefore there will be decreases between the markers rather than increases.
Rnd 18: Repeat Round 2.
Rnd 19: Repeat round 3.
Rnd 20: Knit to marker, SM, K2TOG, K8, K2TOG TBL, SM.
Rnd 21: Repeat Round 2, slipping markers as you come to them.
Rnd 22: Repeat round 3 to marker, SM, Note there are now ten stitches between the markers with their associated yarn overs, therefore between the markers, the repeat is slightly revised so rather than slipping 6 you will proceed as follows: *slip 5 stitches to the right needle, drop YO as you come to them, slip these 5 stitches back to left needle, using the right needle, pick up the 4th stitch on the left needle and move it over the first three on the left needle, knit this stitch to the right needle, take the 5th stitch from the left needle and slip it over the first three, knit this 5th stitch to the right needle. Knit the 1st, 2nd, and 3rd stitches from the left needle* SM.
Rnd 23: Knit to marker, SM, K2TOG, K6, K2TOG TBL.
Rnd 24: Repeat round 1.
Rnd 25: Repeat round 2.
Rnd 26: Repeat round 3, to marker, SM, Note: there are now eight stitches between the markers with their associated YO, therefore between the markers, the repeat is slightly revised so rather than slipping 5 as in Round 22, *slip 4 to the right needle, drop YO as you come to them, slip these 4 stitches back to the left needle, using the right needle, move the 3rd stitch over the first two, knit this 3rd stitch to the right needle, take the 4th stitch from the left needle and place it over the first two on the left needle, knit this stitch to the right needle, knit the first stitch from the left needle, knit the second stitch from the left needle* SM.
Rnd 27: Knit to marker, SM, K2TOG, K4, K2TOG TBL.
Rnd 28: Repeat round 1.
Rnd 29: Repeat round 2.
Rnd 30: Repeat round 3 slip markers as you come to them. There are six stitches between the markers on this row.
Rnd 31: Knit to marker, SM, K2TOG, K2, K2TOG TBL.
Rnd 32: Repeat round 1.
Rnd 33: Repeat round 2.
Rnd 34: Repeat round 3, SM, now there are four stitches between the markers, slip 4 to the right needle, drop YO as you come to them, slip these 4 stitches back to the left needle, using the right needle, move the 3rd stitch over the first two, knit this 3rd stitch to the right needle, take the 4th stitch from the left needle and place it over the first two on the left needle, knit this stitch to the right needle, knit the first stitch from the left needle, knit the second stitch from the left needle.
Rnd 35: Knit to marker, SM, K2TOG twice, SM.
Rnd 36: Repeat round 1, SM, K2TOG, SM.
Rnd 37: Repeat round 2 to marker, remove marker K2TOG, YO. The pattern will continue from here with no additional decreases or shaping.
Rnd 38: Repeat round 3.
Rnds 39-40: Repeat round 1.
Rnd 41: Repeat round 2.
Rnd 42: Repeat round 3.
Continue in pattern until desired length is achieved.
End with a round 3.
Switch to smaller needle.
K2 P1 four rounds.
Bind off using a stretchy bind off. 
All these patterns are fantastic, glad I took out a subscription something for everyone, thank you.
This is a beautiful pattern and I would love to make it, but in all my years of knitting I’ve never come across the notation “SM”. Could you please tell me what it means? Thanks
“SM’ means slip maker
on ‘slip maker’ don’t you wa an ‘r’ to have marker?
What does sm refer to
Beautiful – can’t wait to start on these!! Thank you!