

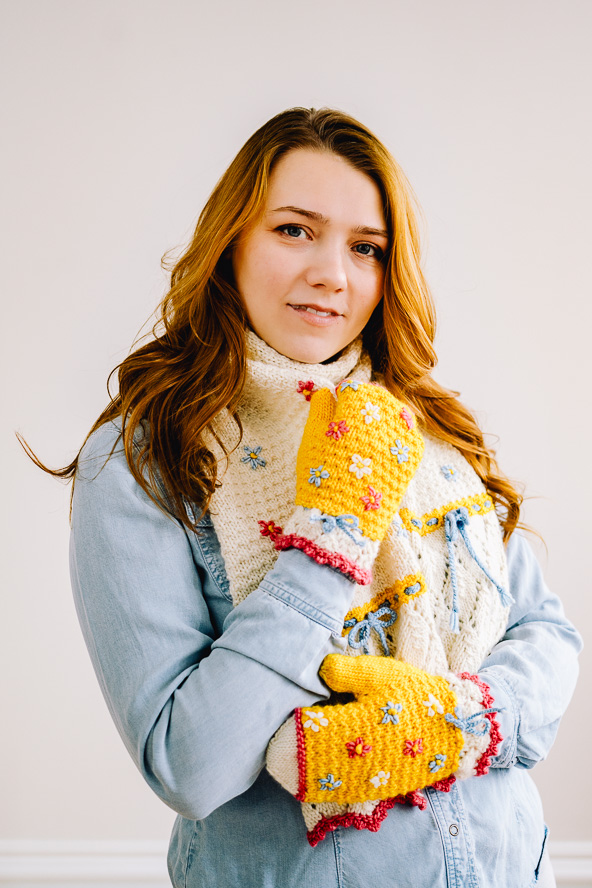
Introducing the Merino Meadows Mittens & Scarf Set: a delightful knitting project that embraces the softness of merino yarn and the vibrance of spring colors. This easy-to-knit accessory set features a canvas of simple textured stitches complemented by playful elements of color, leafy lacework and delicate floral embroidery. Adorned with folded picot edges and charming braided bows, this set exudes a touch of elegance and whimsy, making it an instant springtime favorite.
Time: Weekend Project
Skill Level: Easy
Scarf Size: 9.5” x 60”
Mitten Sizes Women’s S (M, L): [To Fit Hand Circumference: 7” (7.5”, 8”)], [Mitten Length: 8” (8.5”, 9”)] Mittens shown in size Medium
Gauge: 20 sts and 32 rows = 4” [10 cm] in Staggered Andalusian Stitch using US 5 needles
Special Stitches
Staggered Andalusian Stitch:
Cast on multiple of 2.
Row 1: *K1, p1; rep from * until end of row
Rows 2 & 3: Knit
Row 4: *P1, k1; rep from * until end of row
Rows 5 & 6: Knit
Repeat Rows 1-6
Materials
 Yarn: Malabrigo Worsted 100% Merino Wool; 210 yards [192 meters] / 3.5 ounces [100 grams]): #63 Natural (MC 2 hanks), #21 Cactus Flower (CC1 1 hank), #22 Sauterne (CC2 1 hank), #28 Blue Surf (CC3 1 hank), yarn amounts apply to all sizes.
Needles: US 5 (3.75mm) DPNs (for mittens), US size 7 (4.5 mm) straight needles (for scarf)
Notions: Stitch markers, scissors, tapestry needle, scrap yarn
Mittens Pattern
Beginning from the cuff and working up:
Using CC1 and smaller DPNs, cast on 32 (40, 40) sts using a Provisional Cast On, place marker and join to begin working in the rnd.
Rnds 1 & 3: Knit
Rnd 2: *K2tog, yo; rep from * to end of rnd.
Hemming Round: Place the stitches from the provisional cast on onto a second set of needles or circular needle. (K2tog) to end of rnd, each time inserting the needle into the next active stitch and the next corresponding cast on stitch, then knit the two stitches together. This will hem the two sets of stitches together, it does not act as a normal decrease. (32 (40, 40) sts)
Rnd 4: Purl
Cut yarn and switch to MC, then continue:
Rnd 5: *K1, yo, K2, (sl 1, K2tog, psso), K2, yo; rep from * to end of rnd
Rnds 6 & 8: Knit
Rnd 7: *K2, yo, K1, (sl 1, K2tog, psso), K1, yo, K1; rep from * to end of rnd
Rnd 9: *K3, yo, (sl 1, K2tog, psso), yo, K2; rep from * to end of rnd
Rnd 10: Knit until 2 sts remain before marker, place new marker. This marker is now the beginning of the round. Stop knitting and remove the old BOR marker. Re-adjust your stitches as needed, then continue.
Rnds 11-15: Repeat Rnds 5-9
Cut yarn and switch to CC2, then continue:
Rnd 16: Knit
Rnd 17: Purl, adjusting your stitches by -3 (-3, +1) within the rnd. (29 (37, 41) sts)
Rnd 18: K15 (18, 21), place marker, M1R, K1, M1L, place marker, K to end of rnd. (31, 39, 41 sts)
(Note: The stitches within the two new markers are the thumb gusset stitches, which will continue to grow as we begin to work the hand.)
(Note: Wherever the term ‘slip marker’ is used, it denotes moving the marker from the left needle to the right needle, not removing the marker.)
Rnd 19: *K1, p1*; rep from * to * until marker, slip marker, K to next marker, slip marker, rep from * to * until end of rnd.
Rnd 20: Knit
Rnd 21: K to marker, slip marker, M1R, K to marker, M1L, slip marker, K to end of rnd. (2 sts increased)
Rnd 22: *P1, k1*; rep from * to * until marker, slip marker, K to next marker, slip marker, rep from * to * until end of rnd.
Rnd 23: Knit
Rnd 24: Rep rnd 21 (2 sts increased)
Repeat Rnds 19-24 until you have 15 (19, 23) thumb gusset stitches between the two markers, ending with Rnd 24. Your total number of stitches should be 43 (55, 63). The hand should measure 2.25” (3, 3.75”) from the beginning of the thumb gusset.
Post-Gusset Rnd 1: *K1, p1*; rep from * to * until marker, remove marker, place next 15 (19, 23) sts on scrap yarn, remove marker, rep from * to * until end of rnd. (28, 36, 40 sts)
Rnds 2 & 3: Knit
Rnd 4: *P1, k1; rep from * until end of rnd
Rnds 5 & 6: Knit
Rnd 7: *K1, p1; rep from * until end of rnd
Repeat Post-Gusset Rnds 2-7 until the mitten measures 6.5 (7, 7.5) inches (or 1.5 inches shorter than the desired finished length), ending with any round.
Cut yarn and switch to CC1, then continue:
Fingertip Rnd 1: Knit
Rnd 2: Purl
Cut yarn and switch to MC, then continue:
Rnd 3: Knit
Re-arrange your stitches as follows onto 3 DPNs, to make it easier to complete fingertip shaping: Place 14 (18, 20) sts on first needle, then 7 (9, 10) sts each on the second and third needles.
Rnd 4: SSK, K until 2 sts remain on first needle, K2tog, SSK, K until 2 sts remain, K2tog. (24, 32, 36 sts)
Rnds 5, 7 & 9: Knit
Rnd 6: Repeat Rnd 4. (20, 28, 32 sts)
Rnd 8: Repeat Rnd 4. (16, 24, 28 sts)
Rnd 10: (SSK) twice, K until 4 sts remain on first needle, (K2tog) twice, (SSK) twice, K until 4 sts remain, (K2tog) twice. (8, 16, 20 sts)
Rnd 11 (FOR SIZES MED & LARGE ONLY): Repeat Rnd 4. (4 (12, 16) sts)
Remove marker and combine the sts from the second and third needles onto one needle. You should now have two needles, each with 4 (6, 8) sts. Cut yarn, leaving a long tail. Thread the tail onto a tapestry needle and graft the two sets of stitches together using Kitchener Stitch, or the grafting method of your choice.
Thumb
Place the 15 (19, 23) sts from the scrap yarn onto 3 DPNs for the thumb. Place marker and join CC2 to begin working in the round.
Rnd 1: Knit around, decreasing 1 (3, 5) stitches within round. (14, 16, 18 sts)
Knit 6 (8, 10) rnds.
Decrease Rnd 1: *K2, K2tog; rep from * until 2 (0, 2) sts remain, K2 (0, 2). (11, 12, 14 sts)
Decrease Rnd 2: *K1, K2tog; rep from * until 2 (0, 2) sts remain, K2 (0, 2). (8, 8, 10 sts)
Decrease Rnd 3 (FOR SIZE LARGE ONLY): (K3, K2tog) twice. (8 sts)
Cut yarn, leaving a short tail. Thread tail through the remaining stitches and cinch to close.
Finishing
Weave in all yarn ends.
BOW: Cut three 24” lengths of CC3 and braid together. Thread the braid onto a tapestry needle and using the pictures as a guide; weave the braid up and down through the stitches just below the second color change (between cuff rounds 15-16). Bring the two ends together at the center of the top of the mitten and tie together in a bow. Tie off and trim the ends as needed.
EMBROIDERY: Using the pictures as a guide, or your own inspiration…embroider small Lazy Daisy flowers on the top side of the mitten using MC, CC1 and CC3. Finish the centers of the flowers with CC2 French Knots. Weave in or knot all yarn ends on the inside of the mitten.
Scarf Pattern (knit in two halves)
Using CC1 and larger straight needles, cast on 41 sts using a Provisional Cast On.
Rows 1 & 3: Purl
Row 2: *K2tog, yo; rep from * until 1 st remains, K1
Hemming Row: Place the stitches from the provisional cast on on a spare needle. Fold the two sets of stitches together with wrong sides touching. (K2tog) to end of row, each time inserting the needle into the next active stitch and the next corresponding cast on stitch, then knit the two stitches together. This will hem the two sets of stitches together. (41 sts)
Row 4 (WS): K to end of row.
Cut yarn and switch to MC, then continue:
(Note: You can work Rows 5-20 using the written or charted instructions)
Row 5: K2tog, K3, yo, *K1, yo, K3, (sl 1, K2tog, psso), K3, yo; rep from * until 6 sts remain, K1, yo, K3, ssk
Even Rows 6-20: Purl
Row 7: K2tog, K2, yo, K1, *k2, yo, k2, (sl 1, K2tog, psso), k2, yo, K1; rep from * until 6 sts remain, K2, yo, k2, ssk
Row 9: K2tog, K1, yo, K2, * k3, yo, K1, (sl 1, K2tog, psso), k1, yo, k2; rep from * until 6 sts remain, k3, yo, k1, ssk
Row 11: K2tog, yo, k3, *K4, yo, (sl 1, K2tog, psso), yo, K3; rep from * until 6 sts remain, k4, yo, ssk
Row 13: K1, *yo, K3, (sl 1, K2tog, psso), k3, yo, k1; rep from * until 10 sts remain, yo, k3, (sl 1, K2tog, psso), k3, yo, k1
Row 15: K1, *k1, yo, k2, (sl 1, K2tog, psso), k2, yo, k2; rep from * until 10 sts remain, k1, yo, k2, (sl 1, K2tog, psso), k2, yo, k2
Row 17: K1, *k2, yo, k1, (sl 1, K2tog, psso), k1, yo, k3; rep from * until 10 sts remain, k2, yo, k1, (sl 1, K2tog, psso), k1, yo, k3
Row 19: K1, *k3, yo, (sl 1, K2tog, psso), yo, k4; rep from * until 10 sts remain, k3, yo, (sl 1, K2tog, psso), yo, k4
Repeat Rows 5-20 once more, then repeat Rows 5-12 once more.
Cut yarn and switch to CC2, then continue:
Stripe Rows 1 & 2: Knit
Row 3: *K2tog, yo; rep from * until 1 st remains, K1
Rows 4 & 5: Knit
Cut yarn and switch to MC, then continue:
Center Rows 1 & 3: Purl
Row 2 (RS): *P1, k1; rep from * until end of row ending with p1.
Rows 4 & 6: Knit
Row 5: *P1, k1; rep from * until end of row ending with p1.
Repeat Center Rows 1-6 until the piece measures 30 inches or half the desired length of the scarf, ending with Row 3.
Make a second half the same, ending with Row 5. Cut yarn, leaving a long tail for grafting.
Graft the two halves together using Kitchener Stitch or the grafting method of your choice.
Finishing Embroidery
Block scarf to measurements; 10” x 60” (depending on your yarn, the scarf will likely relax to closer to 9.5” in width after blocking).
Using the pictures as a guide, or your own inspiration…embroider small Lazy Daisy flowers all over the center section of the scarf using CC1, CC2 and CC3. Finish the centers of the CC1 and CC3 flowers with CC2 French Knots. For the CC2 flowers, finish with MC French knots. Weave in all yarn ends.
(Using the pictures as a guide) To finish the braided bow at each end of the scarf, as shown, you will be working two braids connected to the scarf (one from each side), which will meet in the center and be tied into a bow. To do this; cut three 48” lengths of CC3. Holding them together, fold them in half to find the middle. Bring one end of the set through the first CC2 eyelet on any side of the scarf. Pull it through up to the middle point. You will now have 6 strands of yarn to work with. Divide them into pairs of 2 and braid until the end, then tie off. This should give you a double-thick braid, connected to one end of the eyelet row. Repeat this process again to create another braid on the other end of the eyelet row. Then thread the braids up and down through the eyelets until they meet in the center. Tie into a cute bow and trim as needed. Repeat the same steps on the eyelet row on the other end of the scarf.