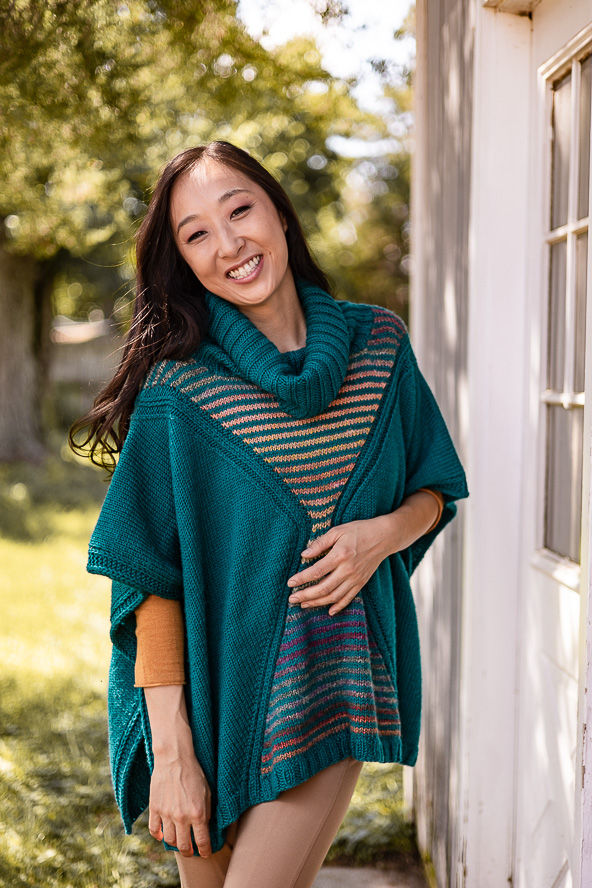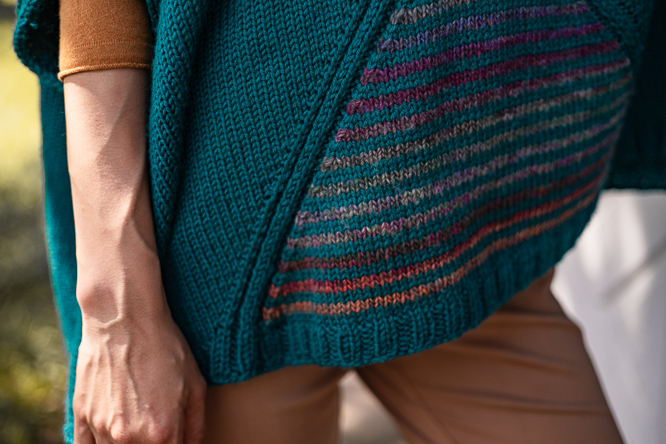
Give a simple rectangular poncho some drama and it becomes rippling waters at sunset at your favorite lake. Shifting twisted stitches in a flattering hourglass shape form the borders of the colorful center panel that’s knit in a gradient yarn alternately striped with the main color. A beautiful border, knit at the same time as the poncho, and a generous cowl complete this stunning poncho.
Time: Three Week Project
Skill Level: Intermediate
Size: S/M (L/XL, 2X/3X)
Finished measurements
Chest: 72 (79, 86)”
Length at center back: 24 (26.5, 29)”
Shown in size S-M.
Gauge: 18 sts and 25 rows = 4” [10 cm] Berroco Ultra® Wool in St st
Materials
Yarn:
 Berroco Ultra® Wool (100% Fine Highland Wool, 370 yards [338 meters] 150 grams: #3361 Kale (MC, 6 (7, 8) skeins)
Lang Frida (100% Virgin Wool, 240 yards [220 meters] 100 grams: #1078.0005 (CC, 1 (1, 2) skeins)
Needles:
US size 8 (5 mm) 40” (100 cm) circular needle or size needed to obtain gauge
US size 8 (5 mm) 24” (60 cm) circular needle or size needed to obtain gauge
Notions:
Stitch markers, removable stitch markers, stitch holders, tapestry needle, scissors
Abbreviations
Left lifted increase (LLI): Lift the left leg of the stitch 2 rows below the stitch on right-hand needle onto left-hand needle and knit it through the back loop. (1 stitch increased).
Right lifted increase (RLI): Lift right leg of the stitch below the next stitch on the left-hand needle onto the left-hand needle and knit it. (1 stitch increased).
Special Stitches
Borders
This poncho has an 8-stitch border on side edges.
Right Border (right side): Sl1k, Sl1p, K4, Sl1p, P1
Left Border (right side): P1, Sl1p, K4, Sl1p, P1
Right Border (wrong side): Sl1k, P1, K4, P1, K1
Left Border (wrong side): K1, P1, K4, P2
Three-Needle Bind Off
Hold both pieces of knitting with right sides together.
Insert needle into first st on front needle and first stitch on back needle, and knit them together. *Repeat this for the next st on the front and back needles. Draw the first st worked over the second st.*
Repeat from * to * until all sts have been bound off. Break yarn and draw through remaining st.
Pattern Notes
The poncho is worked in the intarsia method, back and forth on a circular needle.
Use separate skeins of yarn for each section of color.
Interlock yarns at intarsia joins by bringing the working yarn under the resting yarn.
Carry contrasting color up rather than cutting.
The number of stitches remains the same until bind off for necklines. There are two increases and two decreases on right side rows.

Pattern
With MC, CO 162 (178, 194) sts with German Twisted cast on or another stretchy cast on.
Back
Ribbing
Row 1 (RS): With MC, Right border (see special stitches, above), pm, *K2, P2, repeat from * to last 10 sts, K2, pm, Left border.
Row 2 (WS): Right border, sl marker, *P2, K2, repeat from * to last 10 sts, P2, sl marker, Left border.
Rows 3-4: Rep Rows 1-2.
Row 5: Rep Row 1.
Row 6 (WS): Right border, sl marker, (P2, K2) 7 (8, 9) times, P2, pm, K2, P2, K2, pm, (P2, K2) 18 (20, 22) times, P2, pm, K2, P2, K2, pm, (P2, K2) 7 (8, 9) times, P2, Sl marker, Left border.
Lower Back
Row 1 (RS): With MC, Right border, sl marker, K to marker, LLI, sl marker, P2, K2tbl, P2, sl marker, SSK, K to 2 sts before marker, K2tog, sl marker, P2, K2tbl, P2, sl marker, RLI, K to marker, sl marker, Left border.
Row 2 (WS): With MC, Right border, sl marker, P to marker, sl marker, K2, P2, K2, sl marker, P to marker, sl marker, K2, P2, K2, sl marker, P to marker, sl marker, Left border.
Row 3 (RS): With MC, Right border, sl marker, K to marker, LLI, sl marker, P2, K2tbl, P2, sl marker. With CC, SSK, K to 2 sts before marker, K2tog, sl marker. With MC, P2, K2tbl, P2, sl marker, RLI, K to marker, sl marker, Left border.
Row 4 (WS): With MC, Right border, sl marker, P to marker, sl marker, K2, P2, K2, sl marker. With CC, P to marker, sl marker. With MC, K2, P2, K2, sl marker, P to marker, sl marker, Left border.
Rows 5 – 68 (76, 84): Rep Rows 1-4 (another 16 (18, 20) more times.
Transition Rows
Row 69 (77, 85) (RS): With MC, Right border, sl marker, K to marker, sl marker, P2, K2tbl, P2, sl marker, K to marker, sl marker, P2, K2tbl, P2, sl marker, K to marker, sl marker, Left border.
Row 70 (78, 86): Rep Row 2.
Upper Back
Row 71 (79, 87) (RS): With MC, Right border, sl marker, K to 2 sts before marker, K2tog, sl marker, P2, K2tbl, P2, sl marker. With CC, RLI, K to marker, LLI, sl marker. With MC, P2, K2tbl, P2, sl marker, SSK, K to marker, sl marker, Left border. Updated 3/28/2023
Row 72 (80, 88) (WS): With MC, Right border, sl marker, P to marker, sl marker, K2, P2, K2, sl marker. With CC, P to marker, sl marker. With MC, K2, P2, K2, sl marker, P to marker, sl marker, Left border.
Row 73 (81, 89) (RS): With MC, Right border, sl marker, K to marker, K2tog, sl marker, P2, K2tbl, P2, sl marker, RLI, K to marker, LLI, sl marker, P2, K2tbl, P2, sl marker, SSK, K to marker, sl marker, Left border. Updated 3/28/2023
Row 74 (82, 90) (WS): With MC, Right border, sl marker, P to marker, sl marker, K2, P2, K2, sl marker, P to marker, sl marker, K2, P2, K2, sl marker, P to marker, sl marker, Left border.
Rows 75 (83, 91) – 138 (154, 170): Rep previous 4 Rows another 16 (18, 20) more times.
Row 139 (155, 171): Rep Row 71 (79, 87).
Row 140 (156, 172): Rep Row 72 (80, 88).
Row 141 (157, 173) (RS): With MC, Right border, sl marker, K to marker, K2tog, sl marker, P2, K2tbl, P2, sl marker, RLI, K15 (17, 19). Transfer stiches just worked to stitch holder. Continuing with stitches on needle, BO 44 (48, 56) sts. K15 (17, 19), LLI, Sl marker, P2, K2tbl, P2, Sl marker, SSK, K to marker, Sl marker, Left border.
Shape Left Neckline
Still working with 2 skeins of MC and 1 skein of CC.
Row 142 (158, 174) (WS): With MC, Right border, sl marker, P to marker, sl marker, K2, P2, K2, sl marker, P to end.
Row 143 (159, 175) (RS): With CC, K1, SSK, K to marker, sl marker, LLI, sl marker. With MC, P2, K2tbl, P2, sl marker, SSK, K to marker, sl marker, Left border.
Row 144 (160, 176) (WS): With MC, Right border, sl marker, P to marker, sl marker, K2, P2, K2, sl marker. Cut second skein of MC leaving an 8” tail to weave in. With CC, P to end. Cut CC, leaving an 8” tail to weave in.
Row 145 (161, 177) (RS): With MC, K1, SSK, K to marker, sl marker, LLI, sl marker, P2, K2tbl, P2, sl marker, SSK, K to marker, sl marker, Left border.
Row 146 (162, 178) (WS): Rep Row 142. Cut MC, leaving an 8” tail to weave in.
Transfer stiches to stitch holder.
Shape Right Neckline
Transfer stiches from holder on right shoulder to needle with WS facing and reattach MC.
Working with 1 skein of MC and 1 skein of CC.
Row 142 (158, 174) (WS): With MC, P to marker, sl marker, K2, P2, K2, sl marker, P to marker, sl marker, Left border.
Row 143 (159, 175) (RS): With MC, Right border, sl marker, K to 2 sts before marker, K2tog, sl marker, P2, K2tbl, P2, sl marker. With CC, RLI, K to 3 sts before end, K2tog, K1.
Row 144 (160, 176) (WS): With CC, P to marker, sl marker. With MC, K2, P2, K2, sl marker, P to marker, sl marker, Left border.
Row 145 (161, 177) (RS): With MC, Right border, sl marker, K to 2 sts before marker, K2tog, sl marker, P2, K2tbl, P2, sl marker, RLI, K to 3 sts before end, K2tog, K1.
Row 146 (162, 178) (WS): Rep Row 142. Cut MC, leaving a 45” tail for three-needle bind off.
Transfer stiches to stitch holder.
Front
Work as for back through Row 74 (82, 90).
Rows 75 (83, 91)– 130 (142, 154): Rep previous 4 Rows another 14 (15,16) more times.
Row 131 (143, 155): Rep Row 71.
Row 132 (144, 156): Rep Row 72.
Row 133 (145, 157) (RS): With MC, Right border, sl marker, K to marker, K2tog, sl marker, P2, K2tbl, P2, sl marker, RLI, K13. Transfer stiches just worked to stitch holder. Continuing with stitches on needle, BO 36 (40, 44) sts. K13, LLI, sl marker, P2, K2tbl, P2, sl marker, SSK, K to marker, sl marker, Left border.
Shape Left Neckline
Still working with 2 skeins of MC and 1 skein of CC.
Row 134 (146, 158) (WS): With MC, Right border, sl marker, P to marker, sl marker, K2, P2, K2, Sl marker, P to end.
Row 135 (147, 159) (RS): With CC, K1, SSK, K to marker, sl marker, LLI, sl marker. With MC, P2, K2tbl, P2, sl marker, SSK, K to marker, sl marker, Left border.
Row 136 (148, 160) (WS): With MC, Right border, sl marker, P to marker, sl marker, K2, P2, K2, Sl marker. With CC, P to end.
Row 137 (149, 161) (RS): With MC, K1, SSK, K to marker, sl marker, LLI, sl marker, P2, K2tbl, P2, sl marker, SSK, K to marker, sl marker, Left border.
Rows 138 (150, 162) – 141 (157, 173): Repeat Rows 134-137 another 1 (4, 6) more times.
Row 142 (158, 174) (WS): Repeat Row 134 (146, 158).
Row 143 (159, 175) (RS): Repeat Row 135 (147, 159).
Row 144 (160, 176) (WS): With MC, Right border, sl marker, P to marker, sl marker, K2, P2, K2, sl marker. Cut second skein of MC leaving an 8” tail to weave in. With CC, P to end. Cut CC, leaving an 8” tail to weave in.
Row 145 (161, 177) (RS): Repeat Row 137 (149, 161).
Row 146 (162, 178) (WS): Repeat Row 134 (146, 158). Transfer stitches to a stitch holder. Cut MC, leaving an 8” tail to weave in.
Shape Right Neckline
Transfer stiches from holder on right shoulder to needle with WS facing and reattach MC.
Working with 1 skein of MC and 1 skein of CC.
Row 134 (146, 158) (WS): With MC, P to marker, sl marker, K2, P2, K2, sl marker, P to marker, sl marker, Left border.
Row 135 (147, 159) (RS): With MC, Right border, sl marker, K to 2 sts before marker, K2tog, sl marker, P2, K2tbl, P2, sl marker. With CC, RLI, K to 3 sts before end, K2tog, K1.
Row 136 (148, 160) (WS): With CC, P to marker, sl marker. With MC, K2, P2, K2, sl marker, P to marker, sl marker, Left border.
Row 137 (149, 161) (RS): With MC, Right border, sl marker, K to 2 sts before marker, K2tog, sl marker, P2, K2tbl, P2, sl marker, RLI, K to 3 sts before end, K2tog, K1.
Rows 138 (150, 162) – 141 (157, 173): Repeat Rows 134-137 another 1 (4, 6) more times.
Row 142 (158, 174) (WS): Repeat Row 134 (146, 158).
Row 143 (159, 175) (RS): Repeat Row 135 (147, 159).
Row 144 (160, 176) (WS): With CC, P to marker, sl marker. Cut CC, leaving an 8” tail to weave in. With MC, K2, P2, K2, sl marker, P to marker, sl marker, Left border.
Row 145 (161, 177) (RS): With MC, Right border, sl marker, K to 2 sts before marker, K2tog, sl marker, P2, K2tbl, P2, sl marker, RLI, K to 3 sts before end, K2tog, K1.
Row 146 (162, 178) (WS): Repeat Row 134 (146, 158). Cut MC, leaving a 45” tail for three-needle bind off.
Attaching shoulders
Transfer shoulder stitches from holder back to needle. Use 3-needle bind off to join shoulder stitches.
Block poncho to 36 (40, 44)” w X 48 (53, 58)” h.
Cowl
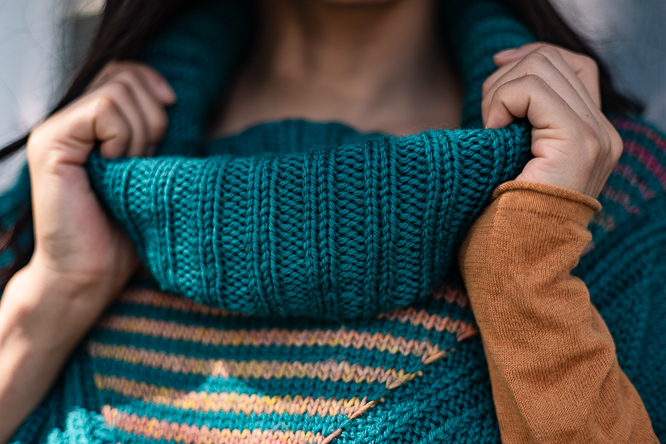
With right side facing, using 24″ circular needle and MC, begin at left shoulder seam, pick up and knit 12 (18, 24) sts along left front neck edge, 2 sts at corner, 36 (40, 44) sts across front neck edge, 2 sts at corner, 12 (18, 24) sts along right front edge, 4 sts along right back edge, 44 (48, 56) sts across back neck edge, then 4 sts along left back edge – 116 (136, 160) sts. Pm and join for working in the round. Work even in K2, P2 ribbing for 12 (13, 14)”. Bind off loosely in pattern.

Finishing
Block cowl portion of poncho to 12 (14, 16)” w x 12 (13, 14)”.” h.
Weave in ends.
Place removable markers 11.5 (13, 14.5)” from top seam in purl ridge between border and body stitches on both front and back of poncho. Smooth poncho out (wrong sides facing), matching stitch markers at each side. Tack front to back at markers to create arm holes.


Loved this pattern and finally wore it at a bonfire tonight!
Oh this makes me so happy to hear! – Nicola, Editor
Once again I have reached out to the designer. I have found it hard to make sense of the pattern. The number of live neckline stitches for the front and back are different for the 3 needle bind off. I don’t understand how I can do the shoulder seam with different stitch counts. On the back there are 5 rows after row 141(bind off row) On the front there are24 additional rows after Row 133(bind off row).
I am enjoying knitting this poncho. I just finished the transition rows on the back and ready to start the upper back. I don’t understand why I stop with 2 stitches remaining to do the LL1. The pattern reads
With CC RL1, K to 2 stitches before marker, LL1, slip marker.
I think it should read k to marker LL1 slip marker.
Please let me know if this is an error in the pattern.
Hello! I’ve reached out to the designer for advice and she or I will reply as soon as possible. Thanks! – Nicola, Editor
Hi Barbara, this portion of the pattern has been updated above, thank you for bringing this to our attention! – Nicola, Editor
I like the colour scheme and design.
How much positive ease do you recommend for the poncho
From the designer: the sample was knit with about 30″ – 34″ of positive ease.
Hope this helps! – Nicola, Editor