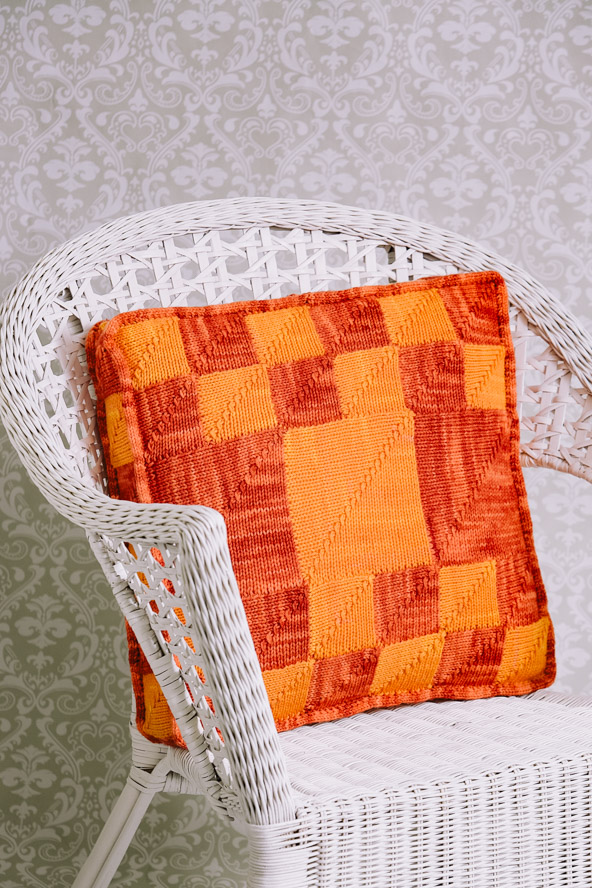
Refresh your home décor with the Heartwood Cushion, a quick and satisfying knit that adds a vibrant touch to any space. Featuring a striking mitered-square design, this cushion is elevated by elegant I-cord embellishments that create a polished finish. The pattern is an excellent way to showcase the tonal beauty of hand-dyed yarn, making each piece uniquely yours. Whether you’re brightening up a living room or adding a cozy accent to a bedroom, this cushion is a fun and cost-effective way to introduce color and texture to your home.
Skill Level: Intermediate
Size: 18” tall x 18” wide x 3” deep
Gauge: Small square = approximately 3″/7.5cm after blocking
Materials
 Yarn: Shalimar Yarns Honey Worsted (100% superwash merino; 250 yards [229 meters]/100 grams): Tequila Sunrise (MC, 3 hanks), Melba (CC, 2 hanks) (Note: Shalimar Equus yarn works as substitute.)
Needles: US size 4 (3.5 mm) straight and double pointed needles
Notions: Pillow form 18” x 18” x 3”, tapestry needle
Abbreviations
sk2p: Sl 1, k2tog, pass slipped st over knit st.
Pattern Notes
Slip the first st of every row of every square to make picking up stitches easier. Slip knitwise on RS rows, and purlwise on WS rows.
Pattern
Front – First Third
First Square
With MC, CO 23 with a long-tail or similar cast-on.
Row 1 (WS) and all WS rows: P across.
Row 2 (RS): K 10, sk2p, k across. (21 sts, 10 on either side of a central decrease)
Row 4: K 9, sk2p, k 9. (19 sts, 9 on either side of a central decrease)
Continue on in pattern as established, working 1 less knit st before and after the decrease on each RS row, purling every WS row, until 3 sts remain after a WS row.
Final Row: Sk2p. End off.
Second Square
With CC, CO 11 sts, pick up 12 sts evenly spaced along right hand side of square just completed.
Rep First Square instructions from Row 1-end.
Third and Fifth Squares
With MC, rep all instructions of Second Square.
Fourth and Sixth Squares
With CC, rep all instructions of Second Square.
Seventh Square
With CC, pick up 11 sts evenly spaced along top of First Square, then cast on 12 sts. Rep First Square instructions from Row 1-end.
Eighth Square
With MC, pick up 11 sts evenly spaced along top of Second Square, then 12 more sts evenly spaced along side of square just completed.
Rep First Square instructions from Row 1-end.
Ninth and Eleventh Squares
With CC, rep all instructions from Eighth Square.
Tenth and Twelfth Squares
With MC, rep all instructions from Eighth Square.
Center
First Large Square
With MC, pick up 22 sts evenly spaced along top of Seventh and Eighth Squares, then cast on 23 sts. Rep First Square instructions from Row 1-end.
Second Large Square
With CC, pick up 22 sts evenly spaced along top of Ninth and Tenth Squares, then pick up 23 sts along side of square just completed. Rep First Square instructions from Row 1-end.
Third Large Square
With MC pick up 22 sts evenly spaced along top of Eleventh and Twelfth Squares, then pick up 23 sts along side of square just completed. Rep First Square instructions from Row 1-end.
Last Third
First Square
With MC, pick up 11 sts evenly spaced along top of First Large Square, working from the center of that square to the outside edge, then cast on 12 sts. Rep First Square instructions of First Third from Row 1-end.
Second Square
With CC, pick up 11 sts evenly spaced along top of First Large Square, working from the right edge of that square to the center, then 12 more sts evenly spaced along side of square just completed.
Rep First Square instructions First Third from Row 1-end.
Third and Fifth Squares
With MC, rep all instructions from Second Square, working from center to the left hand edge of the Large Square below.
Fourth and Sixth Squares
With CC, rep all instructions from Second Square, working from right hand edge to the center of the Large Square below.
Seventh through Twelfth Squares
Rep Seventh through Twelfth Squares of First Third, working on top of the row of squares just completed.
Back
Rep all instructions for Front.
Gusset
Work First Square and Second Square from First Third.
Continue on in pattern as established, alternating MC and CC and joining each square to the one before until 24 squares are completed.
Finishing
Wet block each piece.
Assemble cushion by joining Front to one side of Gusset, and Back to the other side of Gusset with applied I-cord edging as written below. Remember to insert the pillow form into the cushion cover before closing it completely!
I-Cord Note: Because of the slipped stitches, I worked one round of plain I-cord between every row of applied I-cord to make sure the finished cord wouldn’t pucker. Your gauge may vary – you may add or subtract plain rows between applied rows as needed to make your I-cord sit neatly.
Applied I-cord
With MC, cast on 4 sts to DPN.
Row 1: K4, pick up 1 st through 2 pieces of fabric (Front or Back and Gusset), slide stitches to right side of needle.
Row 2: K 3, k2tog, slide sts to right side of needle.
Rep Rows 1 and 2 for pattern all the way around the cushion, working extra plain rows at each corner to accommodate the turn. Bind off when you reach the beginning.
Using a tapestry needle, sew beginning and end of I-cord together.
Weave in all ends.