

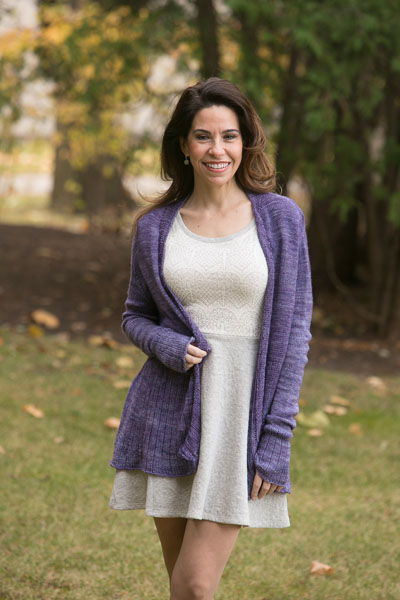
The Open Cloud Cardigan is that special, lightweight cardigan you always reach for when you need just a little something extra. The top is knit in easy stockinette and the lower half switches to an easy rib pattern to add interest and texture.
Skill Level: Intermediate
Size: Finished Bust size: 32 [36, 38, 42, 46,50,52]”, meant to be worn open, pattern offers about 2” of positive ease, but is meant to be fitted in the upper arms
Gauge: 20 sts/32 rows = 4 [10 cm] in Stockinette Stitch
Materials
Yarn: Anzula Cloud (80% superwash merino, 10% cashmere, 10% nylons; 575 yards [525 meters]/100 grams): Fiona (2 (2, 3, 3, 3, 4, 4) skeins)
Needles: US Size 7 (4.4 mm) 32” circular and a set of 4 DPNs
Notions: Stitch markers, yarn needle, waste yarn, tape measure
Abbreviations
Kf/b: Knit into the front and the back of 1 stitch
Pf/b: Purl into the front and the back of 1 stitch
3×1 Rib: Straight
Row 1 (RS): K3, p1.
Row 2 (WS): P3, k1.
Repeat these two rows for pattern.
3X1 Rib: Round
Row 1: K3, p1.
Repeat Row 1 for pattern.
Pattern
Cast on 34 (36, 38, 42, 44, 46, 52) sts.
Row 1 (RS): K1, pm, k2, pm, knit 28 (30, 32, 36, 38, 40, 46) sts, pm, k2, pm, k1.
Row 2 (WS): Pf/b, sm, p2, sm, pf/b, purl to first stitch before m, pf/b, sm, p2, sm, pf/b (4 sts increased). (32(34,36,40,42,44,50) sts)
Row 3: K1, kf/b, sm, k2, sm, Kf/b, knit to 1 st before m, kf/b, sm, k2, sm, kf/b. (4 sts increased)
Row 4: Purl to 1 st before m, pf/b, sm, p2. sm, pf/b, purl to first stitch before m, pf/b, sm, p2, sm, Pf/b, purl to end.
Row 5 (RS): Kf/b, knit to 1 st before m, kf/b, sm, k2, sm, kf/b, knit to 1 st before m, kf/b, sm, k2, sm, kf/b, knit to last st, kf/b. (6 sts increased)
Repeat rows 4 and 5 until sleeve seam measures 3.5 (4, 4.5, 5, 5.5, 6, 6.5)”/ 9.0 [10.0, 11.5, 12.5, 14.0, 15.0, 16.5] cm, ending with a WS row. (31 (37,43,49,54,60,66) front sts, 74 (84, 90, 106, 112, 122, 136) back sts, 2 sts for each seam, 136 (158, 176, 204, 220, 242, 276) sts)
Sleeves
Move markers so that there are 6 sts between them.
RS: K29(35, 41, 47,5 2, 58, 64) sts, pm, kf/b, k4, kf/b, pm, k70 (80, 86, 102, 108, 1118, 132) sts, pm, kf/b, k4, kf/b, pm, k29 (35, 41, 47, 52, 58, 64) sts.
WS: *P to m, sm, Pf/b, p to 1 st before m, Pf/b, sm, repeat from * once, purl to end of the row
Repeat last two rows one time.
RS: *Knit to 1 st before m, Kf/b, sm, Kf/b, knit to 1 st before m, Kf/b, sm, Kf/b; rep from * once. (8 sts increased)
WS: Purl across row.
Repeat last two rows until yoke measures 6.5 [7, 7.5, 8, 8.5, 9, 9.5]”/ 16.5 [18.0, 19.0, 20.5, 21.5, 23.0, 24.0] cm.
Separate Sleeves
RS: Knit 53 (61, 68, 76, 83, 91, 98) sts, remove m, slip 56 (60, 62, 66, 70, 73,76) sleeve sts to scrap yarn, CO 4 (4, 2, 2, 6, 11, 12) sts, knit across back 114 (128, 132, 156, 166, 178, 194) sts, remove m, slip 56 (60, 62, 66, 70, 73, 76) sleeve sts to scrap yarn, CO 4 (4, 2, 2, 6, 11, 12) sts, knit 53 (61, 68, 76, 83, 91, 98) sts. (228 (258, 272, 312, 344, 382, 414) body sts)
Body
Work even in St st until underarm measures 4”/10.0 cm, ending with a RS row.
(WS): Purl across row, increasing 0 (2, 0, 0, 0, 2, 2) sts evenly across row.
(RS): Purl 1 Row.
Work in K3, p1 rib until piece measures 18”/ 45.5 cm from underarm, or until desired length. Bind off in pattern.
Sleeves (Make 2)
Divide 56 (60, 62, 66, 70, 73, 76) sleeve sts evenly over 3 dpns. Pick up and knit 2 (2, 1, 1, 3, 5, 6) sts along CO sts at underarm, pm, pick up and knit 2 (2, 1, 1, 3, 6, 6) sts along CO sts at underarm. Join for working in the rnd. (60 (64, 64, 68, 76, 84, 88) sleeve sts)
Knit 10 Rnds.
Decrease Round: K1, k2tog, knit to 3 sts before m, ssk, k1. (2 sts dec)
Repeat dec rnd every 5 rnds times 11 (13, 11, 13, 17, 19, 19) times. (36 (36, 40, 40, 40, 40, 44, 48) sleeve sts)
Knit until arm measures 12”/ 30.5 cm from underarm (or 5”/12.5 cm less than desired length).
Work in 3X1 rib for 5”/ 12.5 cm. Bind off in rib pattern.
Collar
Starting at right front bottom edge, pick up 2 sts for every 3 rows of the right front edge. The pick up 1 sts for every stitch across the top of the right sleeve, across the back, then across the top of the left sleeve. Finish by picking up 2 sts over every 3 rows along the left front edge. Count your stitches to insure that you have a multiple of 4, decreasing or increasing stitches if necessary. Work collar in 3×1 rib for 2”/ 5.0 cm, or to desired length.
Bind off loosely in pattern.
Finishing
Weave in ends. Block to measurements. 
Finishing says block to measurements, but there are none. Can a blocking diagram be provided?
Hello Kimberly! I’ve reached out to the designer for advice and she or I will reply as soon as possible. Thanks! – Nicola, Editor
Hi I’m a little confused,
I have got to the point sleeves
I have 49st front
102 back (2×2 seam st) =106
204 in total.
Move markers so 6 sts between
K 47 pm kfb k 4 kfb pm = 8 not sure were I’m going wrong is this section correct
Thanks
Hello Sandy! I’ve reached out to the designer for advice and she or I will reply as soon as possible. Thanks! – Nicola, Editor
It would be really helpful to have a schematic which shows the direction of the knitting. Also a pattern note explaining the construction e.g. this is seamless construction bottom up? top down? that starts at where? and then builds to where? thank you
Hello Siobhan! I’ve reached out to the designer for advice and she or I will reply as soon as possible. Thanks! – Nicola, Editor
The sweater is knit from the top-down, with a contiguous set-in sleeve construction, which means that the yoke can be worked continuously right from the cast-on. You work the front, shoulder seam, back, other shoulder seam, and then the other front, from the top-down.
Pattern indicates where you split the sleeves, and then continue to work the body to the bind off.
Hope this helps! – Nicola, Editor
I have a question in the section just before the body it says those are sleeves but then under the body, it lists sleeves X2 is that the Yoke first instead?
or actually please explain this. I am confused as to the sleeves then separate sleeves then body and then sleeves again “Sleeves
Move markers so that there are 6 sts between them.
RS: K29(35, 41, 47,5 2, 58, 64) sts, pm, kf/b, k4, kf/b, pm, k70 (80, 86, 102, 108, 1118, 132) sts, pm, kf/b, k4, kf/b, pm, k29 (35, 41, 47, 52, 58, 64) sts.
WS: *P to m, sm, Pf/b, p to 1 st before m, Pf/b, sm, repeat from * once, purl to end of the row
Repeat last two rows one time.
RS: *Knit to 1 st before m, Kf/b, sm, Kf/b, knit to 1 st before m, Kf/b, sm, Kf/b; rep from * once. (8 sts increased)
WS: Purl across row.
Repeat last two rows until yoke measures 6.5 [7, 7.5, 8, 8.5, 9, 9.5]”/ 16.5 [18.0, 19.0, 20.5, 21.5, 23.0, 24.0] cm.
Separate Sleeves
RS: Knit 53 (61, 68, 76, 83, 91, 98) sts, remove m, slip 56 (60, 62, 66, 70, 73,76) sleeve sts to scrap yarn, CO 4 (4, 2, 2, 6, 11, 12) sts, knit across back 114 (128, 132, 156, 166, 178, 194) sts, remove m, slip 56 (60, 62, 66, 70, 73, 76) sleeve sts to scrap yarn, CO 4 (4, 2, 2, 6, 11, 12) sts, knit 53 (61, 68, 76, 83, 91, 98) sts. (228 (258, 272, 312, 344, 382, 414) body sts)
Body
Work even in St st until underarm measures 4”/10.0 cm, ending with a RS row.
(WS): Purl across row, increasing 0 (2, 0, 0, 0, 2, 2) sts evenly across row.
(RS): Purl 1 Row.
Work in K3, p1 rib until piece measures 18”/ 45.5 cm from underarm, or until desired length. Bind off in pattern.
Sleeves (Make 2)
Divide 56 (60, 62, 66, 70, 73, 76) sleeve sts evenly over 3 dpns. Pick up and knit 2 (2, 1, 1, 3, 5, 6) sts along CO sts at underarm, pm, pick up and knit 2 (2, 1, 1, 3, 6, 6) sts along CO sts at underarm. Join for working in the rnd. (60 (64, 64, 68, 76, 84, 88) sleeve sts)
Knit 10 Rnds.”
Hello! I’ve reached out to the designer for advice and she or I will reply as soon as possible. Thanks! – Nicola, Editor
Hi Sharleen! it is a seamless set-in sleeve construction, so there are 2 different sleeve sections because the first part is setting up the sleeve “seam” (that’s the second and second to last set of 2 sts). Once the seam measurement has been reached, you then start the construction of the actual seam, which is where you then move the sts so that there are 6 sts between the markers (you’ll have to follow the pattern to know how many stitches you need to adjust to have the fronts/backs, but there will now be 6 sts between the sleeve markers for all sizes.
Once the YOKE measurement (different from the sleeve seam!) has been reached, then you separate for the sleeves.
Hope this helps! – Nicola, Editor