

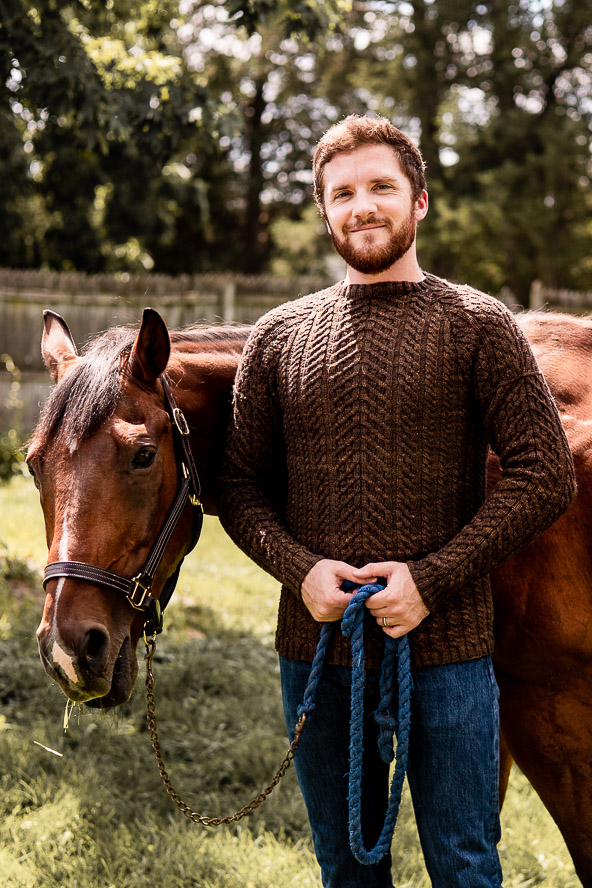
This is a classic cable pattern with a modern sleeve design. The cables are turned inside out on the sleeve cap! Felipe is bound to be a wardrobe staple.
Time: 60 hr project.
Skill Level: Intermediate
Size: Finished Bust Size 36.5 (42, 47, 52) (57, 62.5)” to fit bust 32.5 (38, 43, 49) (53, 58.5)”
4-6” positive ease recommended.
Shown in size 42”
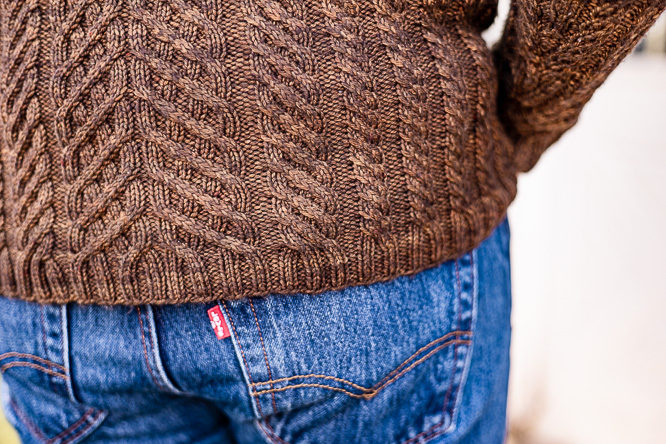
Gauge: 25 sts and 36 rows = 4” [10 cm] in Right & Left Cables after wet blocking
Materials
 Yarn: Yarnslayer Fibers, Merino Melee DK (85% Superwash Merino Wool, 15% Nylon; 246 yards [225 meters]/100 grams): OR59X2, 7 (8, 9, 10){11, 12} skeins
Hook/Needles: US 5 (3.75mm) 32-60” & 16” circular needles and DPNs
US 6 (4mm) 32-60” & 16” circular needles and DPNs
Notions: Markers, removable markers, stitch holders, cable needle, tapestry needle
Downloads
Updated Charts 3/28/2023
Abbreviations
2/2 LC: Slip 2 and hold in front, k2, k2 from cable needle.
2/2 LPC: Slip 2 and hold in front, p2, k2 from cable needle.
2/2 RC: Slip 2 and hold in back, k2, k2 from cable needle.
2/2 RPC: Slip 2 and hold in back, p2, k2 from cable needle.
Left lifted increase (LLI): Insert your left needle from back to front underneath stitch two stitches below the next stitch on the right needle. Knit this stitch through the back loop and slip it off the needle.
Pf&b: Purl front & back.
Right lifted increase (RLI): Use your right needle to pull the knit stitch one row below the first stitch on your right needle, then place the stitch on the left needle, taking care to ensure it doesn’t slip over the stitch next to it. Then knit the stitch and slip it off the needle.
Pattern Notes
This sweater is knit in the round, from the bottom up. The sleeves are seamed onto the body.
Pattern
Body
With smaller needles, CO 238 (270, 302, 334) (366, 398) sts. PM and join in the round, being careful not to twist work.
Setup Rnd 1: * [Work Setup Rnd 1 of Left Cable Chart] 4 (5, 6, 7) (8, 9) times, work Setup Rnd 1 of Center Cable Chart, [work Setup Rnd 1 of Right Cable Chart] 4 (5, 6, 7) (8, 9) times; rep from * once.
Rep Setup Rnd 1 until piece measures 1”.
Switch to larger needles
Setup Rnd 2: * [Work Setup Rnd 2 of Left Cable Chart] 4 (5, 6, 7) (8, 9) times, work Setup Rnd 2 of Center Cable Chart, [work Setup Rnd 2 of Right Cable Chart] 4 (5, 6, 7) (8, 9) times; rep from * once.
Rnd 1: * [Work next Rnd of Left Cable Chart] 4 (5, 6, 7) (8, 9) times, work next Rnd of Center Cable Chart, [work next Rnd of Right Cable Chart] 4 (5, 6, 7) (8, 9) times; rep from * once.
Rep Rnd 1 until piece measures 17 (17.5, 18, 18.5) (19, 19.5, 20)”, ending with an even row.
BO for Underarm
BO rnd: [Work in patt to 8 (8, 8, 8) (16, 16) sts before marker, BO 16 (16, 16, 16) (32, 32) sts] twice. 103 (119, 135, 151) (151, 167) sts for front and back.
Front
Row 1 (RS): Work in patt.
Row 2: Work in patt.
Row 3 (Dec Row): Work appropriate Dec Row. 101 (117, 133, 149) (149, 165) sts.
Dec Row (If third st is knit): K1, k2tog, work in patt to last 3 sts, ssk, k1. 2 sts dec.
Dec Row (If third st is purl): K1, p2tog, work in patt to last 3 sts, ssp, k1. 2 sts dec.
Cont in patt while working Dec every 2 rows 7 (14, 20, 22) (21, 24) times, then every 4 rows 13 (6, 3, 2) (4, 2) times, then every 2 rows 7 (15, 20, 23) (22, 25) times. 47 (47, 47, 55) (55, 63) sts remain.
Place remaining sts on holder.
Back
Attach yarn to RS of Back sts. Work as for Front.
Sleeves
With smaller needles, CO 55 sts.
Setup Rnd 1: Work Setup Rnd 1 of Center Cable Chart.
Rep Setup Rnd 1 until piece measures 1.5”.
Switch to larger needles
Setup Rnd 2: Work Setup Rnd 2 of Center Cable Chart.
Rnd 1: Work next Rnd of Center Cable Chart.
Rep Rnd 1 while working Inc Rnd (see below) every 6 (4, 4, 4) (4, 4) rows 10 (10, 4, 1) (25, 23) times, then every 8 (6, 6, 6) (6, 6) rows 10 (18, 24, 27) (11, 13) times. – 95 (111, 111, 111) (127, 127) sts.
Work Left Cable Pattern, Center Cable Chart, and Right Cable Pattern after 8th Inc Round, and into all additional increased sts when possible.
Inc Row 1: Pf&b, work in patt to last st, pf&b. – 2 sts dec.
Inc Rows 2-3: LLI, work in patt to last st, RLI. – 2 sts dec.
Inc Rows 4-5: Pf&b, work in patt to last st, pf&b. – 2 sts dec.
Inc Rows 6-7: LLI, work in patt to last st, RLI. – 2 sts dec.
Inc Row 8: PLLI, work in patt to last st, PRLI. – 2 sts dec.
Rep Inc Rows 1-8 until all increases have been completed.
Cont in patt until piece measures 18 (18.5, 20, 20.5) (20.5, 21)”, ending with an even row.
BO for Sleeve Cap
Next rnd: Work 8 (8, 8, 8) (16, 16) sts in patt, BO all sts. Do not break yarn.
Pick up for Sleeve Cap
Sleeve Cap: Pick up and purl 79 (95, 95, 95) (95, 95) sts, one per bound off st. Remaining sts will be attached to underarm BO.
Sleeve Cap
Right side and WS have now switched.
Row 1 (WS): K1, p2, k1, work Row 1 of Left Cable 1 (2, 2, 2) (2, 2) times, work Row 23 of Center Cable, work Row 1 of Right Cable 1 (2, 2, 2) (2, 2) times, k1, p2, k1.
Row 2: P1, k2, p1, work next Row of Left Cable 1 (2, 2, 2) (2, 2) times, work next Row of Center Cable, work next Row of Right Cable 1 (2, 2, 2) (2, 2) times, p1, k2, p1.
Row 3 (Dec Row): Work appropriate Dec Row. 77 (93, 93, 93) (93, 93) sts
Dec Row (If third st is knit): K1, k2tog, work in patt to last 3 sts, ssk, k1. 2 sts dec.
Dec Row (If third st is purl): K1, p2tog, work in patt to last 3 sts, ssp, k1. 2 sts dec.
Cont in patt, while working Dec Row every 2 rows 13 (41, 18, 16) (15, 14) times, then 4 rows 7 (0, 5, 8) (10, 12) times, then every 2 rows 13 (0, 18, 17) (16, 15) times. – 11 sts rem.
Place sts on holder.
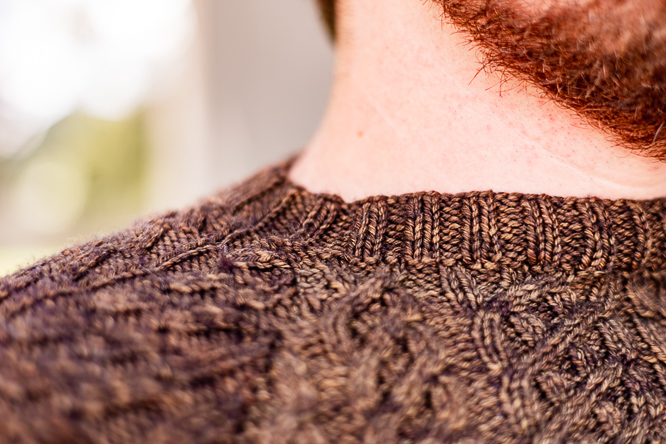
Neck Edging
Set sleeves.
Place sts on needles in the following order: Sleeve 1, Front, Sleeve 2, Back. – 116 (116, 116, 132) (132, 148) sts.
Setup Rnd: [K2tog, k1, p2, k1, p2, k1, ssk, p2tog, p1, [k2, p2] 5 (5, 5, 6) (6, 7) times, k1, [p2, k2] 5 (5, 5, 6) (6, 7) times, p1, ssp] 2 times. – 8 sts dec, 108 (108, 108, 124) (124, 140) sts.
Work in patt until ribbing measures 1”. BO in patt.
Finishing
Weave in ends. Block to schematic measurements.