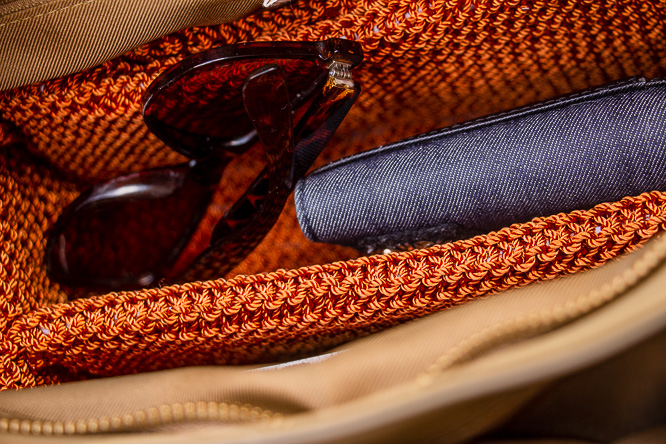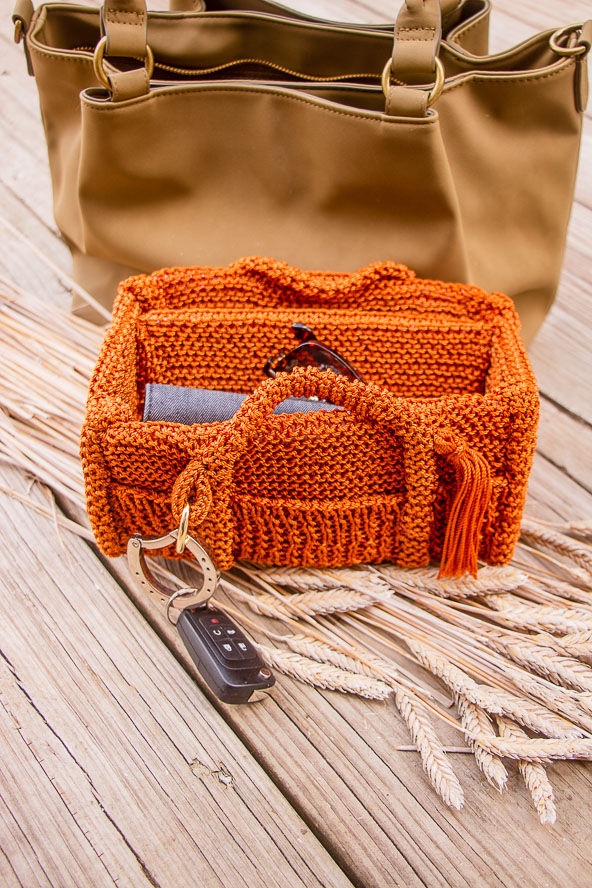
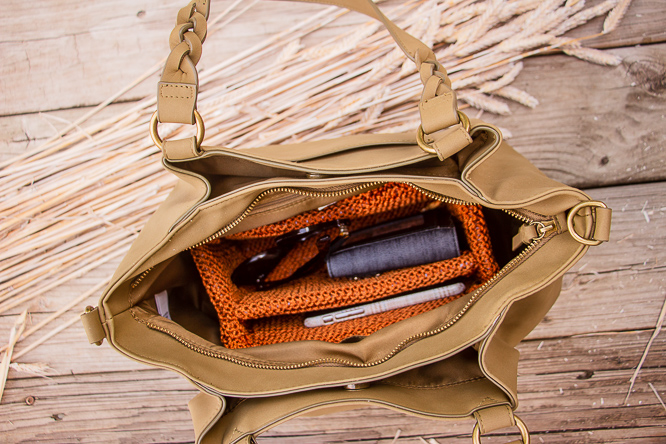
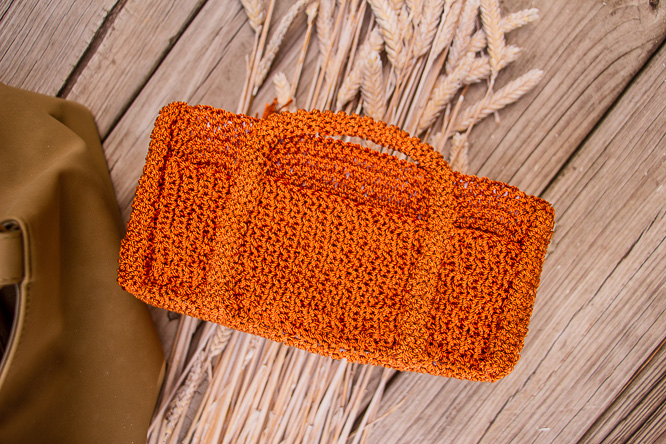
Penny is a cleverly constructed, sturdy organizer that keeps important items within easy reach in the middle of your tote bag. Keys can be attached to the keyring tab and the phone partition safely separates the phone from all items in the bag. Pockets on the front can hold smaller items like lip balm, mini hand sanitizer bottle, gum and other essentials. Keep track of everything you need with this handy tote organizer.
Time: Weekend Project
Skill Level: Easy
Size: 9.25” L x 4.5” W
Gauge: With larger needles: 20 sts and 30 rows garter st = 4” [10cm]
With smaller needles: 29 sts and 34 rows in k1, p1 ribbing = 4” [10cm]
Materials
 Yarn: Omega La Espiga size 18 nylon cord (7 oz/197 yds/200g per roll):
3 rolls #41 goldenrod from www.creativeyarnsource.com
Hook/Needles: #5/3.75mm and #3/3.25mm straight knitting needles and #5/3.75mm dpns (for I-cord)
Notions
Pellon DecoBond interfacing, 1 yd
# 12 wt. cotton thread: 1 spool #713-1056 Med.Tawny Tan from www.sulky.com
12” x 18” sheet 7 mesh plastic canvas, 2
DRBG25mm-GO/4- 1” gold D-ring, 1 from https://emmalinebags.com/
6-inch cardboard square
Scissors, steam iron and pressing surface, scissors, tapestry needle, hand sewing needle, 4 straight pins
Pattern Notes
Weave in ends as work progresses.
Pattern
Lining Preparation
Fold interfacing yardage in half crosswise with adhesive side tog, use iron and pressing surface to fuse following manufacturer’s instructions to create a double layer. Cut all interfacing pieces from double layer.
Lengthwise Lining: Use scissors to cut 3 8×8-inch rectangles from interfacing.
Cut 3 23×50-Hole rectangles from plastic canvas.
Assemble: Fold each interfacing rectangle in half crosswise, insert one plastic canvas rectangle inside. Beg at fold, use cotton thread and hand sewing needle to whip st cut edges tog on remaining 3 sides.
Phone Partition Lining: Cut 1 7×7.75-inch rectangle from interfacing and 1 21×50-Hole rectangle from plastic canvas. Assemble same as for Lengthwise lining.
Short End Lining: Cut 2 4×7.5-inch rectangle from interfacing and 2 23×23-Hole squares. Assemble same as for Lengthwise lining.
Long base
Row 1: With larger needles, CO 40 sts, k across. (40 sts)
Next rows: K across all rows until piece measures 19.75”.
Bind off knitwise.
Assembly
Beg at cast on edge, fold down 4.5” of long base towards inside, use needle and thread to whipstitch cast on edge to base to form casing. Insert 1 lengthwise lining in casing just made and whipstitch both layers of base tog at side edges (creates horizontal side of organizer). Rep for opposite end of base.
Short end panel
Row 1: With larger needles, CO 20 sts, k across. (20 sts)
Next rows: K across all rows until piece measures 25”.
Bind off knitwise.
Assembly
With outside of Long base RS up on a flat surface, center Short end panel across center unsewn single thickness of Long base having 8.5” of panel extending beyond each end of base. Whip stitch long edges of panel to base. Insert remaining lengthwise lining into casing just made. Turn base WS up, beg at cast on edge, fold down 4.25” of short end panel towards inside and whipstitch to remaining unstitched edge of Base to form casing. Insert 1 short end lining in casing just made and whipstitch through both layers at side edge. Rep in same manner for opposite end.
Front Pocket
Row 1: With smaller needles, CO 52 sts, [k1, p1] across.
Next rows: Work in [k1, p1] ribbing until piece measures 2.75”.
Bind off in ribbing pattern.
Assembly
- Place Pocket WS down on RS of one long side of organizer matching CO edge to bottom seam along center of organizer, side edges even and top edge of Pocket approximately 1” down from top of organizer. Sew CO edge to bottom edge of organizer and short ends of pocket to sewn seam at ends of organizer long edge.
- Use tapestry needle and yarn to sew pocket to Front with a straight stitch seam approximately 2.25” in side edge to create pocket division. Rep to sew a 2nd pocket division on opposite end of Pocket and organizer.
Back Pocket
Stitch same as for Front Pocket until piece measures 3 3/8 inches.
Bind off in ribbing pattern.
Assembly
With Back Pocket WS down on RS of remaining long side of organizer, rep steps 1-2 of Front Pocket Assembly.
Phone Partition
Row 1: With larger needles, CO 40 sts, k across. (40 sts)
Next rows: K across all rows until piece measures 7”.
Bind off knitwise.
Assembly
Fold partition in half crosswise, whipstitch cast on and bind off edges tog to form a casing. Insert remaining lengthwise lining in casing just made and whipstitch both layers of partition tog at side edges. Insert partition lining inside casing. Place whipstitch edge of partition against WS of base approximately 0.75” in from one long side edge and sew in place. Bring one short end up vertically to meet end of partition, use needle and thread to sew in place. Rep to sew remaining partition on opposite short end panel in same manner.
Bring side edge of one short end WS tog with adjacent end of long base, use needle and thread to whipstitch tog to create one corner making sure to pierce ends of lining pieces at top corners to secure. Rep for remaining 3 corners.
Key Ring Tab
Make 1
Row 1: With larger needles, CO 8, k across.
Next rows: K across until piece measures 2.5”.
Bind off knitwise.
Assembly
Thread tab through ring, bring ends tog and sew ends tog with needle and thread.
Handle I-cord
Make 2
Row 1: With dpns, using a knit cast on, CO 5, do not turn, slide sts to opposite end of needle. (5 k sts)
Row 2: P across, do not turn, slide sts to opposite end of needle.
Row 3: K across, do not turn, slide sts to opposite end of needle.
Next rows: Rep rows 2-3 until cord measures 12 inches.
Bind off knitwise.
Assembly
Use straight pins to pin handle centered over pocket division seam of Back having handle ends even with bottom of organizer. Note: Approximately 4.5 inches of handle center will be above top edge of organizer to create handle. Use needle and thread to sew inside and outside edges of Handle to organizer.
Pin 2nd handle to Front of organizer in same manner. Tuck sewn end of Key Ring Tab under one side of handle where desired and sew handle in same manner as Back.
Corner I-cord
Make 4 5.5-inch long.
Rep same as for Handles until piece measures 5.5”.
Bind off knitwise.
Assembly
Center 1 corner I-cord over whipstitched corner seams of organizer, having one end even with bottom edge and overlapping opposite end approximately 1” to inside. Use needle and thread to sew both sides of I-cord to organizer. Rep to add remaining 3 5-inch I-cords to remaining 3 corner seams.
Finishing
Tassel
Wrap yarn 15 times around 6” cardboard.
Use 12-inch length of yarn to tie top of tassel.
Cut bottom of tassel.
Use a 12-inch length of yarn to tie tassel approximately 0.75” down from top tie.
Trim tassel length to 4”.
With Front RS facing, use tapestry needle to insert ends of tassel top tie through organizer around right handle and knot tightly to secure.