

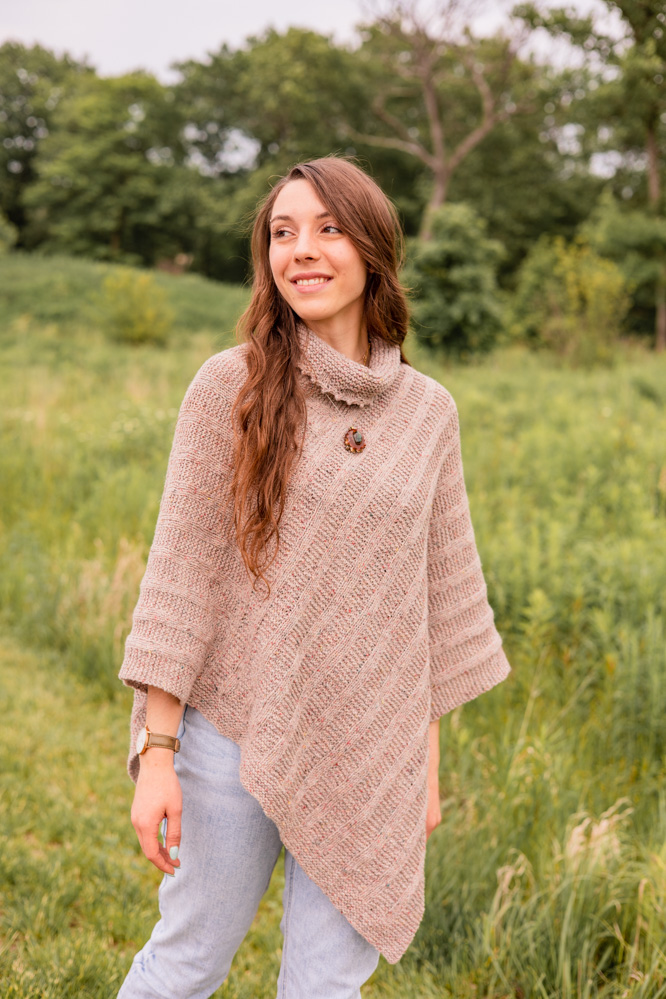
The Aitne Poncho is a versatile and stylish garment that combines simplicity and elegance. Perfect for advanced beginners or knitters seeking a relaxing project, this poncho is worked with classic Irish shaping that gives it a flattering and structured fit. The body of the poncho is worked in a wide garter/stockinette rib pattern, creating intersecting perpendicular lines of symmetry that provide visual interest and texture. The poncho is finished off with a cozy, squishy cowl neck and a delicate picot bind-off, adding a feminine and polished touch to the piece. Whether worn as an everyday layer or dressed up for a special occasion, the Aitne Poncho will keep you warm and stylish. This project is perfect for a soothing knit on long commutes or relaxed evenings, making it a must-have addition to your collection. Ideal for knitters looking to add a touch of Irish-inspired design to their wardrobe.
Time: 2-3 Week Project
Skill Level: Easy
Size: 38” wingspan, 31.5” long (not including cowl)
Gauge: 20 sts and 40 rows = 4” [10 cm] in garter stitch
Materials
 Yarn: Cascade Aegean Tweed (100% organic wool; 328 yards [300 meters]/100 grams): #27 Nougat (6 skeins)
Needles: US size 6 (4 mm) and US size 7 (4.5 mm) 32” circular needles
Notions: Tapestry needle, stitch markers
Downloads
Abbreviations
kf&b = knit into front, then back of the next stitch (1 st increased)
Pattern Notes
The poncho is comprised of two rectangles, each worked separately then seamed together to form the basic poncho shape. Stitches are then picked up around the neckline for the cowl neck, which is worked primarily on a larger circular needle and finished with a picot cast off. A circular needle is used to knit the rectangles in order to accommodate the number of stitches, however you will be working back and forth in rows, not in rounds.
Pattern
First Rectangle
Border:
Using smaller circular needle, CO 100 sts.
Rows 1-13: Knit.
Body:
Row 14 (WS): *P3, k5; rep from * to last 12 sts, p3, pm, k to end of row.
Row 15 (RS): Knit.
Row 16: *P3, k5; rep from * to last 12 sts, p3, k to end of row.
Rep Rows 15-16 until piece measures 30”, ending with a WS row.
BO all sts and weave in yarn ends.
Block to measurements 22” x 36”.
(Note: Due to the stitch pattern and wool yarn, the piece will stretch considerably, allowing for this size to be easily achieved with blocking. If using a non-wool yarn, you may need to work a few extra repeats in order to achieve a finished blocked length of 36”.)
Marking the First Rectangle (after blocking): Lay the piece flat with the right side facing up. Mark the left corner of the CO edge A. Measure 22” up the left side of the piece from point A and mark that spot B. Place marker C at the left corner of the BO edge and marker D at the right corner of the BO edge.
Second Rectangle
Make another rectangle the same as the first and block to measurements 22” x 36”.
Marking the Second Rectangle (after blocking): Lay the piece flat with the right side facing up. Mark the right corner of the BO edge A and the left corner of the BO edge B. Mark the left corner of the CO edge D, then measure 22” up the left side of the work from point D and mark that spot as C.
Assembly
To create the traditional Irish poncho shape, you will join the two rectangles together by matching the markers. Pin the two A points together. Pin the two B points together. Then using a length of yarn, seam the two pieces together from point A to point B.
Without twisting the poncho, pin the two C points together and the two D points together. You should now be able to see the finished poncho shape. Using a length of yarn, seam the two pieces together from point D to C.
Weave in all yarn ends.
Cowl Neck
You should now have a fully formed poncho, with a V-neck opening. To add a cowl neck, continue as follows:
Using smaller needle, pick up 88 sts around the neckline, place marker and join to begin working in the round.
Odd Rnds 1-7: Knit.
Even Rnds 2-8: Purl.
Switch to larger circular needle.
Rnd 9: *K10, kf&b; rep from * to end of rnd. (96 sts)
Work 5 rnds in garter stitch, ending with a purl rnd.
Rnd 15: *K11, kf&b; rep from * to end of rnd. (104 sts)
Work 5 rnds in garter stitch, ending with a purl rnd.
Rnd 21: *K12, kf&b; rep from * to end of rnd. (112 sts)
Work 11 rnds in garter stitch, ending with a purl rnd.
Reverse piece:
Kf&b, sl 1 st back to left needle, then turn work, so you are positioned to begin knitting on the WS. (113 sts)
Rnd 33: *K3, p4; rep from * to last 8 sts, k3, p3, p2tog. (112 sts rem)
Even Rnds 34-36: Knit.
Odd Rnds 35-37: *K3, p4; rep from * to end of rnd.
Picot BO:
Step 1: Insert right needle kwise in the first stitch on left needle and pick up a loop as if to knit, but don’t drop the stitch off the left needle. Place the loop from the right needle onto the left needle.
Step 2: Repeat Step 1 once more.
Step 3: K2. Pass the first (right) stitch on the right needle over the second (left) stitch and off the needle.
Step 4: K1. Pass the first (right) stitch on the right needle over the second (left) stitch and off the needle).
Step 5: Repeat Step 4 three more times.
Step 6: Slip the stitch from the right needle back to the left needle.
Repeat steps 1-6 until you have 1 stitch remaining on the left needle. Repeat steps 1-3 to make a final picot, then cut yarn and draw through loop to secure.
Weave in all yarn ends.
This Poncho pattern looks great for my daughter. I want your MAGAZINE not your Gold Club!! Please, I want a subscription to your “I Love Knitting MAGAZINE!!!! I see the August 2022 MAGAZINE right below this box. Please, I want your KNITTING MAGAZINE!!!! Thank You, Debra Retz-Hoar
Hi Debbie, looks like you might be having trouble accessing your account? Our customer service team can make sure everything is in order if you shoot them an email. We are happy to help! Thanks