

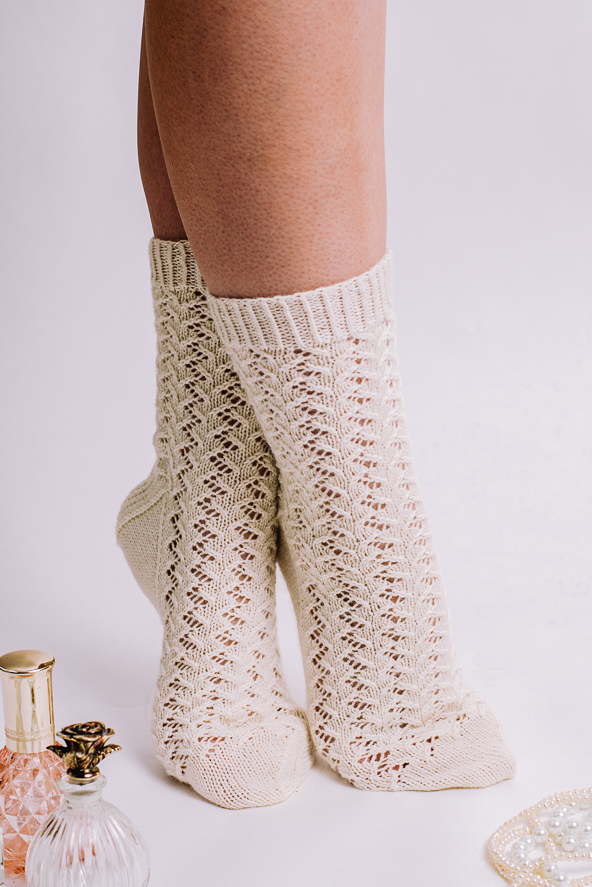
The Carmine Lace Socks combine delicate lacework with cozy warmth, making them the perfect elegant addition to your sock collection. Although the intricate lace pattern might seem complex, it’s surprisingly easy to knit! Worked from the top down, the lace pattern flows gracefully down the sock leg to the toe, creating a beautiful and airy design. The twisted 1/1 ribbed cuff highlights the intricate texture of the lace while ensuring a snug fit. Whether worn as a statement piece or a luxurious treat for your feet, these socks are a must-have for any knitter looking for both beauty and comfort.
Skill Level: Easy
Size: 7 (8.25)” foot circumference, foot length adjustable to any size.
0.5-1” negative ease recommended.
Shown in size 7”.
Gauge: 36 sts and 44 rows = 4” [10 cm] in St st after wet blocking; 32 sts and 44 rows = 4” [10 cm] in lace pattern after wet blocking.
Materials
 Yarn: Lang Yarns Jawoll Superwash 75/25 (75% Wool, 25% Nylon; 230 yards [210 meters]/50 grams): 94 Off White (2 (2) balls).
Needles: US size 1.5 (2.5 mm) circular or DPNs.
Notions: Markers, tapestry needle.
Special Stitches
Lace Pattern (worked over 6 sts)
Rnd 1: K2, yo, ssk, k2.
Rnd 2: K3, yo, ssk, k1.
Rnd 3: K4, yo, ssk.
Rnd 4: K2, k2tog, yo, k2.
Rnd 5: K1, k2tog, yo, k3.
Rnd 6: K2tog, yo, k4.
Rep Rnds 1-6 for patt.
Pattern Notes
This pattern is worked in the round from the cuff down. The socks feature a heel flap and gusset construction. The cuff has a twisted rib.
Pattern
Cuff
CO 60 (72) sts and join to work in the rnd.
Rnd 1: *K1tbl, p1; rep from * to end of rnd.
Rep Rnd 1 until Cuff meas 1.5” / [4 cm].
Leg
Rnd 1: Knit.
Rnd 2: Work Row 1 of Lace Chart, each row of the chart is repeated 10 (12) times per rnd.
Rnd 3: Work next row of Lace Chart.
Cont in est patt until Leg has reached desired length. When you reach Row 6 of the Lace Chart start with Row 1 again.
Heel Flap
Row 1 (RS): (Sl1, k1) 15 (19) times, turn work.
Row 2 (WS): Sl1, p29 (35), turn work.
Rep Rows 1-2 until Heel Flap meas 2.5” / [6.5 cm].
Heel Turn
Row 1 (RS): Sl1, k16 (19), ssk, k1, turn work.
Row 2 (WS): Sl1, p5, p2tog, p1, turn work.
Row 3: Sl1, k6, ssk, k1, turn work.
Row 4: Sl1, p7, p2tog, p1, turn work.
Row 5: Sl1, k to 1 st before gap, ssk, k1, turn work.
Row 6: Sl1, p to 1 st before gap, p2tog, p1, turn work.
Rep Row 5-6 until all Heel sts have been worked.
Gusset and Foot
Set-up Rnd: Pick up sts along side of heel flap, work next row of Lace Chart across instep (each row of the chart is repeated 5 (6) times across the instep), pick up same number of sts along other side of heel flap, k across half of heel. New BOR is in the middle of the heel.
Rnd 1: K to 3 sts before instep, k2tog, k1, work next row of Lace Chart across instep, k1, ssk, k to end.
Rnd 2: K to instep, work next row of Lace Chart across instep, k to end.
Rep Rnds 1-2 until you have 60 (72) sts total, then rep only Rnd 2 until Foot meas 2” / [5 cm] shorter than desired.
Toe
Rnd 1: K to 3 sts before instep, k2tog, k2, ssk, k to 3 sts before end of instep, k2tog, k2, ssk, k to end.
Rnd 2: Knit
Rep Rnds 1-2 until you have 20 (24) sts total. Kitchener Toe closed.
Finishing
Weave in ends.
What is the length of the circular needle? Or are you splitting the stitches between two circular needles so the length doesn’t matter?
Hello Susan! I’ve reached out to the designer for advice and she or I will reply as soon as possible. Thanks! – Nicola, Editor
From the designer: Either works. The pattern can be knit using your needle or needles of choice! Even the small 9 inch circulars would work! I personally knit on dpns, but know others prefer circular needles that’s why they’re mentioned!
It would be helpful to know how many stitches to pick up for the gusset.
Hello Margaret! We’ve reached out to the designer for clarification and she or I will reply as soon as possible. Thanks! – Nicola
Hi Margaret,
As row gauges can differ a little bit I usually recommend picking up 1 stitch in each slipped stitch along the side of the heel flap. And then picking up the same number on the other side of the heel flap.
On my sample I picked up 20 stitches along each side, but as long as there are no holes anything goes!