

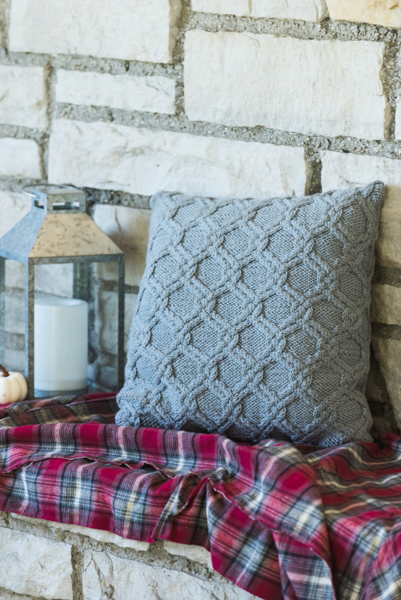
This pillow is inspired as a more intricate honeycomb stitch, with cables flowing in and out locking together to form beautiful spheres. Knit in two pieces and seamed together, each piece is surrounded by a single edge stitch on each side for simple seaming.
Skill Level: Intermediate
Size: Finished Width 12 (16, 18)” / [30.5 (40.5, 45.5) cm] to fit a square pillow form
-2 to 0” ease recommended.
Shown in size 18” / [45.5 cm]
Gauge: 18 sts and 24 rows = 4” [10 cm] in St st after wet blocking
Materials
 Yarn: Cascade Yarn Cascade 220 Superwash (100% Wool; 220 yards [200 meters]/100 grams): 0892 Space Needle (3 balls)
Needles: US size 6 (4.0 mm) 24” straight
Notions: Cable needle (cn), tapestry needle
Abbreviations
2/2LC – Slip two stitches onto cable hook and move to front, knit two stitches, knit stitches from cable hook.
2/2RC – Slip two stitches onto cable hook and move to back, knit two stitches, knit stitches from cable hook.
2/2LPC – Slip two stitches onto cable hook and move to front, purl two stitches, knit stitches from cable hook.
2/2RPC – Slip two stitches onto cable hook and move to back, knit two stitches, purl stitches from cable hook.
Pattern Notes
This pattern is worked flat in separate pieces, beginning at the bottom.
Pattern
CO 66 (82, 98) sts.
Row 1 (WS): P1, (k2, p2, k2, p4, k2, p2, k2) 4 (5, 6) times, p1.
Row 2 (RS): K1, (p2, 2/2LPC, 2/2LC, 2/2RPC, p2) 4 (5, 6) times, k1.
Row 3: P1, (k4, p8, k4) 4 (5, 6) times, p1.
Row 4: K1, (p4, 2/2RC, 2/2RC, p4) 4 (5, 6) times, k1.
Row 5: P1, (k4, p8, k4) 4 (5, 6) times, p1.
Row 6: K1, (p4, k2, 2/2LC, k2, p4) 4 (5, 6) times, k1.
Row 7: P1, (k4, p8, k4) 4 (5, 6) times, p1.
Row 8: K1, (p4, 2/2RC, 2/2RC, p4) 4 (5, 6) times, k1.
Row 9: P1, (k4, p8, k4) 4 (5, 6) times, p1.
Row 10: K1, [p2, 2/2 RPC, (2/2LPC) twice, p2] 4 (5, 6) times, k1.
Row 11: P1, (k2, p2, k2, p4, k2, p2, k2) 4 (5, 6) times, p1.
Row 12: K1, [(2/2 RPC) twice, (2/2LPC) twice) 4 (5, 6) times, k1.
Row 13: P1, (p2, k2, p2, k4, p2, k2, p2) 4 (5, 6) times, p1.
Row 14: K1, k2, (2/2 RPC, p4, 2/2LPC, 2/2LC) 3 (4, 5) times, 2/2 RPC, p4, 2/2LPC, k2, k1.
Row 15: P1, (p4, k8, p4) 4 (5, 6) times, p1.
Row 16: K1, (2/2RC, p8, 2/2RC) 3 (4, 5) times, 2/2RC, p8, 2/2LC, k1.
Row 17: P1, (p4, k8, p4) 4 (5, 6) times, p1.
Row 18: K1, k4, (p8, k2, 2/2LC, k2) 3 (4, 5) times, p8, k4, k1.
Row 19: P1, (p4, k8, p4) 4 (5, 6) times, p1.
Row 20: K1, (2/2RC, p8, 2/2RC) 3 (4, 5) times, 2/2RC, p8, 2/2LC, k1.
Row 21: P1, (p4, k8, p4) 4 (5, 6) times, p1.
Row 22: K1, k2, (2/2LPC, p4, 2/2RPC, 2/2LC) 3 (4, 5) times, 2/2LPC, p4, 2/2RPC, k2, k1.
Row 23: P1, (p2, k2, p2, k4, p2, k2, p2) 4 (5, 6) times, p1.
Row 24: K1, [(2/2LPC) twice, (2/2RPC) twice] 4 (5, 6) times, k1.
Size 12” Only
Rep Rows 1-26 once, then Rows 1-24 once more.
Size 16” Only
Rep Rows 1-26 twice, then Rows 1-24 once more.
Size 18” Only
Rep Rows 1-26, 3 times, then Rows 1-12 once more.
Sewn-on Finish Only
Knit 1 row.
BO all sts.
Zipper Finish Only
Row 1: Knit across.
Row 2: Knit across.
Rep Rows 1-2 for 4 more rows.
Button Finish Only
First piece only
Row 1: Knit across.
Rep Row 1 for 9 more rows.
Second piece only
Row 1: Knit across.
Rep Row 1 for 2 more rows.
Next Row: Knit about 1/4 of the way across the row, BO 3 sts, knit another 1/4 of the way, BO 3 sts, knit another 1/4 of the way, BO 3 sts, knit to the end of the row.
Next Row: Knit across the row, CO 3 sts each time you reach a BO set from the previous row.
Rep Row 1 for 5 more rows.
Finishing
Sewn-on Finish Only
Seam the two pieces together on the top and sides, insert the pillow, and then seam together at the bottom.
Zipper Finish Only
Seam the two pieces together on the sides and the Cast On edges. Sew the zipper onto the last edge, following the instructions that came with the zipper. Insert pillow.
Button Finish Only
Fold under the knit rows on the top, then seam the two pieces together at the sides, catching the knit rows to form two small pockets.
Seam the Cast On edges together.
Attach buttons across from buttonholes on the last edge.
Insert the pillow into the pocket on the side with the buttons.
Comments are closed.