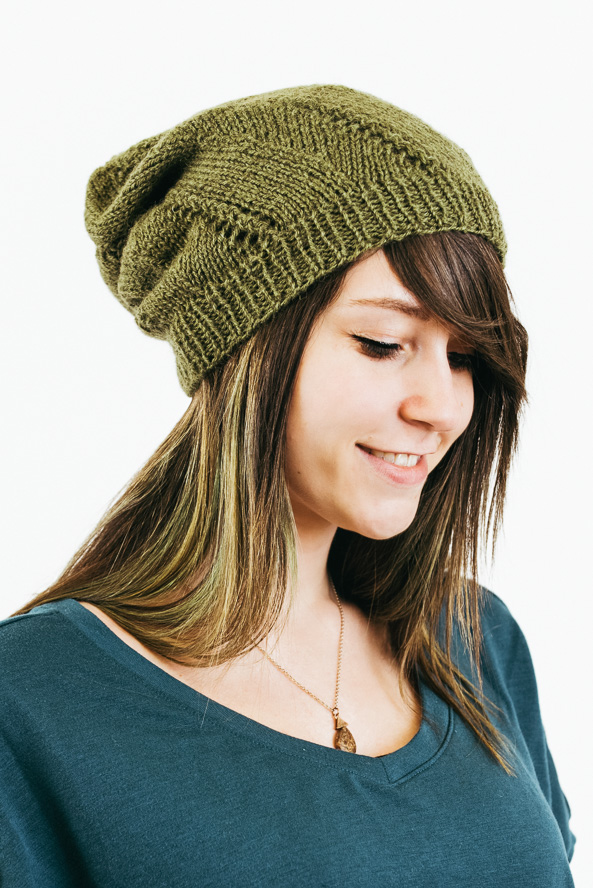
Inspired by nature, this top-down slouchy hat uses decreases and eyelets to mimic a spiral-shaped cactus. In one skein of luxury natural yarn, it’s much easier to make than it looks!
Skill Level: Intermediate
Size: 14 (17, 19)” brim circumference (unstretched) to fit up to 18 (21, 23)” head circumference
4” negative ease recommended.
Gauge: 20 sts and 28 rows = 4” [10 cm] in St st
Materials
Yarn:
![]() Blacker Yarns Tamar DK (30% Wool, 18% Wensleydale, 18% Teeswater, 17% Cotswold, 17% Leicester Longwool); 240 yards [220 meters]/50 grams): Lerryn, 1 skein
Blacker Yarns Tamar DK (30% Wool, 18% Wensleydale, 18% Teeswater, 17% Cotswold, 17% Leicester Longwool); 240 yards [220 meters]/50 grams): Lerryn, 1 skein
Needles: US size 6 (4.0mm): DPNS and/or circular needles up to 24” long; US size 4 (3.5 mm) DPNS and/or circular needles up to 24” long
Notions: Tapestry needle; removable markers; (optional) crochet hook if using Emily Ocker’s Circular Cast-On method.
Special Stitches
1×1 Rib
Rnd 1: *K1, p1; rep from * around.
Rep Rnd 1 for patt.
Emily Ocker’s Circular Cast-On Method
Make a loose loop of yarn around your left thumb.
Insert crochet hook through loop from front to back, catch working end of yarn and pull through loop.
Catch working yarn again and pull through loop just made (as if to crochet 1 chain). This is your first st. Leave st on crochet hook.
Rep Steps 2-3 until you have cast-on required number of sts.
Transfer sts from hook to needles. After a few rnds, pull the yarn tail tight to close hole.
Pattern Notes
This hat is worked from the top down. Increases are worked into the pattern. You can either cast on in your normal preferred way or try Emily Ocker’s Circular Cast-On Method to avoid having a hole at the center of your hat.
Pattern
With larger DPNs, CO 6 sts, pm and join to work in the rnd, dividing sts evenly between DPNs.
Rnd 1: Knit.
Rnd 2: *Kfb; rep from * to end – 12 sts.
Rnd 3: *Kfb, k1; rep from * to end – 18 sts.
Rnd 4: *Yo, pm, ssk, yo, k1; rep from * to end – 24 sts.
Rnd 5: Knit.
Rnd 6: K to m, *yo, sm, ssk, yo, k to m; rep from * to end of rnd – 30 sts
Rep last 2 rnds 9 (11, 13) more times total sts, changing to circular needles if preferred when necessary. This is the end of the crown shaping – 84 (96, 108) sts.
Next Rnd: *K4 (5, 6), ssk, k to m, yo, sm, ssk, yo, k1; rep from * to end of rnd.
Next Rnd: Knit.
Rep last 2 rnds until Hat meas 6 (7, 8)” from end of crown shaping.
Dec Rnd: *K4 (5, 6), ssk, k to m, sm, ssk, k1; rep from * to end of rnd – 72 (84, 96) sts.
Change to smaller needles.
Knit 1 rnd.
Work in 1×1 Rib for 1½”.
BO fairly loosely in rib patt.
Finishing
Weave in ends and block very gently, making sure the fabric does not stretch too much. You may prefer to spray with a fine mist of water and then pin to size rather than wet-blocking.


I need beginner instructions for leg warmers & simple hat I love your add please help
Hi! You can browse our beginner and easy patterns here:
https://www.ilikeknitting.com/tag/beginner/
https://www.ilikeknitting.com/tag/easy/
My suggestions for the patterns you are looking for are:
https://www.ilikeknitting.com/magazine/knitting-hat-patterns/grayson-mistake-rib-beginner-hat/
https://www.ilikeknitting.com/magazine/knitting-accessories/lola-legwarmers/
https://www.ilikeknitting.com/magazine/knitting-accessories/swarming-boot-cuffs/
https://www.ilikeknitting.com/magazine/pattern-sets/color-blocked-set/
– Nicola, Editor
Thank you, thank you, thank you!!! I have been looking for a good item to knit!!!!
Yay! Enjoy! – Nicola, Editor
How do I add the negative ease suggested. I have never done this before.
Thanks
Hello Carol! I’ve reached out to the designer for advice and she or I will reply as soon as possible. Thanks! – Nicola, Editor
From the designer: Hi there – It just means to make a smaller size than your head measurement, so if the head is 18 inches, make the 14 inch one.
The line above it means the same thing (but is clearer if you’re not familiar with the term negative ease!) so if the head is under 18” make the 14” size, head 18-21 make the 17” size and for a head bigger than 21” make the 19” size.
This is because the hat needs to stretch. If you made one that was the same size as your actual head it would fall down over your eyes!
Hope that makes sense,
– Nicola, Editor
With this pattern : Desert Dreams Beanie : Could i please have the abbreviations explained. Thank you. Aloma
Hi! Here are the terms used and what they mean:
kfb = Knit front and back
ssk = slip slip knit
yo = yarn over
k to m = knit to marker
sm = slip marker
Hopefully that helps! – Nicola, Editor