

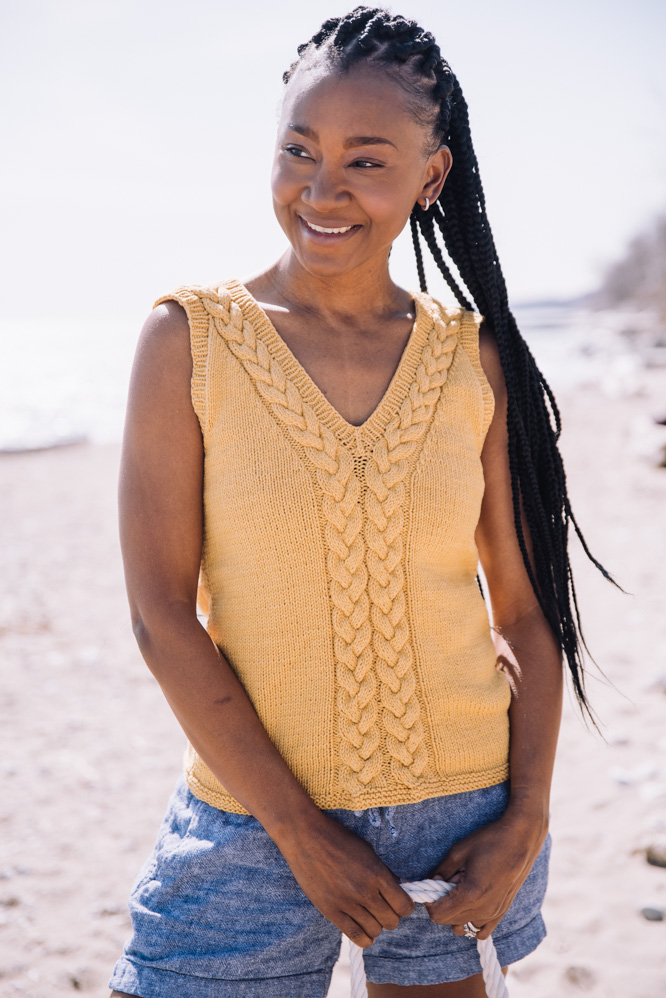
Cora is a beautiful stockinette stitch tank top with a wonderful cable pattern worked in front into a V-neck and continues to the shoulders. Knit in a sunny yellow, this is the tank that will kick off your summer knitting in a bright way.
Time: 30 Hours Project
Skill Level: Intermediate
Size: Finished Bust Size 36 (40, 44, 48, 52)” to fit bust 34 (38, 42, 46, 50)”
2” positive ease recommended.
Shown in size 36”
Gauge: 20 sts and 28 rows = 4” [10 cm] in St st after wet blocking
Materials
 Yarn: Plymouth Yarn Denim (60% cotton, 40% acrylic; 218 yards [200 meters]/100 grams): 1586 Mustard (3 (4, 5, 6, 7) balls)
Needles: US size 7 (4.5 mm) straight, US 5 (3.75 mm) circular 16” long
Notions: Cable needle (cn), tapestry needle, stitch markers
Abbreviations
4/4 RPC: Sl 4 sts onto cn, hold in back, k4, k4 from cn
4/4 LPC: Sl 4 sts onto cn, hold in front, k4, k4 from cn
Special Stitches
Cable panel for front:
Panel of 30 sts
Row 1 (RS): P2, (k12, p2) twice.
Row 2 and all even numbered rows: K2, (p12, k2) twice.
Row 3: P2, (k4, 4/4 LPC, p2) twice.
Row 5: Rep Row 1.
Row 7: P2, (4/4 RPC, k4, p2) twice.
Row 8: K2, (p12, k2) twice.
Rep Rows 1-8 for pattern.
Cable panel for left-side of V-neckline:
Panel of 15 sts
Row 1 (RS): P2, k12, p1.
Row 2 and all even numbered rows: K1, p12, k2.
Row 3: P2, k4, 4/4 LPC, p1.
Row 5: Rep Row 1.
Row 7: P2, 4/4 RPC, k4, p1.
Row 8: K1, p12, k1.
Rep Rows 1-8 for pattern.
Cable panel for right side of V-neckline:
Panel of 15 sts
Row 1 (RS): P1, k12, p2.
Row 2 and all even numbered rows: K2, p12, k1.
Row 3: P1, k4, 4/4 LPC, p2.
Row 5: Rep Row 1.
Row 7: P1, 4/4 RPC, k4, p2.
Row 8: K2, p12, k1.
Rep Rows 1-8 for pattern.
Pattern Notes
The cable pattern is work at the center front. You can place markers where the cable pattern should be worked.
When you cast on for the front, 4 fewer stitches are cast on than for the back. After you work the garter edge, the stitches are increased at the indicated points. This way, the bottom edge along the cable area will not flare out.
The back is worked in stockinette stitch. The decreases for the neckline are taken out behind the cable pattern, so it can go all the way to the shoulders.
Pattern
Back
With larger needles, CO 90 (100, 110, 120, 130) sts.
Work 8 rows (4 ridges) of garter st.
Work in St st until piece measures 16 (16.5, 16, 16.5, 16)”.
Armhole
BO 5 (7, 9, 10, 12) sts at beginning of next 2 rows. (80 (86, 92, 100, 106) sts)
Decrease one st on each side every other row 5 (7, 9, 11, 13) times. (70 (72, 74, 78, 80) sts)
Work even in St st until piece measures 22 (23, 23, 24, 24)”.
Back neck
K18, with another ball of yarn, BO next 34 (36, 38, 42, 44) sts, k18. (18 sts each side)
Work both sides at the same time.
Decrease one st on both sides of the neck every other row 3 times. (15 sts each side)
Work in St st until piece measures 25 (25, 26, 26, 27)”.
BO all sts loosely.
Front
With larger needles, CO 86 (96, 106, 116, 126) sts.
Work 8 rows (4 ridges) of garter st.
Set-up row (WS): P30 (35, 40, 45, 50), [k2, (p5, M1 p-st) twice, k2, (p5, M1 p-st) twice, k2] (cable panel worked twice), p30 (35, 40, 45, 50). (90 (100, 110, 120, 130) sts)
Row 1 (RS): P30 (35, 40, 45, 50), work Row 1 of cable panel for front across next 30 sts, p30 (35, 40, 45, 50).
Cont working in pattern as established with front cable panel until piece measures 14 (14.5, 14, 14.5, 14)”. End with a WS row.
Divide for neckline
Next row (RS): Work in pattern as established to center front, with another ball of yarn, work the second half of the front to the end.
Work both sides at the same time.
Next row: P30 (35, 40, 45, 50), work next corresponding row of cable panel for right side of V-neckline across next 15 sts, change to other ball of yarn, work next corresponding row of Cable panel for left-side of V-neckline across next 15 sts, p30 (35, 40, 45, 50).
Dec row (RS): K to last 2 sts before cable panel, decrease one st, work next row of 15-st cable panel for left-side of V-Neckline as established, change to other ball of yarn, work next row of 15-st cable panel for right-side of V-Neckline as established, decrease one st, k to end. (2 sts decreased)
Rep Dec row for V-neck shaping every 4 rows 9 more times, then every other row 10 (11, 12, 14, 15) times.
Armhole
At the same time when piece measures 16 (16.5, 16, 16.5, 16)”, shape armhole same as for back. (15 sts each side once all decreases are completed)
Work even in pattern as established until piece measures 25 (25, 26, 26, 27)”.
BO all sts loosely.
Finishing
Sew shoulder seams.
Armhole finishing
With smaller needles, pick up and knit 90 (95, 100, 105, 110) sts around armhole.
Work k1, p1 ribbing for 1″. BO all sts loosely.
Neckline finishing
With smaller needles and starting from center back neck, pick up and knit 150 (154, 158, 162, 166) sts. Place marker at center point of V-neck.
Rnd 1: [K1, p1] around.
Rnd 2: [K1, p1] until 1 st before marker, DD, cont in pattern as established.
Rnds 3-6: Rep Rnds 1-2 twice.
BO all sts.
Sew side seams. Weave in all ends. Block top to size.
Can this tank have sleeves added?
Sure! you can add sleeves.
There is no mistake. The number of stitches on the set-up row have been increased by 4 stitches at the cable area (Four M1 p-st worked). This way the bottom edge of the top stays flat.
For the decreases at the V-neckline here the way I worked it:
Dec row (RS): K to last 2 sts before cable panel, ssk, work next row of 15-st cable panel for left-side of V-Neckline as established, change to other ball of yarn, work next row of 15-st cable panel for right-side of V-Neckline as established, k2tog, k to end. (2 sts decreased)
Pattern definitely needs correction. Set up row has more stitches than we’re cast on. Instructions for decrease at V-neck are vague.
Hello Linda! I’ve reached out to the designer for advice and she or I will reply as soon as possible. Thanks! – Nicola, Editor
What method is used for decreases on the front? I can’t get my decreases to look like the photo. Thanks.
Hello Marla! I’ve reached out to the designer for advice and she or I will reply as soon as possible. Thanks! – Nicola, Editor
I have worked the decreases as follows:
Dec row (RS): K to last 2 sts before cable panel, ssk, work next row of 15-st cable panel for left-side of V-Neckline as established, change to other ball of yarn, work next row of 15-st cable panel for right-side of V-Neckline as established, k2tog, k to end. (2 sts decreased)
Print Layouts need some work
Hello! Thank you for your feedback. We are always looking for new ways to improve our user experience. -Nicola, Editor