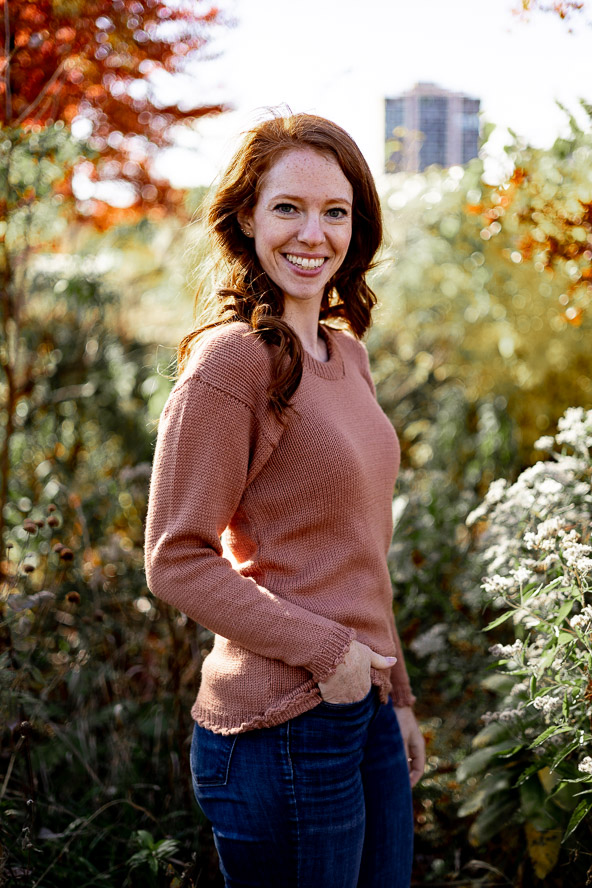
This is a very easy, yet beautiful sweater that begins with a clever cast-on that creates scallops at the bottom edge and cuffs. The body is worked in stockinette with a crew neckline and modified drop shoulders and long sleeves with matching scallops.
Time: 2 Weeks Project
Skill Level: Easy
Size: Finished Bust Size 36 (40, 44, 48, 52)” to fit bust 34 (38, 42, 46, 50)”
2” positive ease recommended.
Shown in size 36”
Gauge: 20 sts and 28 rows = 4” [10 cm] in St st after wet blocking
Materials
 Yarn: Universal Yarn Deluxe Dk Superwash, (100% Super Wash Wool; 284 yards [260 meters]/100 grams): 7825 Adobe (4 (5, 6, 7, 8) balls)
Hook/Needles: US size 5 (3.75 mm) and 6 (4 mm), 24” straight, US size 5 circular needle size 16”
Notions: stitch holders, tapestry needle
Special stitches
Instructions for cast on:
Each scallop is worked on 8 st+1
Cast on 8 sts for each edge stitch then add one more. Use long-tail cast on with a very long tail. * Knit 2, move working yarn in front of left-hand needle and lay across left needle as though it were the next stitch, [with right-hand needle move the next stitch on the left needle over that yarn and off the needle] six times, knit into the first loop on left needle (yes, the same yarn you just moved all the stitches over). Repeat from * across all sts.
Pattern Notes
Back shoulders are placed on holders to be bound off with front shoulders.
The neckline is folded to create a lovely neckline.
Pattern
Back
With larger needles cast on 209 (233, 257, 281, 305) sts. Following the instructions above to make scallops using smaller needles. You will have 26 (29, 32, 35, 38) scallops and 79 (88, 97, 106, 115) sts on the needle.
With smaller needles work 10 rows of k1, p1 ribbing.
Switch to larger needles and work stockinette stitch increasing 12 (13, 14, 15, 16) sts evenly across row. (91 (101, 111, 121, 131) sts)
Armhole
Work 16 (17, 16, 17, 17)” to underarm. Bind off 8 (12, 15, 19, 23) sts on each side for armhole. (75 (77, 81, 83, 85) sts remaining)
Back neck shaping
Work both sides at the same time. Work for 24 (24, 24, 26, 26)” from the bottom edge. On the next right-side row, work next 28 (29, 30, 31, 31) sts. With another ball of yarn bind off 19 (19, 21, 21, 23) sts for back neck. Work the last 28 (29, 30, 31, 31) sts. Updated 5/9/2023
Decrease 1 stitch on the neck side every other row 3 times. 25 (25, 27, 27, 29) for each shoulder
Work straight until piece measures 25 (26, 26, 27, 27)”. Place sts on holder to be bound with front shoulder sts.
Front
Work same as back including armholes until piece measures 19 (19, 20, 20, 21)”. Work both sides at the same time. On the next right-side row work 30 (31, 32, 33, 33) sts. With another ball of yarn, bind off next 15 (15, 17, 17, 19) and knit last 30 (31, 32, 33, 33) sts.
Decrease 1 stitch on the neck side every other row 5 times. 25 (26, 27, 28, 28) for each shoulder.
Work straight until front and back are the same length. Using the 3-needle Bind-off technique bind off front and back matching shoulders.
Sleeve (make 2)
With larger needles cast on 89 (89, 89, 97, 97) sts. Following the instructions above to make scallops using smaller needles. You will have 11 (11, 11, 12, 12) scallops for the cuff and 34 (34, 34, 37, 37) sts on the needle.
With smaller needles work 10 rows of k1, p1 ribbing.
Switch to larger needles and work stockinette stitch increasing 6 (6, 6, 5, 5) evenly across row. (40 (40, 40, 42, 42) sts)
Continue working in stockinette stitch increasing 1 st on both sides every 4 rows 27 (27, 32, 31, 31) times. (94 (94, 104, 104, 104) sts)
Continue straight until sleeve is 19 (19, 19.5, 19.5, 20)” long. Bind off all sts loosely.
Finishing
Neckline finishing
With smaller circular needles and starting from the center back neck pick up and knit 130 (130, 134, 134, 138) sts around the neckline. Mark the beginning of the round. Work 10 rounds of k1, p1 ribbing. Work 1 round of purl. Work 10 rounds of k1, p1 ribbing. Do not bind off. Fold the ribbing in half and sew each live st to the edge of the first round. Fasten off.
Sew sleeves in place. Sew side seams. Weave in all ends. Block the sweater to size.


In making this sweater I believe there may be an error. The pattern instructs to stockinette stitch from bottom to neck for 26″, then says to decrease 3 stictches at the neck and work until 26″. Should the first bit be less or the second longer? It can’t be the same length
Hello Susan! I’ve reached out to the designer for advice and she or I will reply as soon as possible. Thanks! – Nicola, Editor
You are absolutely right. The instruction should read to knit until piece measures 24 (24, 24, 26, 26)”. Sorry for the typo.
the instructions for the scalloped edging are confusing. Do you have a tutorial or some visual aids?
Hi Kathleen! I’ve reached out to the designer for some advice, but please let me know if you have a particular part that is confusing to you that she can help clarify. Thanks! – Nicola, Editor
Hi Kathleen, here is the link to the YouTube video:
https://www.youtube.com/watch?v=sgLECPL7bvE
Hope it helps.
I love this sweater. Could it be done on a knitting loom?
Hello! I’ve reached out to the designer for advice and she or I will reply as soon as possible. Thanks! – Nicola, Editor
Sorry I do not have any experience with knitting looms. I can’t answer your question.