

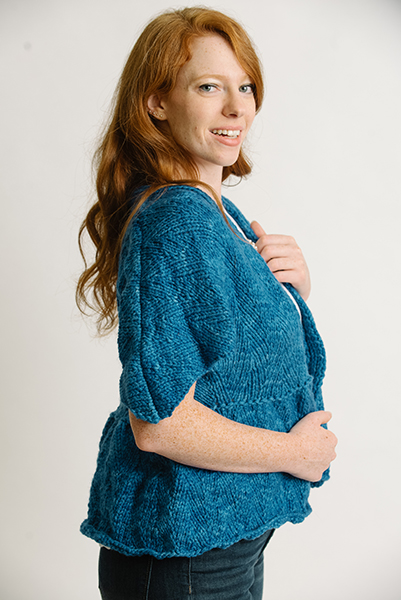
The French Cobalt Cardigan is fun and stylish tweak on the French Lavender Cardigan from the February 2018 issue. Made in a bold blue and featuring a cute little tie, this cardi is perfect for donning during those slightly warmer winter days and well into spring. Knit with bulky yarn, this project works up quickly, making it essential to have this season. Toss it on with a simple t-shirt and jeans combination, you’re ready for anything — from running errands to brunch with friends.
Skill Level: Easy
Size: Finished Waist Size 24 (27, 31, 34, 39, 42, 46)”
1” positive ease recommended.
Shown in size 27”
Gauge: 12 sts and 16 rows = 4” [10 cm] in patt after wet blocking
Time: Month Long Project
Materials
 Yarn: Malabrigo (pure merino wool; 100 yards [91.5 meters]/100 grams): 26 Continental, 6 (6, 7, 7, 8, 8, 9) balls
Needles: US size 11 (8.0 mm) 24” or longer circular
Notions: Tapestry needle, stitch holder, stitch markers (6 total – 2 marker A, 4 markers B), one 1” button (optional)
Abbreviations
M1: On the back side of your work, insert the RH needle into the purled head of the stitch below the next stitch, lift it up and place it onto the left-hand needle, knit.
Special Stitches
Lace Pattern
Row 1 (WS): Purl.
Row 2 (RS): K1, *k2tog, k2, m1, k3; rep from * to last 2 sts, k2.
Row 3: Purl.
Row 4: K2, *k2, m1, k3, k2tog; rep from * to last st, k1.
Rep Rows 1-4 for patt.
Pattern Notes
This pattern is worked flat from the bottom up.
Pattern
Peplum
CO 143 (164, 185, 206, 234, 255, 276) sts.
Work Rows 1-4 of Lace Pattern until piece meas 10” for CO edge.
Waist
Sizes – (27, -, 34, 39, -, 46)” only
Next Row (WS): *K2tog; rep from * across row. (- (82, -, 103, 117, -, 138) sts)
Sizes 24 (-, 31, -, -, 42, -)” only
Next Row (WS): *K2tog; rep from * across to last 3 sts, k3tog. (71 (-, 92, -, -, 127, -) sts)
All Sizes
PM A after the first 12 (14, 17, 19, 23, 25, 28) sts, and another marker A after the next 59 (68, 75, 84, 94, 102, 110) sts.
Chest
Next Row (RS): Resume Lace Pattern with Row 2 for 9 (9, 15, 16, 23, 23, 23) sts, PM B, k2 (4, 0, 2, 0, 1, 4), m1, k1, PM A, k1, m1, k4 (4, 5, 5, 2, 3, 4),
cont in Lace Pattern Row 2 to last 5 (5, 6, 6, 3, 4, 5) sts before PM A, k4 (4, 5, 5, 2, 3, 4), m1, k1, PM B, k1, m1, k2 (4, 0, 2, 0, 1, 4), PM A, cont with Lace Pattern Row 2 to end.
Cont with patt as est, and inc every RS row until piece meas 6.5 (5, 4, 3.5, 3, 2, 1)” from Waist.
Note: As you increase and the st count in between markers A and B reaches 7 sts, you may incorporate them into the pattern and move PM B over.
Armhole Division
Place Left Front and Back onto stitch holder and cont in patt as est for Right Front.
Cont inc every RS row until you have 48 (48, 51, 51, 51, 54, 54) sts and piece meas 16.5 (17, 17, 17.5, 17.5, 18, 18)” from Waist.
BO all sts.
Repeat for Left Front.
For Back, cont inc every RS row until there are 108 (108, 114, 114, 114, 120, 120) sts on needles and piece meas 16.5 (17, 17, 17, 17.5, 17.5, 18, 18)” from Waist.
BO all sts.
Collar
CO 7 sts.
Row 1: *K1, p1; rep from * to last st, k1.
Rep Row 1 until Collar meas 10” from CO edge.
(Optional) Buttonhole Row: K1, *wyif, sl 1, wyib, sl1, psso; rep from * until 3 sts have been bound off, sl st on the RH needle to LH needle, turn work, CO 3 sts, wyif, CO 1 st, turn work, sl 1, pass the last CO st over it, work to end of row, resume est K1, P1 Rib patt.
Cont in patt until piece meas 26.5 (27, 27, 27.5, 27.5, 28, 28)”.
BO all sts.
Finishing
Using mattress stitch, seam front shoulders to back. There should be a 4” gap in the center back.
Using mattress stitch, attach ribbed collar to front and back pieces.
Steam block to dimensions, making sure to pin out the scalloped hem, as well as the batwing sleeves.
Optional Tie Closure: Cut a 10” piece of yarn or ribbon and attach one piece on each side of the waist to tie closed.