

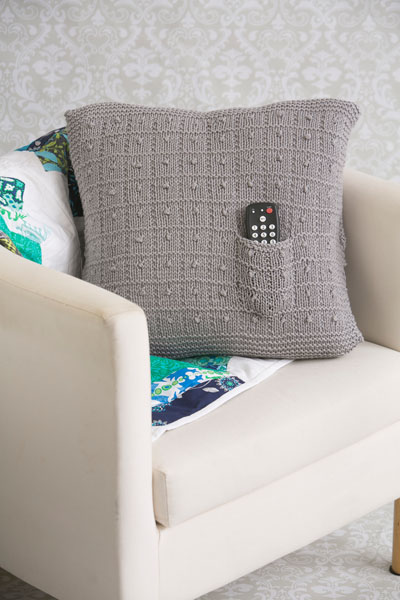
This pillow has a clean, modern design that will fit every décor. Made with an easy textured stitch – just knits and purls – that creates crisp squares with a knot in each center, this pillow features a pocket, where you can keep your TV remote, or anything else you want to keep handy.
Skill Level: Easy
Size: 16” x 34” [40 x 86 cm], to fit a 16” [40 cm] square pillow form
Gauge: 20 sts and 24 rows = 4” [10 cm] in St st after blocking
Materials
Yarn: Ewe Ewe Wooly Worsted (100% merino wool; 95 yards [87 meters]/50 grams): #97 Silver (5 balls)
Needles: US size 8 (5.0 mm) straight or circular needles
Notions: Markers, removable markers, stitch holders, waste yarn, tapestry needle, two 1” buttons
Special Stitches
Work Knot: (K1, p1, k1, p1) into next stitch, pass second, third, and fourth stitches over first.
Buttonhole
Be sure to work all the stitches tightly.
Knit to the point where the buttonhole will be placed. Hold the yarn in front of the work. Sl the first st on the LH needle purlwise. Move yarn to back of work. *Sl next st purlwise. Pass first slipped st over second slipped stitch. Rep from * 2 more times. Sl the last st back to the LH needle.
Turn work. Move yarn to back of work. CO 4 sts onto the left needle, using the Cable Cast On – but before placing the last loop on LH needle, bring yarn to the front; it will rest between two stitches.
Turn work. Sl first st from LH needle purlwise. Pass the last cast-on st over the slipped stitch. Pull yarn tight. Continue working the row.
Pattern Notes
This pattern is worked as a rectangle with a set-in pocket. It is folded and sewn on the sides. It has two buttons and buttonholes for a closure.
Pattern
Pocket Lining
CO 13 sts.
Row 1 (WS): Purl.
Row 2 (RS): Knit.
Rep Rows 1 and 2, 12 more times.
Break yarn, leaving an end about 36” [90 cm] long for tacking down lining. Leave pocket sts on a holder, spare ndl or waste yarn.
Pillow Cover – Section 1
CO 69 sts.
Setup Row 1 (WS): P1, k to last st, p1.
Setup Row 2 (RS): Knit.
Rep these 2 rows twice more.
The last row worked is Row 1 of Chart.
Row 2 (WS): P1, k4, p5, work Row 2 of Chart (from left to right) until 5 sts rem; k4, p1.
Row 3 (RS): K5, work Row 3 of Chart (from right to left), k10.
Row 4 (WS): P1, k4, p5, continue with Chart as set, ending with k4, p1.
Rows 5-40: Work 5 complete reps of all 8 rows of Chart, maintaining first and last sts in St st for selvedge, and 4 sts in garter st for border, ending with Row 8 of the 5th rep.
Row 41 (RS): Knit.
Row 42 (WS): P1, k to last st, p1.
Rows 43-58: Rep these 2 rows 8 more times.
Rows 59-90: Work 4 complete reps of all 8 rows of Chart, maintaining first and last sts in St st for selvedge, and 4 sts in garter st for border, ending with Row 8 of the 4th rep.
Note: Maintain selvedge sts and garter borders throughout remainder of piece.
Attach Pockets
Row 91 (RS): Work 16 sts in patt, hold Pocket Lining at back of work, RS facing; SSK next st tog with first st of Pocket Lining; slip next 11 Pillow Cover sts to waste yarn; k11 sts from Pocket Lining; k next st of lining tog with next Pillow Cover st, work in patt to end.
Cont in patt until piece measures 26” [65 cm], lightly stretched, ending with Row 6 of Chart.
Section 2
Row 1 (RS): Knit.
Row 2 (WS): P1, k to last st, p1.
Rows 3-18: Rep these 2 rows 8 more times.
Rows 19-58: Work 5 complete reps of all 8 rows of Chart, maintaining first and last sts in St st for selvedge, and 4 sts in garter st for border, ending with Row 8 of the 4th rep.
Row 59 (RS): Knit.
Row 60 (WS): P1, k to last st, p1.
Rows 61-62: Rep these 2 rows once more.
Row 63 (Buttonhole Row): K23, work 3-st buttonhole, k17, work 3-st buttonhole, k to end.
Row 64: P1, k to last st, p1.
Row 65: Knit.
Rows 66-69: Rep these 2 rows twice more.
BO all sts.
Finishing
For Pocket Top, return live sts to needle (from waste yarn).
Row 1 (RS): Knit.
BO loosely.
Sew Pocket Lining to WS of piece.
Weave in yarn ends. Block piece to required measurements.
Sew up sides of pillow cover so that garter borders are on top and bottom of square, and buttonhole band overlaps button band.
Sew buttons opposite buttonholes. 