

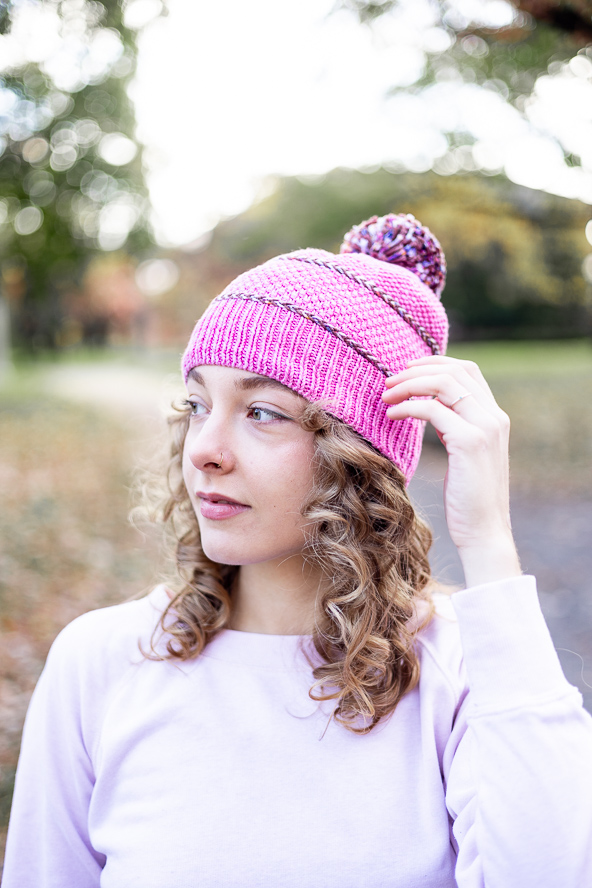
This fun design explores variations of *knit 1, purl 1* stitch patterns to create a textured hat that is very easy to customize. The pattern uses 1×1 ribbing, moss stitch and seed stitch to illustrate the different effects that are created by shifting the vertical alignment of alternating knits and purls, creating a bold sampler of textured stitch motifs. Featuring decorative Latvian braids, contrasting colors and topped with a speckled pom pom, this cozy hat will keep you stylish and warm all season long.
Time: Weekend Project
Skill Level: Intermediate
Size: 18″ [46 cm] circumference x 8″ [20 cm] height
Gauge: 26 sts and 38 rnds = 4” [10 cm] in moss st on larger needles
Materials
 Yarn: Malabrigo Verano (100% Pima Cotton; 205 yards [187 meters]/100 grams): 903 Impatient Pink (MC, 1 skein), 945 Summertime (CC1, 1 skein), 932 Mud (CC2, 1 skein)
Needles: US size 4 (3.5 mm) 16” circular needles
US size 5 (3.75 mm) 16” circular needles and DPNs
Notions: Marker(s), tapestry needle, 85-mm pompom maker
Abbreviations
P3tog – purl 3 stitches together
Pattern Notes
This pattern is worked in the round from the bottom up.
The stitch pattern repeats throughout the project are never more than 2 stitches wide, so it would be very simple to modify the circumference of the finished hat, or to adapt the pattern to work with any yarn/gauge, as desired.
The hat can also be customized by changing the directions of the Latvian braids, by using different colors, or by using gradations of a single hue in each tier for an ombre effect.
The p3tog decreases in the crown are staggered in an attempt to minimize the appearance of shaping lines that would disrupt the stitch pattern, but they can easily be aligned instead, if preferred.
Pattern
Brim (1×1 Ribbing)
With MC, CO 120 sts using a tubular method. Pm to indicate BOR and join to work in the round without twisting.
Rnd 1: With smaller needles, (p1, k1) around.
Rep Rnd 1 for 2.5” [6 cm].
Switch to larger needles.
1st Latvian Braid
Rnd 1: Join CC1 and CC2. (K1 with CC1, k1 with CC2) around.
Rnd 2: Bring both CC yarns to front. (P1 with CC1, p1 with CC2) around, bringing the new color over the old color for each st, twisting the working yarns tog.
Rnd 3: With both CC yarns still in front, (p1 with CC1, p1 with CC2) around, bringing the new color from under the old color for each st, untwisting the working yarns.
Break CC1 and CC2, leaving 6″ [15 cm] tails.
Body (Moss Stitch)
Rnd 1: With MC, k all.
Rnds 2-3: (K1, p1) around.
Rnds 4-5: (P1, k1) around.
Reps Rnds 2-5 for 2.5” [6 cm], ending after a rep of Rnd 4.
2nd Latvian Braid
Rep all instructions for 1st Latvian Braid.
Crown (Seed Stitch)
Rnd 1: With MC, k all.
Rnd 2: (K1, p1) around.
Rnd 3: (P1, k1) around.
Rnds 4-9: Rep Rnds 2-3.
Rnd 10: [(K1, p1) 10 times, k1, p3tog] around. (110 sts)
Rnd 11: Rep Rnd 3.
Rnds 12-15: Rep Rnds 2-3.
Rnd 16: [(K1, p1) 4 times, k1, p3tog, (k1, p1) 5 times] around. (100 sts)
Rnd 17: Rep Rnd 3.
Rnds 18-19: Rep Rnds 2-3.
Rnd 20: [(K1, p1) 6 times, k1, p3tog, (k1, p1) twice] around. (90 sts)
Rnd 21: Rep Rnd 3.
Rnds 22-23: Rep Rnds 2-3.
Rnd 24: [K1, p1, k1, p3tog, (k1, p1) 6 times] around. (80 sts)
Rnd 25: Rep Rnd 3.
Rnds 26-27: Rep Rnds 2-3.
Rnd 28: [(K1, p1) 6 times, k1, p3tog] around. (70 sts)
Rnd 29: Rep Rnd 3.
Rnd 30: [(K1, p1) twice, k1, p3tog, (k1, p1) 3 times] around. (60 sts)
Rnd 31: Rep Rnd 3.
Rnd 32: [(K1, p1) 3 times, k1, p3tog, k1, p1] around. (50 sts)
Rnd 33: Rep Rnd 3.
Rnd 34: [K1, p3tog, (k1, p1) 3 times] around. (40 sts)
Rnd 35: Rep Rnd 3.
Rnd 36: [(K1, p1) twice, k1, p3tog] around. (30 sts)
Rnd 37: Rep Rnd 3.
Rnd 38: (K1, p3tog, k1, p1) around. (20 sts)
Rnd 39: Rep Rnd 3.
Rnd 40: (K1, p3tog) around. (10 sts)
Break MC, leaving a long tail.
Thread tail onto tapestry needle and pull through 10 rem sts, cinching tightly to close.
Finishing
Weave in all ends. Wash and block.
Using CC1 and CC2 held together, make pompom and attach to crown.
Needs to be a PDF.
Hello! We currently do not allow downloads of our patterns, but are exploring options in the near future. You are welcome to save this pattern by copying and pasting into a word document or by printing the pattern via the printer icon on the left hand side of your screen. Hope this helps! – Nicola, Editor
So Nice! Thank you!