

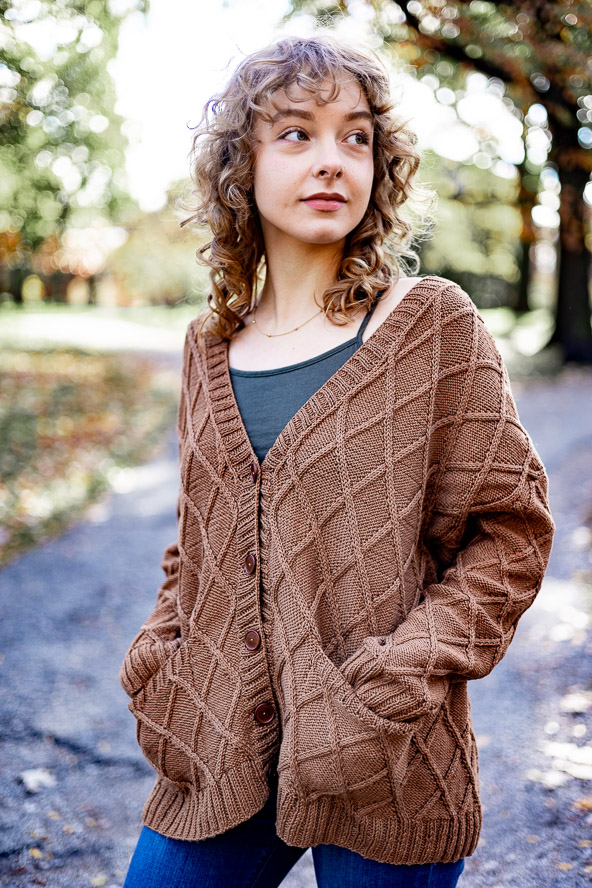
Aveline combines a classic V-neck style with a wonderful diamond pattern, long straight lines, button band, drop-shoulder sleeves and inset pockets. The result is a versatile and timeless garment you’ll wear all season.
Time: 88 Hours pattern
Skill level: Intermediate
Size: To fit bust 32 (36, 40, 44, 48)”, finished bust 42.25 (46.5, 50.5, 54.25, 58.5)”, with 10.5″ ease.
Shown in size 36″
Gauge: 28 sts and 32 rows = 4″ [10 cm] in charted pattern, after wet blocking; 22 sts and 28 rows = 4″ [10 cm] in St st.
Materials
 Yarn: Scheepjes Catona (100% Mercerized Cotton, 136 yards [125 meters]/50 grams): #157 Root Beer – 13 (14, 15, 16, 17) balls).
Needles: US size 3 (3.5mm) 16″, 32″ and 40″ circular needles
Notions: tapestry needle, cable needle, stitch holder, five ¾” buttons
Special Stitches
Vertical three-row buttonhole
The buttonhole recedes along the purl stitches in the rib and is worked during three consecutive rows as foll:
Row 1: With the RS facing, work in [k2, p2] ribbing as established to one st before the desired buttonhole position, ending with a knit stitch, [yarnover] 2 times, p2tog, work in rib to end of row, or to next buttonhole.
Row 2: Work to the double yarnover of the previous row, knit the first loop of the double yarnover and drop the second loop off the needle.
Row 3: Work in rib as established to the hole formed by the double yarnover, purl into the centre of the hole, then drop the stitch on the needle above the hole off the needle. –1 buttonhole completed.
Sloped BO
To prevent “stair steps” from forming between subsequent BO rows, use the sloped BO method as following: On the first BO row, bind off as usual to define the initial part of the slope. Work the next row to the last st, but do not work the last st. Turn work so that the unworked st becomes the first st on the RH needle. Sl the first st on the LH needle Pwise, then BO the unworked st by lifting it over the sl st and off the needle.
Double Selvedge stitch (ds)
Row 1 (RS): Sl 1 wyib, k1; work in given stitch pattern to last 2 sts; sl 1 wyib, p1.
Row 2 (WS): Sl 1 wyib, p1; work in given stitch pattern to last 2 sts; sl 1 wyif, p1.
Repeat these 2 rows.
Edge stitch (es)
Purl the first and last st of each row.
Pattern notes
In order for the pattern stitch to flow continuously around the body without interruption by side seams, the right front, back and left front are worked in a single piece to the armholes. Then the fronts and back are worked separately to the shoulders to create the armhole openings. A circular needle is used to accommodate the large number of sts.
When working the double selvedge st, after slipping the first st, pull the yarn as tight as possible before knitting or purling the next st.
Diamonds stitch pattern
Work according to chart. Start and finish as indicated on chart, and repeat in width every motif respectively. In height always repeat rows 1-28.
Note: At the edges and during shaping, if there are not enough stitches to work a cable, work remaining stitches in St st, or Rev st st, to maintain patt.
Pattern
Pocket linings (make 2)
CO 32 (32, 34, 34, 36) sts and work in St st until pocket measures 5″, inc evenly 10 sts on last row. 42 (42, 44, 44, 46) sts
Break yarn and leave sts on a holder.
Body
CO 290 (322, 350, 378, 408) sts and work in 2×2 ribbing until piece measures 2″.
Set pattern:
Next Row (RS): Es, work Row 1 of Diamonds stitch patt from chart, starting and finishing as indicated on chart, and repeating in width every 16-sts rep respectively, es.
Continue in Diamonds stitch patt as set for 42 (42, 42, 42, 42) rows, and with RS facing for next row.
Place pockets
Next row (RS): Work in patt 14 (18, 21, 24, 27) sts, sl next 42 (42, 44, 44, 46) sts onto a holder and, in their place, work in pattern across 42 (42, 44, 44, 46) sts of first pocket lining, continue in patt with the next 178 (202, 220, 242, 262) sts, sl next 42 (42, 44, 44, 46) sts onto a holder and, in their place, work in pattern across 42 (42, 44, 44, 46) sts of second pocket lining, continue in patt with the rem 14 (18, 21, 24, 27) sts.
Continue in patt until piece measures 13.75 (13.50, 14.25, 14, 14.25)” and with RS facing for next row.
Shape V-neck: Note: armhole shaping beg before shoulder shaping ends; read the foll sections all the way through before proceeding.
Dec 1 st 18 (16, 16, 16, 15) times at each beg and end of every 4th row and then 4 (10, 11, 11, 14) times at each beg and end of every 2nd row.
Right front
At the same time, when piece measures 14.50 (13.75, 14, 13.50, 12.75)” and with RS facing, separate work to shape armholes, as following:
Next row (RS): Work in patt 69 (78, 85, 91, 99) sts, inc 1 st at the end (for the armhole seam) and sl next 221 (244, 265, 287, 309) sts onto a holder. 70 (79, 86, 92, 100) sts
Continue in patt until piece measures 7.50 (8.25, 8.75, 9.5, 10.5)” from begin of armhole shaping and with WS facing for next row.
Shoulder shaping
Keeping patt correct, BO at the beginning of next and every WS row, as following: 8 (9, 10, 11, 12) sts 6 (5, 5, 5, 5) times and 0 (8, 9, 10, 11) sts 0 (1, 1, 1, 1) times.
Back
Bring back on the needle the next 152 (166, 180, 196, 210) sts from holder, and keeping patt correct, continue working the back, inc on the first row 1 st at each end (for the armhole seam), and leaving the rem sts on hold. 154 (168, 182, 198, 212) sts
Continue in patt until piece measures 7.50 (8.25, 8.75, 9.5, 10.5)” from begin of armhole shaping and with RS facing for next row.
Shoulder shaping
BO 8 (9, 10, 11, 12) sts at the beginning of next two rows, then BO at the beginning of every following row: 8 (9, 10, 11, 12) sts 10 (8, 8, 8, 8) times and 0 (8, 9, 10, 11) sts 0 (2, 2, 2, 2) times.
BO the rem 58 (62, 64, 68, 70) sts for neckline.
Left front
Bring back on the needle the rem sts from holder, and keeping patt correct, continue working the left front, inc on the first row 1 st at right edge (for the armhole seam).
Work as for right front, reversing shaping.
Sleeves (make 2)
CO 66 (66, 70, 72, 76) sts and work in 2×2 ribbing until piece measures 2″.
Continue in diamonds patt, following chart and inc 1 st at each edge as following:
On every following 6th (6th, 6th, 4th, 4th) row, 16 (10, 10, 25, 20) times, then at each edge of every following 0th (4th, 4th, 0th, 2nd) row, 0 (8, 10, 0, 10) times. 98 (102, 110, 122, 136) sts
Work even for 0 (4, 2, 2, 4) rows until piece measures 13.75 (13.75, 14.25, 14.25, 14.75)”,
Shape cup: BO 3 (3, 3, 4, 4) sts at the beg of next 18 (20, 26, 8, 18) rows, then 2 (2, 2, 3, 3) sts at the beg of following 10 (8, 2, 20, 10) rows. BO rem 24 (26, 28, 30, 34) sts.
Finishing
Front openings & neck band
With RS facing, and starting at Right Front cast-on edge, pu and k156 (156, 163, 163, 162) sts along Right Front edge, 58 (62, 64, 68, 70) sts along back neck and 156 (156, 163, 163, 162) sts along Left Front edge. 370 (374, 390, 394, 394) sts
Row 1 (WS): Ds, *k2, p2; rep to last 4 sts, k2, ds.
Row 2 (RS): Ds, p2, *k2, p2; rep to last 2 sts, ds.
These 2 rows form 2×2 rib. Work in rib as established for 1 more row.
SIZES 32 (36, -, -, 48) ONLY
Next Row (RS): Work 6 sts in rib as set, *work three-row buttonhole, work 18 sts in rib; rep from * 4 more times, work three-row buttonhole, work to end.
SIZES – (-, 40, 44, -) ONLY
Next Row (RS): Work 6 sts in rib as set, *work three-row buttonhole, work 18 sts in rib; rep from * 3 more times, work three-row buttonhole, work 20 sts in rib, work three-row buttonhole, work to end.
ALL SIZES
Work in rib as established for 5 more rows.
BO all sts in rib.
Block all pieces to finished measurements.
Sew the buttons on the left band, opposite to the buttonholes.
Whip-stitch pocket linings to WS of fronts. With yarn threaded on a tapestry needle, sew shoulder and underarm seams. Sew sleeves into armholes.
Pocket tops (make 2)
Sl 42 (42, 44, 44, 46) sts from pocket holder onto needles and rejoin yarn with RS facing. Work 6 rows in 2×2 rib and BO in rib. Sew sides of pocket tops to RS of fronts.
Weave in ends. Block again, if desired.