

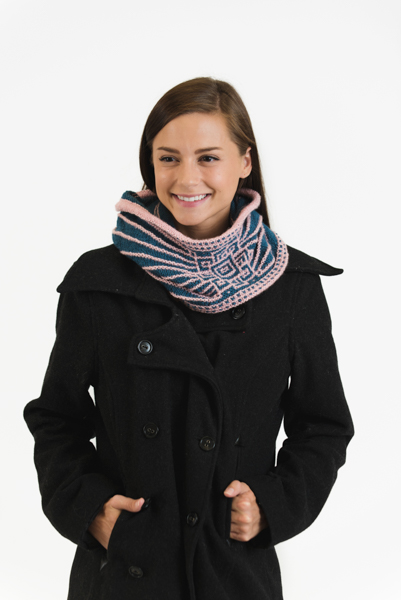
This softly draped cowl-hood features a mosaic colorwork central motif. This hooded cowl can be worn as a hood under a jacket to keep out the chill and then lowered to become a cowl once you’ve entered into the safety of the indoors.
Skill Level: Intermediate
Size: 21¼” / [54 cm] on the tallest part/hood x 5½” / [14 cm] on the shorter mosaic part x 23½” / [60 cm] circumference.
Gauge: 22 sts and 30 rows = 4” [10 cm] in St st with MC after wet blocking.
Materials
Yarn: NaturGarn Indiecita Alpaca (100% Alpaca; 182 yards [167 meters]/50 grams): Color 780 British (MC), 2 balls; Katia Concept Merino Silk (70% Merino Wool, 20% Silk, 10% Polyamide; 104 yards [95 meters]/25 grams): 103 (CC), 2 balls.
Needles: US size 3 (3.25 mm): 24” circular or DPNs; US size 4 (3.5 mm): 24” circular or DPNs.
Notions: Markers; stitch holders; waste yarn for provisional cast-on; tapestry needle.
Abbreviations
beg: Begin(ning)
k: Knit
CO: Cast On
MC: Main color
mds: Make double stitch (used for short rows)
p: Purl
pm: Place marker
RS: Right side
sl: Slip stitch (purlwise with yarn in back unless told otherwise)
st(s): Stitch(es)
WS: Wrong side
wyib: With yarn in back
wyif: With yarn in front
Special Stitches
German Short Rows
Make Double Stitch (Mds)
On RS
- Work to stitch specified in the pattern.
- Turn work with WS facing.
- Slip 1 st purlwise with yarn in front from left to right hand needle.
- Bring yarn up and over the needle to the back of the work. This will distort the stitch so it will show 2 legs instead of only 1 (the stitch is “doubled”).
- Bring yarn to front to purl the rest of the row.
On WS
- Work to stitch specified in the pattern.
- Turn work with RS facing, bring yarn to front.
- Slip 1 st purlwise with yarn in front from left to right hand needle
- Bring yarn up and over the needle to the back of the work. This will distort the stitch so it will show 2 legs instead of only 1 (the stitch is “doubled”).
To pick up doubled stitches
- Work to the doubled stitch.
- Work through both legs of the doubled stitch as if it was one simple stitch (like a k2tog or p2tog).
Kitchener stitch
See Ready, Set, Stitch for a full photo tutorial on the Kitchener stitch!
Fiore Pattern
Rnd 1: With MC, knit – 27 sts.
Rnd 2: With MC, purl.
Rnd 3: With CC, k5, sl2, k1, sl2, k7, sl2, k1, sl2, k5.
Rnd 4: With CC, p5, sl2 wyif, p1, sl2 wyif, p7, sl2 wyif, p1, sl2 wyif, p5.
Rnd 5: With MC, k4, sl1, k5, sl1, k1, sl1, k3, sl1, k5, sl1, k4.
Rnd 6: With MC, p4, sl1 wyif, p5, sl1 wyif, p1, sl1 wyif, p3, sl1 wyif, p5, sl1 wyif, p4.
Rnd 7: With CC, k11, sl1, k15.
Rnd 8: With CC, p11, sl1, p15.
Rnd 9: With MC, k4, sl1, k5, sl1, k1, sl1, k3, sl1, k5, sl1, k4.
Rnd 10: With MC, p4, sl1 wyif, p5, sl1 wyif, p1, sl1 wyif, p3, sl1 wyif, p5, sl1 wyif, p4.
Rnd 11: With CC, k5, sl1, k3, (sl1, k1) twice, (sl1, k3) twice, sl1, k5.
Rnd 12: With CC, p5, sl1 wyif, p3, (sl1 wyif, p1) twice, (sl1 wyif, p3) twice, sl1 wyif, p5.
Rnd 13: With MC, k4, (sl1, k1) 9 times, sl1, k4.
Rnd 14: With MC, p4, (sl1 wyif, p1) 9 times, sl1 wyif, p4.
Rnd 15: With CC, k5, sl1, k15, sl1, k5.
Rnd 16: With CC, p5, sl1 wyif, p15, sl1 wyif, p5.
Rnd 17: With MC, k4, sl1, k3, sl1, k9, sl1, k3, sl1, k4.
Rnd 18: With MC, p4, sl1 wyif, p3, sl1 wyif, p9, sl1 wyif, p3, sl1 wyif, p4.
Rnd 19: With CC, k9, sl1, k7, sl1, k9.
Rnd 20: With CC, p9, sl1 wyif, p7, sl1 wyif, p9.
Rnd 21: With MC, k2, (sl1, k1) 4 times, sl1, k5, sl1, k1, sl1, k5, sl1, k2.
Rnd 22: With MC, p2, (sl1 wyif, p1) 4 times, sl1 wyif, p5, sl1 wyif, p1, sl1 wyif, p5, sl1 wyif, p2.
Rnd 23: With CC, (k3, sl1, k1, sl1) 3 times, k5, sl1, k3.
Rnd 24: With CC, (p3, sl1 wyif, p1, sl1 wyif) 3 times, p5, sl1 wyif, p3.
Rnd 25: With MC, k2, sl1, k1, sl1, k3, (sl1, k1) 5 times, sl1, k3, sl1, k1, sl1, k2.
Rnd 26: With MC, p2, sl1 wyif, p1, sl1 wyif, p3, (sl1 wyif, p1) 5 times, sl1 wyif, p3, sl1 wyif, p1, sl1 wyif, p2.
Rnd 27: With CC, k3, sl1, k5, (sl1, k1, sl1, k3) 3 times.
Rnd 28: With CC, p3, sl1 wyif, p5, (sl1 wyif, p1, sl1 wyif, p3) 3 times.
Rnd 29: With MC, k2, (sl1, k5, sl1, k1) twice, (sl1, k1) 3 times, sl1, k2.
Rnd 30: With MC, p2, (sl1 wyif, p5, sl1 wyif, p1) twice, (sl1 wyif, p1) 3 times, sl1 wyif, p2.
Rnd 31: With CC, k9, sl1, k7, sl1, k9.
Rnd 32: With CC, p9, sl1 wyif, p7, sl1 wyif, p9.
Rnd 33: With MC, k4, sl1, k3, sl1, k9, sl1, k3, sl1, k4.
Rnd 34: With MC, p4, sl1 wyif, p3, sl1 wyif, p9, sl1 wyif, p3, sl1 wyif, p4.
Rnd 35: With CC, k5, sl1, k15, sl1, k5.
Rnd 36: With CC, p5, sl1 wyif, p15, sl1 wyif, p5.
Rnd 37: With MC, k4, (sl1, k1) 9 times, sl1, k4.
Rnd 38: With MC, p4, (sl1 wyif, p1) 9 times, sl1 wyif, p4.
Rnd 39: With CC, k5, (sl1, k3) twice, (sl1, k1) twice, sl1, k3, sl1, k5.
Rnd 40: With CC, p5, (sl1 wyif, p3) twice, (sl1 wyif, p1) twice, sl1 wyif, p3, sl1 wyif, p5.
Rnd 41: With MC, k4, sl1, k5, sl1, k3, sl1, k1, sl1, k5, sl1, k4.
Rnd 42: With MC, p4, sl1 wyif, p5, sl1 wyif, p3, sl1 wyif, p1, sl1 wyif, p5, sl1 wyif, p4.
Rnd 43: With CC, k15, sl1, k11.
Rnd 44: With CC, p15, sl1 wyif, p11.
Rnd 45: With MC, k4, sl1, k5, sl1, k1, sl1, k3, sl1, k5, sl1, k4.
Rnd 46: With MC, p4, sl1 wyif, p5, sl1 wyif, p1, sl1 wyif, p3, sl1 wyif, p5, sl1 wyif, p4.
Rnd 47: With CC, k5, sl2, k1, sl2, k7, sl2, k1, sl2, k5.
Rnd 48: With CC, p5, sl2 wyif, p1, sl2 wyif, p7, sl2 wyif, p1, sl2 wyif, p5.
Rnd 49: With MC, knit.
Rnd 50: With MC, purl.
Pattern Notes
The cowl is worked in the round, and the garter mosaic is worked only on a small part of the circumference (approx. 5″), while the rest is worked in simple stockinette stitch with garter ridges.
Garter stitch mosaic compresses the fabric vertically and working only part of the circumference in this way makes the rest of the cowl drape naturally in a gentle curve.
With the use of short rows this effect is underlined, so to obtain a piece that is significantly taller on the side of the circumference opposite to the mosaic part.
Pattern
With CC, smaller needles, and using the Provisional CO method, CO 136 sts. Join to work in the rnd, PM A for beg of rnd.
Work 6 rnds in St st.
Lower Border
Rnd 1: With CC, p to end.
Rnd 2: With MC, *k1, sl1 wyib; rep from * to end.
Rnd 3: With MC, *p1, sl1 wyib; rep from * to end.
Rnd 4: With CC, k to end.
Rep Rnds 1-4 once more.
Rnd 9: With CC and larger needles, p21, pm 1, p22, pm 2, p22, pm 3, p27, pm 4, p22, pm 5, p22.
Rnd 10: With MC, k to m 3, work in Fiore patt to m 4, k to end.
Short Row Section
Row 1: K to m 3, turn the work.
Row 2: Mds, p (past the beginning of the rnd m) to m 4, turn.
Row 3: Mds, k to m 2, turn.
Row 4: Mds, p to m 5, turn.
Row 5: Mds, k to m 1, turn.
Row 6: Mds, p to m A, turn.
Row 7: Mds, k to 12 past the m 1, turn.
Row 8: Mds, p to 12 past the m A, turn.
Row 9: Mds, k to 12 past the m 2, turn.
Row 10: Mds, p to 12 past the m 5, turn.
Row 11: Mds, k to m A.
Row 12: With MC, k to m 3, work in Fiore patt to m 4, k to end.
End working in rows.
Rnd 13: Change to CC, k to m 3, work in Fiore patt to m 4, k to end.
Rnd 14: With CC, p to m 3, work in Fiore patt to m 4, k to end.
Rnd 15: Change to MC, k to m 3, work in Fiore patt to m 4, k to end.
Rnd 16: With MC, work a Short Row Section.
Rep Rnds 13-16, 11 more times until the entire Fiore patt have been worked.
Change to CC, k to end, removing all markers with the exception of m A.
Upper Border
Rnd 1: With CC, p to end.
Rnd 2: With MC, *k1, sl1 wyib to end.
Rnd 3: With MC, *p1, sl1 wyib to end.
Rnd 4: Change to CC, k to end.
Rep Rnds 1-4 once, then Rnd 1 once more.
Break MC yarn and weave in ends.
Work 6 rnds in St st. Join live sts with the CC purl bumps on the WS of the rnd before the start of the Upper Border.
Finishing
Unravel the Provisional CO. Join the sts from the Provisional CO with the CC purl bumps on the WS of the rnd before the start of the Lower Border.
Weave in ends.
Wash the piece and let it dry flat.