

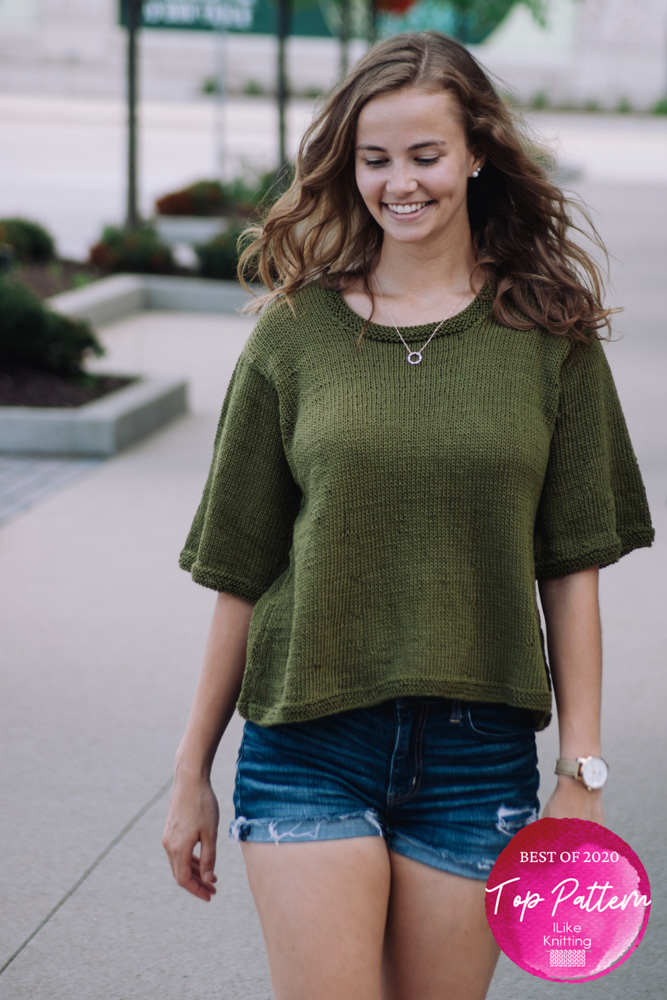
The Olive Flare Top is a timeless addition to your wardrobe, offering a simple yet sophisticated design that can be dressed up or down for any occasion. This top is knit in soft stockinette stitch throughout the body, providing a smooth and comfortable feel. The garter stitch trim along the lowered jewel neckline, sleeve edges, and bottom hem adds a subtle texture contrast, elevating the design without overpowering its simplicity.
What truly makes the Olive Flare Top stand out is its flattering silhouette. The gently flared body and elbow-length sleeves create an effortlessly chic shape that’s perfect for all body types. This piece is not only versatile but also incredibly easy to wear, making it an essential staple for your year-round wardrobe. Whether paired with jeans for a casual look or a skirt for a more polished style, the Olive Flare Top is a classic that will remain a favorite for seasons to come.
Skill Level: Easy
Size: Finished Bust Size 39 (43, 47, 51)”
3” positive ease recommended.
Shown in size 43”
Gauge: 19 sts and 24 rows = 4” [10 cm] in St st after a light steaming
Materials
 Yarn: Plymouth Yarn Cleo DK Cotton (100% Mercerized Pima Cotton; 125 yards [114 meters]/50 grams): #170 Olive (7 (8, 8, 9) skeins)
Needles: US size 6 (4mm) 16” and 24” circular for borders, US size 7 (4.5mm) 24” circular for front, back, and sleeves
Notions: Stitch markers, tapestry needle
Pattern Notes
This garment uses unit construction, which means each piece is finished as much as possible (bands, seams, etc.) before moving on to the next major piece. This eliminates much of the finishing work at the end – something many knitters dislike.
Circular needle is used to accommodate large number of sts. Do not join, work in rows.
Pattern
Back
With smaller 24” needle, CO 111 (121, 131, 141) sts.
Knit 8 rows.
Change to larger needle.
Purl 1 row.
Mark center 23 (29, 33, 35) sts
*Dec Row (RS): K1, ssk, knit to 2 sts before first marker, k2tog, sm, knit to second marker, sm, ssk, knit to last 3 sts, k2tog, k1. (4 sts dec’d)
Work even in St st for 9 rows.
Rep from * 4 times more. (91 (101, 111, 121) sts)
Work even until Back meas 15 (15, 16, 16)” above CO edge, ending with a WS row.
Shape Underarm
BO 9 (12, 15, 16) sts at beg of next 2 rows.
Dec 1 st each end every RS row 3 (3, 4, 5) times. (67 (71, 73, 79) sts)
Work even until armhole meas 7 (7.5, 8, 8.5)” above BO underarm sts, ending with a WS row.
Shape Back Neck and Shoulder
Mark center 17 (19, 19, 23) sts.
Next Row (RS): Knit to first marker, join second ball of yarn and BO center marked sts, knit to end of row.
Working on both sides of neck with separate balls of yarn, dec 1 st at each neck edge every row 3 times, AT THE SAME TIME, BO at each arm edge 7 (8, 8, 8) sts twice, then last 8 (7, 8, 9) sts.
Front
Work as Back until piece meas 3 (3.5, 4, 4.5)” above BO underarm sts, ending with a WS row.
Shape Neck
Mark center 15 (17, 17, 21) sts.
Next Row (RS): Knit to first marker, join second ball of yarn and BO center marked sts, knit to end of row.
Working on both sides of neck with separate balls of yarn, dec 1 st at each neck edge every RS row 4 times.
Work even until armhole meas same as Back above BO underarm sts, ending with a WS row.
Shape Shoulders
BO at each arm edge 7 (8, 8,8) sts twice, then last 8 (7, 8, 9) sts.
Neckband
Sew shoulder seams.
With smaller 16” circular needle, pick up and k3 sts for every 4 rows and 1 st in each BO st of Front and Back neck. Join, placing marker between first and last st.
Beg with a purl row, work even in garter st for 6 rnds.
BO purlwise.
Sleeves
With smaller needle, CO 81 (86, 90, 95) sts.
Knit 8 rows.
Purl 1 row.
Change to larger needle.
Next Row (RS): K3, ssk, knit to last 5 sts, k2tog, k3. (2 sts dec’d)
Mark center 21 (22, 26, 29) sts.
*Work even in St st for 7 rows.
Dec Row (RS): K3, ssk, knit to 2 sts before first marker, k2tog, sm, knit to second marker, sm, ssk, knit to last 5 sts, k2tog, k3. (4 sts dec’d)
Rep from * twice more. (67 (72, 76, 81) sts)
Work even until Sleeve meas 8 (8, 9, 9)” above CO edge, ending with a WS row.
Shape Sleeve Cap
Mark each end st for underarm.
Work even for 1.75 (2.5, 2.75, 3)” above markers.
Dec 1 st each end every RS row 3 (3, 4, 5) times. (61 (66, 68, 71) sts)
BO all sts.
Finishing
Sew Sleeves into armholes, matching marked underarm sts to first BO underarm sts.
Sew Sleeve and side seams.
Weave in all ends. Steam lightly.
Hi there I’m confused about the line above the decrease row in the “back” section- mark center 23 stitches. What is 23 the center of? Also In a q above there’s a note to place two markers, still a little puzzling to me.
Hi Jo, thanks for reaching out! The 23 stitches are in the center of the 111 you’d casted on. So you should have 44 stitches on the right and 44 stitches on the left. So, you should place stitch markers at each side of those center 23 stitches. In other words, mark stitch #45, and stitch #67. I hope that helps! -Dana, Editor
I need to know how to do knit and purl wise stitches, please help me.
Hi there, you may find these articles helpful: https://www.ilikeknitting.com/category/knitting-pattern-basics/
– Nicola, Editor
Hi how do I find out what the abbreviations mean please like sm, bo, etc
bo = bind off
sm = slip marker
thanks! I got the schematics download from the magazine
Dec Row (RS): K1, ssk, knit to 2 sts before first marker, k2tog, sm, knit to second marker, sm, ssk, knit to last 3 sts, k2tog, k1. (4 sts dec’d)
You only say place center marker, what do you mean “knit to second marker?
Hello Cara! I’ve reached out to the designer for advice and she or I will reply as soon as possible. Thanks! – Nicola, Editor
It’s March 10, has this been clarified?
Hi Marsha, I apologize for the delay! You place 2 markers – one on each side of Center sts. Hope this helps! – Nicola, Editor
What does the bottom look like? Would like to see more views of sweater.
Sorry about that! More photos are available now. 🙂