

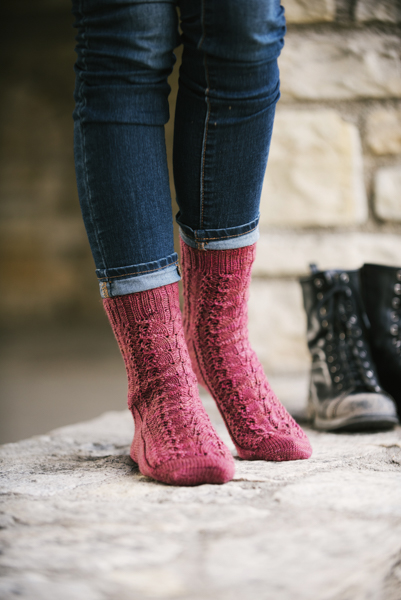
The shade of ripened cranberries just before their fall harvest inspired the deep color of these socks. Not only does the yarn have just the right pop of fall flair, the distinctive stitch pattern will make you glad to kick off those shoes and show off your cozy style.
Skill Level: Intermediate
Size: Small (Medium, Large), approximate 6¾ (7¾, 8 ¾)” circumferences around the foot and ankle with the leg height and foot length of all sizes adjustable to fit and preference.
Shown in size Medium.
Gauge: 36 sts and 44 rows = 4” [10 cm] in St st, blocked.
Materials
Yarn:
![]() Blue Moon Fiber Arts Socks that Rock Lightweight (100% Merino; 405 yards [370 meters]/146 grams): Princess Plummy, 1 skein.
Blue Moon Fiber Arts Socks that Rock Lightweight (100% Merino; 405 yards [370 meters]/146 grams): Princess Plummy, 1 skein.
Needles: US size 1.5 (2.5 mm): DPNS or 40-47” circular for magic loop.
Notions: 1 stitch marker (optional); tapestry needle.
Abbreviations
co= cast on
bo= bind off
st(s)= stitch(es)
sl1= slip 1 stitch purl-wise
k= knit
p= purl
ktbl= knit through the back loop
kfb= knit into the front of the stitch and then into the back of the stitch
k2tog= knit 2 sts together
ssk= slip two stitches as if to knit, one at a time, k2tog through the back loop
p2tog= purl 2 sts together
Special Stitches
Stitch Pattern
Note: The written instructions are for the first half of the stitches.
For foot and leg in St st, work round instructions followed by k28 (32, 36) sts.
To have the pattern on the front and back of the leg, work round instructions twice.
Rnd 1: P1 (3, 5), k2tog, yo, p2, yo, ssk, k2tog, k4, yo, p2, yo, k4, ssk, k2tog, yo, p2, yo, ssk, p1 (3, 5).
Rnd 2: P1 (3, 5), k2, p2, k2, k2tog, k3, yo, k1, p2, k1, yo, k3, ssk, k2, p2, k2, p1 (3, 5).
Rnd 3: P1 (3, 5), yo, ssk, p2, k2tog, yo, k2tog, k2, yo, k2, p2, k2, yo, k2, ssk, yo, ssk, p2, k2tog, yo, p1 (3, 5).
Rnd 4: P1 (3, 5), k2, p2, k2, k2tog, k1, yo, k3, p2, k3, yo, k1, ssk, k2, p2, k2, p1 (3, 5).
Rnd 5: P1 (3, 5), k2tog, yo, p2, yo, ssk, k2tog, yo, k4, p2, k4, yo, ssk, k2tog, yo, p2, yo, ssk, p1 (3, 5).
Rnd 6: P1 (3, 5), k2, p2, k1, k2tog, yo, k5, p2, k5, yo, ssk, k1, p2, k2, p1 (3, 5).
Rnd 7: P1 (3, 5), yo, ssk, p2, k2tog, yo, k6, p2, k6, yo, ssk, p2, k2tog, yo, p1 (3, 5).
Rnd 8: P1 (3, 5), k2, p2, k8, p2, k8, p2, k2, p1 (3, 5).
Rep Rnds 1-8 for patt.
Pattern Notes
The socks are worked from the toe-up. The pattern is written for DPNs referring to Needles 1-4.
You can accommodate it for Magic Loop or 2 circulars by in the beginning using the front for Needles 1 and 2 and the back for Needles 3 and 4.
Pattern
Toe
Using a toe up cast-on (I prefer Judy’s Magic Cast-On method), CO 28 (32, 36) sts. Divide sts evenly on the needles. Place a stitch marker to note the beginning of rnd. (Note:.)
Note: If using DPNs, you may need to move sts from needle to needle from time to time to accommodate the Stitch Pattern. Needles 1 and 2 are the top of the toe sts. Needles 3 and 4 are the bottom of the toe sts.
Set-up Rnd: Knit all sts on each needle.
Rnd 1: Needle 1: kfb, knit to end of needle.
Needle 2: k to last 2 sts, kfb, k1.
Needle 3: kfb, k to end of needle.
Needle 4: k to last 2 sts, kfb, k1.
Rnd 2: Knit all sts on each needle.
Rep Rnds 1-2 until there are 56 (64, 72) sts total.
Note: If you prefer a more pointed toe, CO on fewer sts and then work more rnds until you have increased to 56 (64, 72) sts. If you prefer a different toe, by all means, work toe of preference until you have the desired amount of sts.
Foot
Note: Needles 1 and 2 will be the top of the foot (working the Stitch Pattern) and Needles 3 and 4 will become the sole stitches (working in St st). Begin working from the chart or written instructions, repeating Rnds 1-8.
Cont working in est patt until Foot meas 2½” shorter (LESS) than the entire desired length of your foot.
Gusset
In this section, Needles 1 and 2 will cont in Stitch Pattern up the Foot and towards the front of the leg. Needles 3 and 4 will be increasing and forming the instep gusset on the Sole of the foot working towards the heel of the sock.
Rnd 1: Needles 1 and 2: Cont working the next row in patt.
Needle 3: kfb, k to end of needle.
Needle 4: k to last 2 sts, kfb, k1.
Rnd 2: Needles 1 and 2: Cont working in patt.
Needles 3 and 4: k all sts.
Rep these 2 rnds until there are 48 (56, 64) sts on Needles 3 and 4.
Turning the Heel
Work over Needles 1 and 2 once more. These will hold the top sts.
Cont working back and forth over Needles 3 and 4 for turning the heel.
Note: Make special note of the last rnd worked in Stitch Pattern as you will cont working that same rnd once the heel has been turned.
Row 1 (RS): K27 (31, 35), ssk, k1, turn.
Row 2 (WS): Sl1, p7, p2tog, p1, turn.
Row 3: Sl1, k to 1 st before gap, ssk, k1, turn.
Row 4: Sl1, p to 1 st before gap, p2tog, p1, turn.
Rep these last 2 rows until there are 28 (32, 36) sts rem on Needles 3 and 4.
Leg
Resume working on all 4 needles, paying careful attention to working the rest of the same row in Stitch Pattern where you left off to turn the heel.
Note: The sample is shown with the Stitch Pattern on both the front and the back of the sock.
You can make this sock as simple or as detailed as you would like.
If you wish to keep the back of the leg in St st, keep working the pattern as you were.
If you wish to have the Stitch Pattern on the back of the sock same as for the front, start working the back of the sock repeating the same row as worked over Needles 1 and 2 before working the gusset. After that, work the Stitch Pattern twice.
Either way you choose to do the leg, you may need to pick up a st on either side to close up any holes there may be, remembering to k2tog or ssk with an end st to maintain the correct st count.
Work Leg until meas 1½-2” shorter (LESS) than the entire desired length of the sock.
Cuff (Ribbing)
Knit 1 rnd.
Rnd 1: (Ktbl, p1) 28 (32, 36) times.
Rep Rnd 1 for 1½-2”.
BO all sts in patt using a stretchy bind-off.
Make second Sock same as first.
Finishing
Weave in all ends. 
how do i print the patterns i want
Hello Dolores! You are welcome to save this pattern by copying and pasting into a word document or by printing the pattern via the printer icon on the left hand side of your screen. Hope this helps! – Nicola, Editor
Hello, Nicola.
Would you answer my questions posted on Jan 17th?
I am looking forward to finishing these socks. I don’t want to screw up the pattern now! The yarn is coming from needle 3/4 (the back of sock) WS. How do I continue knitting??
I have not heard back from the designer on your questions. In the meantime, perhaps other knitters on Ravelry who have completed this pattern could offer some insight?
https://www.ravelry.com/patterns/library/cranberry-harvest-socks
I have some questions regarding this beautiful sock pattern.
1) When working on the FOOT section, I subtracted a 10% negative ease from my foot length (many sock tutorials recommended that) and then proceeded to subtract the 2.5 inch. The sock will be too small. My gauge is correct. My guess the negative ease was already included????
2) I completed the TURNING THE HEEL section, finishing on the WS with row 4 as directed. Now I am lost. Sentence #5 states “start working the back of the sock, repeat the same row as worked on Needles 1 and 2 before working the gusset. …work stitch pattern twice.”
I am using two circular needles – one for each sock – magic loop.
I completed the FRONT of sock with row 8 of stitch pattern.
The yarn is coming from the BACK of the sock, implying that I continue on the FRONT of sock, which would be in pattern. BUT the yarn is in the wrong place!
OR do I knit the back starting in stitch pattern with row #1? Then continue the front of sock in SAME ROW AS BACK???
Also does “work st pattern twice ” mean 16 rows as there are 8 rows in the stitch pattern?? HELP!!!
Any assistance is welcome.
#1 You will be going from the FOOT section to the GUSSET section–the place where it widens to fit around your instep. Just continue on with those instructions. Where it says to
Rnd 1: Needles 1 and 2: Cont working the next row in patt.
Needle 3: kfb, k to end of needle.
Needle 4: k to last 2 sts, kfb, k1.
Rnd 2: Needles 1 and 2: Cont working in patt.
Needles 3 and 4: k all sts.
the kfb’s are the increases on both sides of the sock, then you knit one round.
You should enc up with the gusset section equaling 2-1/2″
#2 When you are turning the heel you are getting rid of the extra stitches. That’s what the ssk and p2tog are for. Looking at the photo shows this. You are going up the back of the heel. See the diagonal line? That is the decreases.
There is no Line 5, it goes to the leg section. If you want your socks to look like the photo, you have to repeat the chart twice to have it look the same on the front and the back of the sock. Otherwise the back will be plain stockinette stitch. In the photo, see the row of purl stitches up the side? That will be wider for larger socks, where you repeat the chart.
Yes, You would start with Row 1 on the back, knit across to the other side of the sock, then Row 1 again on the front if you stopped with Row 8 on the front. You will continue repeating the 8 rows of the chart, like you did on the foot part, but this time on the front and back of the sock until you have the sock as tall as you want it–minus the cuff.
Hope this helps.
What is the magic loop method and where do I find it?
The magic loop knitting method is a technique used to knit small-diameter circular projects, such as socks, sleeves, or hats, using a long circular needle. This method eliminates the need for double-pointed needles or multiple sets of circular needles for small circumference projects. The magic loop technique is especially useful when you have a small number of stitches, like when working on the crown of a hat or the toe of a sock. The magic loop method allows you to knit in the round with a single long circular needle, eliminating the need for double-pointed needles or multiple circular needles. It’s a versatile technique and can be particularly helpful for projects with a small circumference. There are tutorials out there that will do a better job of demonstrating technique, but I hope this helps for now!
looks like a very beautiful pattern I can’t wait to try it.
I am new to the club. I would like a pdf of this sock pattern so I can download into my knit companion program. Charts confuse me and have always used the print version
Hello Tara! Thank you for your feedback. We are always looking for new ways to improve our user experience. We currently do not allow downloads of our patterns, but are exploring options in the near future. – Nicola, Editor
I love Penny’s patterns. They are always clear and beautiful. This one is perfect fir Valentine’s Day!
Hi! Lovely pattern. I downloaded the Cranberry Harvest Socks chart, which when you open it is called Cranberry Blossoms Socks chart – I’m assuming they are the same thing! I haven’t used charts a lot, but it looks like it might match the socks picture….
Hi Ruth, yes it’s just a naming error and it is the correct chart. Always good to check! – Nicola, Editor
I am a new member and am wondering how I can save a pattern in my knitting companion so that I have access to my row counters etc. I am able to download the charts but not the pattern itself
Hello! At this time, we do not offer pattern downloads. You are welcome to save this pattern by copying and pasting into a word document or by printing the pattern via the printer icon on the left hand side of your screen. Hope this helps! – Nicola, Editor
I am able to download into Knit Companion by printing as a pdf file and then emailing it to myself. When I open my email, I can then download into Knit Companion.
It would be nice to have the ability to print the patterns. If I missed it, please let me know where it is.
Hi Sharon! There should be a printer icon that’s green and white that floats on the left hand side of your screen. If that’s not there, please let us know by contacting our customer service team! You also may be able to use your browser’s file + print option of just ctrl+p if all else fails. Hope that helps! – Nicola, Editor
https://www.ilikeknitting.com/contact-us/
Do you have access to a video on learning how to knit socks? I have never tried to knit them and would like to learn how.
If you have access to Internet by computer or smartphone you can go to YouTube channel by Earthtonesgirl Podcast “No Fear Sock Knitting” FREE classes with lots of videos from start to finish by a great teacher! Denise is great to learn from because she goes slow, has excellent close-ups, explains everything so well 😀 (this is just one of many tutorials on YouTube so look at a bunch to find the techniques you are interested in learning) You can do it! 🙂