

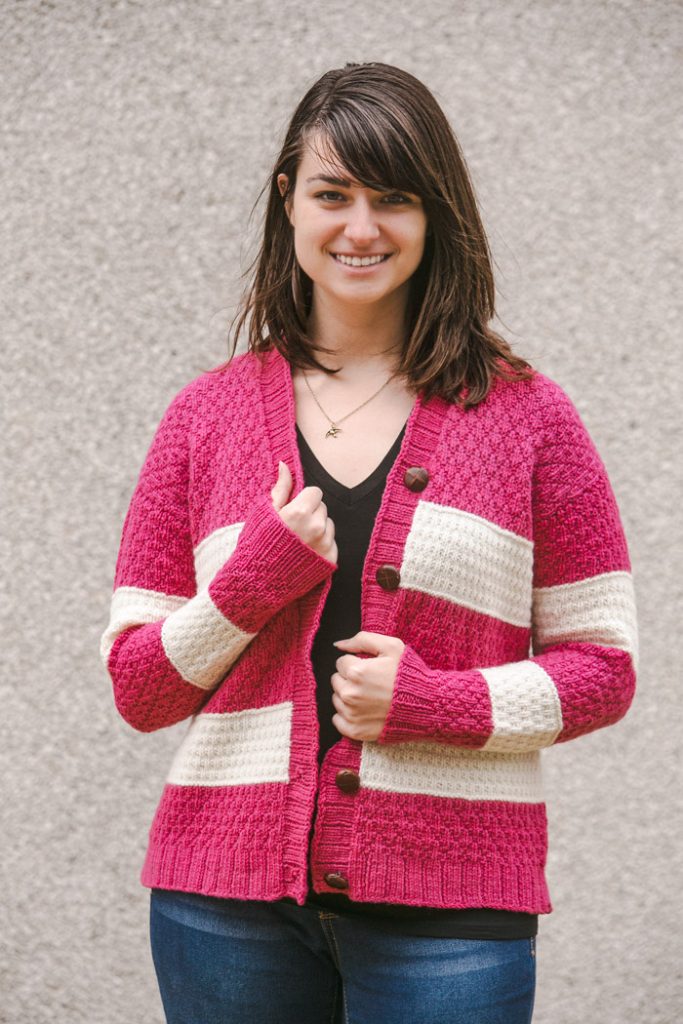
Featuring an allover textured stitch pattern, modified drop shoulders, and bold, playful stripes in two (or more) colors, this cardigan strikes the perfect balance between style and snugness. The sweater is worked in pieces and seamed for a structured yet relaxed fit, creating a cocoon of softness that you’ll never want to take off.
Dress it up with your favorite boots and jeans, or pair it with leggings for a cozy day at home—this sweater is versatile, vibrant, and irresistibly comfy.
Skill Level: Easy
Sizes: S (M, L, XL, XXL); Chest/Bust at Underarm: 39.6 (46, 49.2, 52, 55.6)”; Length: 24 (26, 26, 27, 27)”
The Boyfriend Cardigan was designed with 4”-5” positive ease.
Gauge: 20 sts and 28 rows = 4″ in pattern
Materials
 Yarn: Blacker Swan Falkland Islands Wool DK (100% pure new wool; 119 yards [110 meters]/50 grams): Guava Pink (MC, 7 (8, 9, 10, 11) skeins), Dusty Miller (CC, 3 (4, 4, 4, 4) skeins)
Needles: US size 6 (4.0 mm) needles or size to obtain correct gauge
Notions: Tapestry needle, 5 or 6 ½” to ¾” -diameter buttons
Special Stitches
Seersucker Stitch (multiple of 4)
Row 1 (RS): *K1, p1, repeat from * to end.
Row 2 and all WS rows: Work each st in the manner it presents.
Row 3: *P1, k3, repeat from * to end.
Row 5: Rep row 1.
Row 7: *K2, p1, k1, repeat from * to end.
Rep Rows 1-8 for Seersucker Stitch.
Granite Stitch (multiple of 2)
Row 1 (RS): K across.
Row 2 (WS): P across.
Row 3: *P1, k1, repeat from * to end.
Row 4: Work each st in the manner it presents.
Row 5: Rep row 1.
Row 6: Rep row 2.
Row 7: *K1, p1, repeat from * to end.
Row 8: Rep row 4.
Rep Rows 1-8 for Granite Stitch.
Pattern
Back
With MC, cast on 101 (117, 125, 133, 141) sts.
K1, *k3, p1, rep from * to last st, k1. The first and last st of every row should be k to create the selvedge for seaming. Work in k3, p1 rib for 12 more rows.
Row 14 (WS): P1, m1, p2, *k1, p3, rep from * to end of row.
Begin Seersucker Stitch. Work even for 18 rows, ending with a WS row. Break MC. With CC, k 2 rows. Begin Granite Stitch. Work even for 22 rows, ending with a WS row. P 1 row. Break CC. With MC, p one row. Resume Seersucker Stitch. Work even for 30 rows, ending with a WS row. Break MC. With CC, k 2 rows. Resume Granite Stitch. Work even for 22 rows, ending with a WS row. P 1 row. Break CC. With MC, p one row. Resume Seersucker Stitch. Work even for 10 (14, 14, 14, 16) rows, ending with a WS row.
Armhole Bind Off
Bind off 8 (10, 10, 12, 14) sts at beginning of next 2 rows. (86 (98, 106, 110, 114) sts)
Work even, remember to continue selvedge st, for 48 (51, 57, 63, 68) rows, ending with a WS row. Bind off in pattern.
Left Front
Read ahead: Neck shaping will begin AT THE SAME TIME as armhole bind off! Be diligent about your row counts and you won’t have any problems.
With MC, cast on 49 (53, 57, 65, 69) sts. K1, *k3, p1, rep from * to last st, k1. The first and last st of every row should be k to create the selvedge for seaming. Work in k3, p1 rib for 12 more rows.
Row 14 (WS): P1, m1, p2, *k1, p3, rep from * to end of row.
Begin Seersucker Stitch. Work even for 18 rows, ending with a WS row. Break MC. With CC, k 2 rows. Begin Granite Stitch. Work even for 22 rows, ending with a WS row. P 1 row. Break CC. With MC, p one row. Resume Seersucker Stitch. Work even for 30 rows, ending with a WS row. Break MC. With CC, k 2 rows. Resume Granite Stitch. Work even for 22 rows, ending with a WS row. P 1 row. Break CC. With MC, p one row. Resume Seersucker Stitch. Work even for 10 (14, 14, 14, 16) rows, ending with a WS row.
Armhole Bind Off
Bind off 8 (10, 10, 12, 14) sts at beginning of next row. Work even, remember to continue selvedge st, for 48 (51, 57, 63, 68) rows, ending with a WS row. Bind off in pattern.
At the same time, begin neck shaping:
Neck Shaping
**Remember to continue selvedge st.
Dec RS row: k1, work in pat to last 3 sts, k2tog, k1. Repeat dec row every 4 rows, 9 (10, 11, 12, 14) times. Then every 2 rows, 3 (2, 3, 4, 3) times. Work even for 6 (7, 7, 7, 6) rows or until armhole measures same as Back to shoulders, ending with a WS row.
Right Front
Work as for Left Front until Armhole Bind Off/Neck Shaping. Then continue as follows:
Neck Shaping
**Remember to continue selvedge st.
Dec RS row: K1, ssk, work in pat to end of row. Repeat dec row every 4 rows, 9 (10, 11, 12, 14) times. Then every 2 rows, 3 (2, 3, 4, 3) times. Work even for 6 (7, 7, 7, 6) rows or until armhole measures same as Back to shoulders, ending with a WS row.
At the same time, bind off armhole stitches:
Armhole Bind Off
Bind off 8 (10, 10, 12, 14) sts at beginning of next WS row. Work even, remember to continue selvedge st, for 48 (51, 57, 63, 68) rows, ending with a WS row. Bind off in pattern.
Sleeves – Make 2
With MC, cast on 33 (37, 37, 41, 45) sts. K1, *k3, p1, rep from * to last st, k1. The first and last st of every row should be k to create the selvedge for seaming. Work in k3, p1 rib for 12 more rows.
Row 14 (WS): P1, m1, p2, *k1, p3, rep from * to end of row.
Begin Seersucker Stitch. Work even for 6 rows, ending with a WS row. BEGIN SLEEVE SHAPING, AT SAME TIME continue Seersucker Stitch. Work even for 12 (6, 6, 4, 2) more rows, ending with a WS row. Break MC. With CC, k 2 rows. Begin Granite Stitch. Work even for 22 rows, ending with a WS row. P 1 row. Break CC. With MC, p one row. Resume Seersucker Stitch. Work even for 30 rows, ending with a WS row. Break MC. With CC, k 2 rows. Resume Granite Stitch. Work even for 22 rows, ending with a WS row. P 1 row. Break CC. With MC, p one row. Resume Seersucker Stitch. Work even for 24 (26, 26, 30, 32) rows, ending with a WS row. Bind off in pattern.
Sleeve Shaping
Inc Row (RS): K1, m1, work to last st, m1, k1. Rep Inc Row every 6 (6, 4, 4, 4) rows 9 (8, 22, 17, 13) times, then every 4 (4, 2, 2, 2) rows 9 (10, 0, 7, 13) times.
Finishing
Block pieces. Sew shoulder seams. Using coil-less safety pins, on the Right Front, mark where you will make your button holes. I suggest placing your first button just under your bust. Depending on the size you are making 5 – 6 buttons evenly spaced between the bust and the bottom should look nice. I like using the k rib for the button holes. It looks neat and clean and the ribs are easy to count for even spacing. Once you’ve worked a few rows of the front bands you can make slight adjustments to your buttonhole placements so they fall on a k rib.
Neck Band
With RS facing and using MC, on bottom of the Right Front pick up about 5 sts for every 7 rows around neck. I like to pick up my sts before working them so I can make sure things are even. You should pick up a multiple of 4 + 3 sts. Beginning at bottom of the right side of the sweater, work in k3, p1 rib for 4 rows. On next RS row work row 1 of button holes at markers. Work row 2 (WS) of button holes. Work 3 more rows. Bind off in rib.
Button Holes
Row 1 (RS): Work to stitch marker or beginning of k3 section of the rib where button hole will be placed. Bind off 2 sts. Continue in k3, p1 rib.
Row 2 (WS): Work in k3, p1 rib to button hole. Using the backwards loop cast on 2 sts. Continue in k3, p1 rib.
Set in sleeves. Sew underarm and sleeve seams. Weave in ends. Sew buttons opposite buttonholes.