

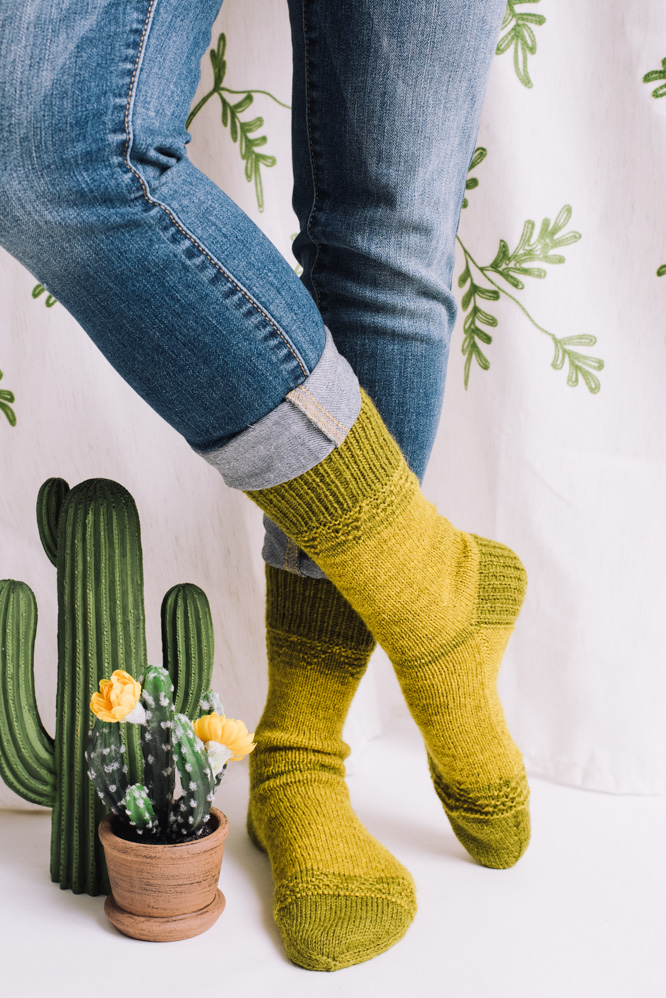
Simple and interesting, the Prickly Pear Socks have a variety of design features that keep the knitter on their “toes.” Worked from the top down, they start with a ribbed cuff, two-color slipped stitch design transitions and so much more!
Skill Level: Intermediate
Size: Extra Small (Small, Medium, Large) 6.5 (7.5, 8.5, 9.5)” / [16.5 (19, 21.5, 24) cm] foot circumference
0.5 to 1” negative ease recommended.
Shown in size Medium.
Gauge: 32 sts and 44 rows = 4” [10 cm] in St st.
Materials
 Yarn: The Fibre Co. Cumbria Fingering (90% Wool, 10% Mohair; 328 yards [300 meters]/100 grams): CUF016 Helvellyn (MC, 1 skein), CUF014 Buttermere (CC, 1 skein).
Needles: US size 1 (2.25 mm) set of 4 DPNs
Notions: Markers, removable markers, stitch holders, tapestry needle.
Abbreviation
skp – Slip 1, k1, pass slipped stitch over
Special Stitches
K1, P1 Ribbing
Rnd 1: *K1, p1; rep from * around.
Rep Rnd 1 for patt.
2-Color Cuff Slip Stitch Pattern
Rnd 1: With MC, k around.
Rnd 2: With CC, k around.
Rnd 3: With MC, *k1, p1, sl1, p1, sl1, p1, sl1, p1; rep from * around.
Rnds 4-5: Rep Rnds 1-2.
Rnd 6: With MC, *k2, p1, sl1, p1, sl1, p1, k1; rep from * around.
Rnds 7-8: Rep Rnds 1-2.
Rnd 9: With MC, *k3, p1, sl1, p1, k2; rep from * around.
Rnds 10-11: Rep Rnds 1-2.
Rnd 12: With MC *k4, p1, k3; rep from * around.
2-Color Toe Slip Stitch Pattern
Rnd 1: With MC, *k4, p1, k3; rep from * around.
Rnd 2: With MC, k around.
Rnd 3: With CC, k around.
Rnd 4: With MC, *k3, p1, sl1, p1, k2; rep from * around.
Rnds 5-6: Rep Rnds 2-3.
Rnd 7: With MC, *k2, p1, sl1, p1, sl1, p1, k1; rep from * around.
Rnds 8-9: Rep Rnds 2-3.
Rnd 10: With MC, *k1, p1, sl1, p1, sl1, p1, sl1, p1; rep from * around
Rnds 11-12: Rep Rnds 2-3.
Rnd 13: With MC, *p all sts around.
Pattern Notes
This pattern is worked in the round from the top down with a heel flap and gusset.
The use of 4 DPNs (double pointed needles) is described throughout.
Pattern
CO 48 (56, 64, 72) sts, using Cast on with Jeny’s stretchy slipknot cast on or any other elastic cast on and distribute sts to 3 DPNs (half of the sts on 1 DPN, one quarter sts each on 2 DPNs).
Close the rnd.
Work K1, P1 Ribbing around for 26 Rnds.
Change to CC, k 1 rnd.
Change to MC, p 1 rnd.
Work 2-Color Cuff Slip Stitch Pattern once.
Change to CC, k 40 rnds.
Change to MC, k around.
Change to CC, k around. Do not cut the CC unused strand.
Change to MC, k around.
Heel
At the end of the last row, turn the work and p24 (28, 32, 36) heel sts, turn. The heel sts will be worked back and forth on a single DPN. The unworked 24 (28, 32, 36) instep sts are moved onto a st holder.
Heel Row 1: *Sl1, k1; rep from * to last 3 sts, k2, sl1, turn.
Heel Row 2: P across, turn.
Rep Heel Rows 1-2 a total of 12 times. (26 rows worked)
Turn the heel
Foundation Row RS: K16 (19, 21, 24) sts, skp, turn. (1 st dec’d left of heel flap)
WS Row: Sl1, p8 (10, 10, 12) sts, p2tog, turn. (1 st dec’d right of heel flap)
RS Row: Sl1, k to 1 st before the gap, skp, turn. (1 st dec’d left of heel flap)
WS Row: Sl1, p to 1 st before the gap, p2tog, turn. (1 st dec’d right of heel flap)
Cont last 2 rows until there are only heel flap sts rem.
Shape the Gusset
Return the sts from the holder to a needle. You’ve now got the instep stitches on one needle, and rem heel sts on a second, with two selvedge edges bet them.
K across the heel sts, do not turn the work.
Using a new needle, pick up 14 sts along the left side of the heel and k those sts. This will be referred to as Needle 1.
K across the instep (non-heel) stitches. This will be referred to as Needle 2.
Using a new needle, pick up 14 sts across the right side of the heel and k those sts. With this same needle, k half of the rem heel sts onto this same needle. This will be referred to as Needle 3. You will now have a small number of sts left on your needle, ready to be worked. Slide these onto Needle 1.
K one rnd.
Change to CC and p all heel and gusset sts (Needles 1 and 3), k all instep sts (Needle 2).
Dec Rnd: On the very next rnd, work a dec rnd as follows:
Needle 1: P to last 3 sts, p2tog, p1. (1 st dec’d)
Needle 2: Knit even
Needle 3: P1, p2tog, p to end of needle. (1 st dec’d)
Alternate Dec Rnd and even rnds until you’re back to 48 (56, 64, 72) sts, the number of sts you cast-on originally.
Foot
Using CC (the strand should already be in place) k the instep sts and p the sole sts until the foot of the sock meas 3” less than the length of the actual foot that will be wearing the sock.
Work 2-color Toe Slip Stitch Pattern once.
Toe
Dec for the toe.
Recall that the center of the rnd is the center of the heel. Make sure sts are distributed as follows: 1/2 of sole sts on Needle 1, starting at the center of the rnd, all of the knit sts on Needle 2 (these are the instep sts for the top of the foot), and the rem 1/2 of sole sts on Needle 3.
Work a Dec Rnd:
Needle 1: K to last 3 sts, k2tog, k1. (1 st dec’d)
Needle 2: K1, ssk, k to last 3 sts, k2tog, k1. (2 sts dec’d)
Needle 3: K1, ssk, k to end of needle. (1 st dec’d)
Alternate even k rnds and Dec Rnds as follows:
Rep Dec Rnd every 4th rnd 2 (2, 1, 0) times, then every 3rd rnd 2 (2, 3, 3) times, then every 2nd rnd 4 (4, 3, 4) times, and then work Dec Rnd every rnd until 8 sts rem.
Finishing
Cut the yarn leaving a long tail of about 12”, thread this tail on a yarn needle and pull the thread through the 8 sts, pulling them tight.
Feed the needle through the center point to the WS and sew in all the ends and trim excess yarn.
Weave in all ends.
How do we print any of these patterns?
Hi Sharon! You are welcome to save this pattern by copying and pasting into a word document or by printing the pattern via the printer icon on the left hand side of your screen. Hope this helps! – Nicola, Editor