

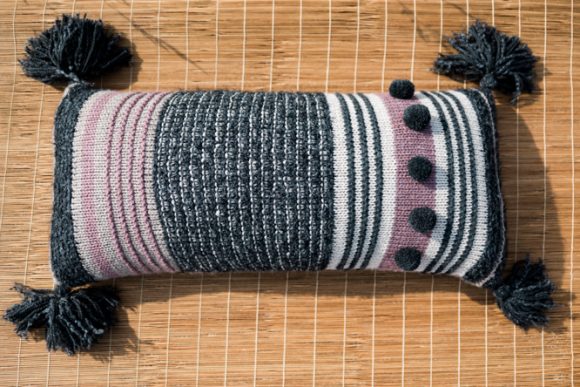
Bring a touch of cozy charm to your space with the Starling Pillow, a delightful fusion of texture and color. This design transitions seamlessly from smooth stockinette to purl ridges, then to the plush feel of boucle yarn, creating a captivating textural landscape. Add playful poms and tassels for a final whimsical flourish. Whether styled on a sofa or layered on a bed, this pillow is a fun and stylish way to welcome fall into your home.
Time: Weekend Project
Skill Level: Intermediate
Size: 14” x 30”. Pillow covers have approx. 2” of negative ease
Gauge: 14 Sts and 22 rows = 4” [10 cm] with larger needle in St st with Blue Sky Fibers Woolstok held double
Materials
 Blue Sky Fibers Woolstok (100% fine highland wool; 370 yards [338 meters]/150 grams): Gravel Road (MC, 1 skein)
Blue Sky Fibers Woolstok (100% fine highland wool; 123 yards [112 meters]/50 grams): Gravel Road (MC, 1 skein), Lilac Bloom (A, 1 skein), Drift Wood (C, 1 skein), Cast Iron (D, 2 skeins)

Rowan Soft Boucle (45% cotton, 23% superfine alpaca, 22% Merino wool, 10% polyamide; 109 yards [100 meters]/50 grams): Slate (B, 1 skein)
Needles:
US size 9 (5.5 mm) 24” (60 cm) circular needle or one size smaller than main needle
US size 10 (6 mm) 24” (60 cm) circular needle or size needed to obtain gauge
Notions: Pillowflex 14” x 32” Synthetic Down Pillow Form Insert (available through Amazon or Etsy) or similar pillow insert, three 1 1/4” buttons, 3 yards 1/8” grosgrain ribbon (optional for poms and tassels), eight 1 1/4” plain buttons or 1” circles of craft foam (optional for backing of buttons and poms), tapestry needle, sharp scissors, 1 3/8” pom maker, 5 1/2” x 3” piece of heavy cardboard (to make tassels)
Downloads:
Pattern Notes
Worsted weight yarn is held double throughout. Boucle yarn is held singly.
The pillow is worked back and forth on a circular needle. In one pattern section you slide the piece to the opposite end to knit alternating yarns.
Do not cut yarn unless directed. Carry yarn of alternating color up the side, catching it every other row.
A Susan Bates® Knit-Chek can be used as an alternative to the piece of cardboard to make the tassel.
Pattern
Holding MC double and with smaller needle, CO 48 sts using the German Twisted cast-on or a cast-on of your choice. Do not join.
Button band
Rows 1-12: With MC, knit.
Change to larger needle.
Pillow body
Section 1
Rows 1-4: With MC in St st.
Rows 5-6: With A in St st.
Rows 7-8: With MC in St st.
Rows 9-16: Rep Rows 5-8 two times.
Rows 17-18: Rep Rows 5-6.
Rows 19–22: With MC in St st.
Rows 23–26: With A in St st. At end of last row, cut A leaving a 6” tail to weave in.
Rows 27-54: With MC in St st. At end of last row, cut MC leaving a 6” tail to weave in.
Change to smaller needle.
Boucle Band 1
With B, knit for 2.5”, ending with a WS row.
Change to larger needle.
Section 2
Rows 1–4: With MC in St st.
Rows 5–8: With A in St st.
Rows 9-12: Rep Rows 1-4.
Rows 13-14: With A, knit.
Rows 15-16: With MC in St st.
Rows 17-24: Rep Rows 13-16 two times.
Rows 25-26: Rep Rows 13-14. At end of last row, cut A leaving a 6” tail to weave in.
Rows 27-30: With MC in St st. At end of last row, cut MC leaving a 6” tail to weave in.
Change to smaller needle.
Boucle Band 2
Rows 1-2: With B, knit.
Row 3: With C, purl. Slide sts to opposite end of needle.
Rows 4-5: Rep Rows 1-2. Slide sts to opposite end of needle.
Row 6: With C, knit.
Rep last 6 rows for pattern for 9.5”, ending with Rows 1 and 2.
At end of last row, cut B leaving a 6” tail to weave in.
Change to larger needle.
Section 3
Rows 1–4: With C in St st.
Rows 5-6: With D, knit.
Rows 7-8: With MC in St st.
Rows 9-12: Rep Rows 5-8.
Rows 13-14: Rep Rows 5-6.
Rows 15-18: Rep Rows 1-4.
Rows 19-30: With A in St st.
Rows 31-48: Rep Rows 1-18. At end of last row, cut C and D leaving a 6” tail to weave in.
Change to smaller needle.
Boucle Section 3
With B, knit for 1.5”, ending with a WS row.
Change to larger needle.
With MC, knit 3 rows. At end of last row, cut MC leaving a 6” tail to weave in.
Change to smaller needle.
With B, knit for 1.25”, ending with a WS row. Cut B leaving a 6” tail to weave in.
Change to larger needle.
Section 4
Rows 1-22: With MC in St st.
Rows 23-24: With D, knit.
Rows 25-26: With MC in St st.
Rows 27-30: Rep Rows 23-26.
Rows 31-32: Rep Rows 23-24.
Rows 33-52: With MC in St st.
Rows 53-62: Rep Rows 23-32. At end of last row, cut D leaving a 6” tail to weave in.
Rows 63-98: With MC in St st.
Change to smaller needle.
Buttonhole band
Rows 1-6: With MC, knit.
Row 7 (buttonholes): K9, *wyif sl1p, [wyib. sl1p, psso] 4 times, sl first st on right needle to left needle; turn work, pull yarn taught to close gap at beg of buttonhole; using the twisted purl cast on method, CO 5 sts; turn work, wyib, slip next st on left needle to right needle, psso, k8; rep from * twice. (48 sts; 3 buttonholes made)
Rows 8-14: Knit.
BO all sts. Cut MC leaving a 6” tail to weave in.
Finishing
Weave in ends. Lightly block pillow to 14” x 30” dimensions.
Pin the pillow with WS sides together and at the same time overlapping the button bands with the buttonhole band on top. With mattress stitch, sew top and bottom seams. Use 2 strands of yarn where the button bands overlap for extra strength. Turn to wrong side. Stitch across each corner diagonally about 3/4” from the edge to eliminate the “point”. Turn to right side. Align and sew buttons to the button band under the buttonholes. To make the buttons more secure, while attaching the button, sew through a plain button or 1” circle of craft foam placed on the wrong side of the button band aligned with the button.
Poms:
With 2 strands of D held together, make five 1 3/8” poms. Trim evenly. Evenly space and tie poms to 2.5” stripe on front of pillow. I like to feed the strands of yarn or 1/8” ribbon used to secure the poms through a plain button or piece of craft foam on the inside of the pillow for stability. I also like to tie the ends in a bow, rather than attach the poms permanently, so that I can remove them when washing the pillow cover.
Tassels:
With 2 strands of D and 1 strand of B, starting at one end, wrap yarn around the cardboard form lengthwise (5.5”) 25 times. Stop at the same end you started and cut yarn. With a 12-15” strand of yarn or 1/8” ribbon, slip this strand between the wrapped yarn and the cardboard. Position at the end opposite of the cut ends of yarn. Tie a tight double knot. With a sharp pair of scissors, cut the yarn at the opposite end and remove cardboard. Cut a 12” strand of yarn D. With yarn, tie a knot about 1” from the top of the tassel leaving one short end (approx. 2-3”) and one long end. Wrap the long end around the tassel several times. Tie a double know with both ends. Weave ends in the center of the tassel. Trim the tassel so bottom edge is even. With a tapestry needle, separately feed ends of tassel ties into a corner of the pillow cover about ¾” apart. On the inside of the cover, tie ends securely and make a bow. Repeat at each corner of the pillow cover. Tassels should be removed before washing and then reattached.
Place the pillow form insert into the cover, button up the buttons and enjoy both “surfaces” of your new decorative pillow!

I love knitting and I am 72 years old. I know that payment was refused. I am sorry but I can give the informaiton need to update my invoice so I can pay what I owe you.
Thank you and have a nice week-end
You are welcome to reach out to our customer service team with any questions.
https://www.ilikeknitting.com/contact-us/
– Nicola, Editor
I love knitting and I am 72 years old
I just love that pillow