

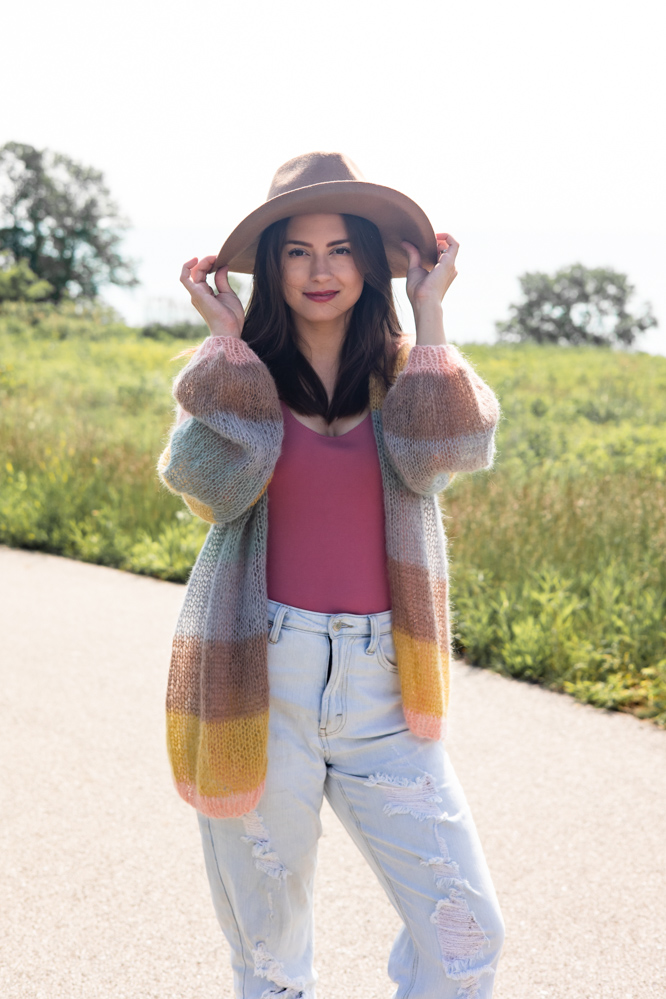
The Rylan Oversized Cardigan is the ultimate layering piece—soft, gauzy, and irresistibly cozy. Designed with comfort in mind, this cardigan features a relaxed, oversized fit that drapes effortlessly over any outfit, making it perfect for chilly mornings, breezy evenings, or simply curling up at home.
Knit with a lofty, fluffy yarn, Rylan has an airy texture that provides warmth without feeling heavy. Its simple construction makes it an approachable project for knitters of all skill levels, and the hardest decision you’ll have to make is which color to choose! Whether paired with jeans and a tee or layered over a dress for an effortlessly chic look, this cardigan will become a go-to favorite in your handmade wardrobe.
Time: 1 Week Project
Skill Level: Intermediate
Size: Finished Bust Size 46.5 (48.5, 52.5, 56.5, 60.5) (64.5, 68.5, 72.5, 76.5)” to fit bust 30 (32, 36, 40, 44) (48, 52, 56, 60)” / XS (S, M, L, XL) (2X, 3X, 4X, 5X)
16” positive ease recommended.
Shown in size 52.5”
Gauge: 11 sts and 14 rows = 4” [10 cm] in St st, with yarn held double
Materials
 Yarn: Yarn & Colors Elegant (25% mohair, 25% wool, 50% acrylic; 218 yards [200 meters]/20 grams): 101 Rose (MC, 2 (2, 2, 2, 3) (3, 3, 3, 4) balls), 089 Gold (CC1, 2 (3, 3, 3, 3) (4, 4, 4, 5) balls), 006 Taupe (CC2, 2 (2, 2, 2, 2) (2, 2, 3, 3) balls), 096 Shark Grey (CC3, 2 (2, 2, 2, 2) (2, 2, 3, 3) balls), 092 Pea Green (CC4, 2 (2, 2, 2, 2) (2, 2, 3, 3) balls)
Needles: US size 11 (8.0 mm) 60” circular needles
Notions: Stitch holder, tapestry needle
Pattern Notes
This pattern is worked using two strands of yarn held together throughout. First, the body is knitted in one piece to the underarms, then in panels to the shoulders. The sleeves are worked in the round from the bottom up. Then the cardigan is seamed at the shoulders and the sleeves are sewn in. The neckband is picked up and knitted at the end.
Pattern
Back
With MC, CO 116 (122, 132, 144, 154) (166, 176, 188, 198) using the Long Tail CO.
Rows 1 (RS)-6 (6, 6, 6, 8) (8, 8, 8, 8): *K1, p1; rep from * to end.
Break MC and join CC1.
Next rows: Work in St st for 14 (14, 15, 16, 16) (18, 19, 19, 19) rows.
Break CC1 and join CC2.
Next rows: Work in St st for 14 (14, 15, 16, 17) (17, 18, 19, 19) rows.
Break CC2 and join CC3.
Next rows: Work in St st for 14 (15, 15, 16, 16) (18, 19, 19, 20) rows.
Break CC3 and join CC4.
Next rows: Work in St st for 14 (15, 15, 16, 17) (17, 18, 19, 20) rows.
Divide sts with RS facing as follows:
Leave first 26 (27, 30, 33, 35) (38, 41, 44, 46) sts on needle for left front, place next 64 (68, 72, 78, 84) (90, 94, 100, 106) sts on hold for back, and place last 26 (27, 30, 33, 35) (38, 41, 44, 46) sts on hold for right front.
Shape Left Front
Work first 14 (15, 15, 16, 16) (17, 18, 19, 20) rows in CC1 and then change to MC to work last 15 (15, 15, 15, 17, 17, 18, 19, 20) rows for a total of 29 (30, 30, 31, 33) (34, 36, 38, 40) rows.
With RS facing, join CC1 to left front edge.
Sizes L (XL, 2X, 3X, 4X, 5X) only:
Row 1 (RS): K1, ssk, k to end of row. (1 st decreased at neck edge)
Row 2: P across.
Rep [Rows 1-2] 4 (4, 6, 7, 12, 11) more times. (28 (30, 31, 33, 31, 34) sts rem)
All Sizes:
*Row 1 (1, 1, 11, 11) (15, 17, 27, 25) (RS) (dec): K1, ssk, k to end of row. (1 st decreased at neck edge)
Next 2 rows: Work in St st.
Next row (WS) (dec): P to last 3 sts, p2tog, p1. (1 st decreased at neck edge)
Next 2 rows: Work in St st.
Rep from * until 17 (18, 20, 21, 23) (24, 26, 27, 29) sts rem.
Work 4 (5, 2, 2, 4) (1, 1, 2, 3) more row(s) in St st. BO all sts.
Back Panel:
Place held back sts back onto needle.
With RS facing, join CC1 to right edge of back sts.
Work in St st for 14 (15, 15, 16, 16) (17, 18, 19, 20) rows.
Change to MC.
Work in St st for 15 (15, 15, 15, 17) (17, 18, 19, 20) rows. BO all sts.
Shape Right Front
Place held right front sts back onto needle.
Work first 14 (15, 15, 16, 16) (17, 18, 19, 20) rows in CC1 and then change to MC to work last 15 (15, 15, 15, 17, 17, 18, 19, 20) rows for a total of 29 (30, 30, 31, 33) (34, 36, 38, 40) rows.
With RS facing, join CC1 to right edge of right front sts.
Sizes L (XL, 2X, 3X, 4X, 5X) Only:
Row 1: K to last 3 sts, k2tog, k1. (1 st decreased at neck edge)
Row 2: P across.
Rep [Rows 1-2] 4 (4, 6, 7, 12, 11) more times. (28 (30, 31, 33, 31, 34) sts rem)
All Sizes:
**Row 1 (1, 1, 11, 11) (15, 17, 27, 25) (RS) (dec): K to last 3 sts. k2tog, k1. (1 st decreased at neck edge)
Next 2 rows: Work in St st.
Next row (WS) (dec): P1, ssp, p to end of row. (1 st decreased at neck edge)
Next 2 rows: Work in St st.
Rep from ** until 17 (18, 20, 21, 23) (24, 26, 27, 29) sts rem.
Work 4 (5, 2, 2, 4) (1, 1, 2, 3) more row(s) in St st. BO all sts.
Sleeve (make 2)
Cuff
With MC, CO 22 (24, 24, 26, 28) (28, 30, 32, 34) using the Long Tail CO, pm and join to work in the round.
Rnds 1-5 (5, 5, 5, 6) (6, 6, 6, 6): *K1, p1; rep from * around.
Inc rnd: *K1, M1L; rep from * to last 3 (2, 4, 3, 2) (4, 3, 1, 0) st(s), then [M1R, k1, M1L] 3 (2, 4, 3, 2) (4, 3, 1, 0) time(s). (47 (50, 52, 55, 58) (60, 63, 65, 68) sts)
Sleeve
Break MC and join CC2.
Next rnds: K for 14 (15, 15, 16, 17) (18, 18, 19, 19) rnds.
Break CC2 and join CC3.
Next rnds: K for 15 (15, 16, 17, 17) (18, 19, 19, 19) rnds.
Break CC3 and join CC4.
Next rnds: K for 15 (15, 16, 17, 18) (18, 19, 19, 20) rnds.
Break CC4 and join CC1.
Next rnds: K for 15 (15, 16, 17, 18) (18, 19, 19, 20) rnds. BO all sts.
Finishing
With WS facing and MC, sew shoulder seams.
Match up center of top of sleeve with shoulder seam, and using CC4, sew sleeve to body.
Weave in all ends.
Neckband
With RS facing, join MC to bottom front right corner, pick up and knit 73 (76, 77, 81, 85) (89, 94, 97, 100) sts up front edge to shoulder seam, 16 (16, 17, 20, 20) (24, 24, 28, 28) sts across back neckline, and 73 (76, 77, 81, 85) (89, 94, 97, 100) sts down left front edge to bottom corner. (162 (168, 171, 182, 190) (202, 212, 222, 228) sts)
Rows 1 (WS)-5 (5, 5, 5, 5, 7) (7, 7, 7, 7): *K1, P 1; rep from * to end.
With RS facing, BO all sts.
Weave in ends.
I am on my 3rd sweater. I can not get the shoulder seem to look like the pattern picture. I also found that the back panel need more stitches than pattern called for. Do you have any corrections to the pattern above?
Hello! I’ve reached out to the designer for advice and she or I will reply as soon as possible. Thanks! – Nicola, Editor
Hi Peggy! From the designer: The shoulder is seamed using the invisible horizontal seam technique, however if you prefer a decorative seam you can use a different technique.
Can you share the size you are making and the gauge you achieved on your tension swatch so we can help further regarding the sizing query?
– Nicola, Editor