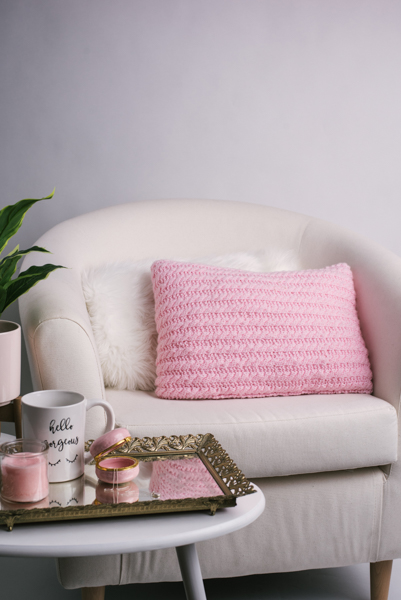
The Paris Amour Pillow is a charming, customizable project that adds a touch of romance and elegance to any room. With a simple four-row repeat pattern, this pillow is perfect for knitters of all skill levels and allows for easy adaptation to create two different pillow sizes (16”x12” or 16”x16”), making it versatile for various spaces and décor styles.
Embellished with adorable heart buttons, the design exudes a cozy, heartfelt vibe, making it the ideal gift for loved ones or a sweet addition to your own home. Whether you’re looking to brighten up a living room, bedroom, or even a cozy nook, the Paris Amour Pillow offers a beautiful blend of texture, love, and personalization. Perfect for anyone who loves knitting up cozy home accessories, this pillow will bring warmth and charm to your space while showcasing your craft.
Skill Level: Beginner
Size: 16″ x 12″ (16″ x 16″)
Gauge: 26 sts and 26 rows = 4” [10 cm] in pattern stitch; 18 sts and 24 rows = 4” [10 cm] in St st
Materials
 Yarn: Sidar Supersoft Aran (100% Acrylic; 258 yards [236 meters]/100 grams): 842 Pretty Pink (2 (3) skeins)
Needle: US size 8 (5 mm) 24” circular
Notions: Tapestry needle, three 0.75” buttons, cable needle, fabric pen or ball point pen, optional: sewing needle, thread, 2.5″ dressmakers snaps
Special Stitches
C4F (cable 4 front): Sl 2 sts to cable needle (cn), hold in front, k next 2 sts, k 2 sts from cn.
Pattern Notes
The cable pattern with the garter ridge provides additional flexibility to fit desired pillow insert.
The cables themselves are tight to provide a denser fabric which contrasts with the garter ridges to provide additional visual interest.
When air drying finished piece, block lightly to suit pillow insert as some inserts are thicker than others.
Pattern
Body
CO 80 (104) sts.
Rows 1, 4: Knit.
Row 2: K2, *p4, k2; rep from * to end.
Row 3: K2, *c4f, k2; rep from * to end.
Rep Rows 1-4 until work meas 37”, ending with Row 4.
Buttonholes
Row 1: K19 (21), (yo, k2tog, k18) 3 (4) times, k1 (3).
Row 2: K2, *p4, k2; rep from * to end.
Row 3: K2, *c4f, k2; rep from * to end.
Row 4: Knit.
BO sts.
Finishing
Weave in ends.
Place finished piece in basin.
Fill basin with warm water, approximately 110 degrees F.
Allow the piece to soak in lukewarm water until it sinks into the basin.
Roll piece between two towels, gently wring the towels to remove excess water.
Block to rectangle shape to fit pillow.
Allow to air dry.
To aid in final assembly and ensure a good fit, it is suggested that the pillow insert be used to “dry fit” the buttons and mark their positions before sewing them to the RS of the work. Measurements herein are suggested based upon the pillow insert used for the sample pillow. Your measurements may vary based upon the thickness of your pillow insert. The cover does have some negative ease to keep it neat.
With WS facing, cast on edge on your right and bind off edge on your left, position pillow insert 15″ from the cast on edge.
Fold cast on edge of rectangle from right to left 15″ such that RS is now facing. Likewise, fold bind off edge of rectangle from left to right 6″ to form flap with RS facing.
Using ball point pen mark the position of each button on the middle layer.
Unfold work and remove insert.
Attach buttons to RS as marked.
With WS facing, position pillow insert 14″ from the cast on edge.
Fold cast on edge of rectangle from right to left 15″ such that RS is now facing. Likewise fold bind off edge of rectangle from left to right 6″ to form flap with RS facing.
Button three buttons.
Using stitch markers or straight pins mark the point on the WS of the back of the pillow where the flap from the right meets it. This will become the length of the seam to be sewn along the selvedge edge. For the sample this was 13.75”.
Repeat for second selvedge edge.
Unbutton the three buttons.
Remove pillow insert.
Using blanket stitch along the first and last garter stitch columns, sew the sides of the pillow along the selvedge edge with RS facing from the pin to the fold on each side.
Place insert in pillow.
Button three buttons.
Optional Finishing
To maintain a neat line where the flap buttons, attach 2 snaps on the WS of the flap along the selvedge edge and corresponding WS along the selvedge edge of the back of the pillow.