

Designing knitting patterns is equal parts a wonderful creative outlet and a frustrating, tedious process. Budding designers everywhere are faced with one particular problem when it comes to scarves, blankets, dishcloths, and other flat pieces that you don’t need to worry about with garments like hats and gloves: the wrong side. You’ll find yourself faced with two options when you’ve chosen a flat-knitted piece: you can create what is often a more intricate and beautiful design on one side of the item and try your best to only display the right side of the accessory, or you could attempt to design a reversible piece. One of the most interesting ways to make a piece reversible is through the use of reverse stockinette stitch.
Designing knitting patterns is equal parts a wonderful creative outlet and a frustrating, tedious process. Budding designers everywhere are faced with one particular problem when it comes to scarves, blankets, dishcloths, and other flat pieces that you don’t need to worry about with garments like hats and gloves: the wrong side. You’ll find yourself faced with two options when you’ve chosen a flat-knitted piece: you can create what is often a more intricate and beautiful design on one side of the item and try your best to only display the right side of the accessory, or you could attempt to design a reversible piece. We have a fantastic guide to reversible knitting where you can learn all of your options. One of the most interesting ways to make a piece reversible is through the use of reverse stockinette stitch.
Understanding how to utilize stockinette stitch with reverse stockinette stitch to make a reversible design will be your handiest tool when designing flat-knit items.
It’s not impossible. By nature, stockinette stitch has one smooth side with the classic knitted “v” structure, and one side that looks similar to garter stitch, comprised entirely of purl bumps. By cleverly utilizing stockinette stitch differently on each side, you can create a design on one side of your work with an equal-yet-opposite display on the other side.
For instance, if you design a stockinette stitch backdrop with a reverse stockinette stitch diamond (or any shape) in the center, you create what appears to be a stockinette backdrop with a garter diamond in the center on the right side, but a garter backdrop with a stockinette stitch diamond on the wrong side.
Reverse stockinette stitch is exactly how it sounds—it’s the same stitch as stockinette stitch, but you knit on the wrong side and purl on the right side. You can get creative with the shapes you create, and both sides are wearable and beautiful—just different. The only caveat here is that if the reverse stockinette area isn’t equal to the stockinette area and spread out significantly enough, it could cause your work to curl. This is where any of the basic reversible stitches, like garter, moss, or rib stitch, would come in handy for a border. In this example, I utilized a seed stitch border rather than garter stitch so it wouldn’t get lost in the purl bumps of the reverse stockinette stitch on the “wrong” side.
Certain types of basketweave stitch use this technique, and rib stitch is really just a more modest example of this technique. You’ll notice if you flip over rib stitch, what looks like lines of garter stitch is really just reverse stockinette stitch.
Creating Your Own Reverse Stockinette Stitch Design
Designing your own reverse stockinette stitch pattern is easier than it seems! All you need is a vision and Excel, or some other handy chart-making tool. You’ll want to make a chart with the background all in one color, and the design which you choose to feature in the other. In this case, yellow represents the background and blue represents the design.
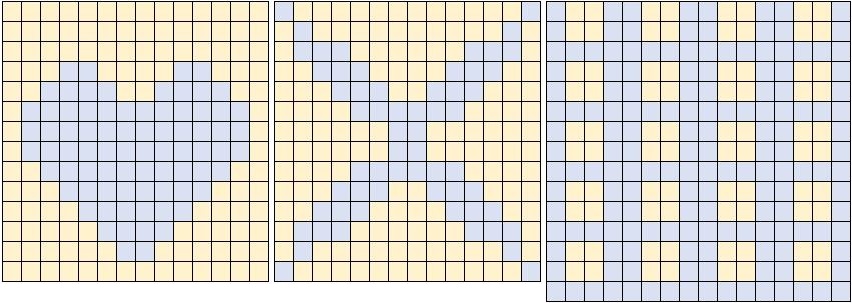
Consider these three examples. The first is a simple heart pattern. Simple shapes on backgrounds are easy to design because you don’t have to worry about how it will repeat, since the shape won’t be creeping up onto the edge of any other shapes.
The opposite is displayed in the last two. Reverse stockinette patterns that run throughout the design will be a little more complicated since you need to make sure the right edge aligns with the left edge, and the top edge aligns with the bottom. You’ll see if either of these charts are repeated horizontally or vertically, they each align seamlessly.
Use caution with initials, words, or logos, however, since the second side will display them in reverse! This technique really works best with shapes and images instead of letters. If you’re looking to create a design with words, or something that must not have a mirrored look on the second side, you may find double knitting to be more appropriate. Check out this guide to double knitting here.
In order to write out your pattern, you’ll need to remember these instructions:
Knit blue stitches on the right side, but purl them on the left side.
Purl yellow stitches on the right side, but knit them on the left side.
Additionally, there are two ways to approach writing out your pattern:
- You can start from the bottom righthand corner and move leftward, then snake up to the next row and write that out from left-to-right. In this case, the odd rows will be one side (either “right” or “wrong;” it does not matter with which you start), and the even rows will be another. The complication with this method is that your shapes will come out much more horizontal, and will essentially “stretch” in width. This is because stitches and rows aren’t equal in size the way chart rows and columns are! This problem can be avoided if you choose to create a chart where the rows are narrower than the columns. That way, you will get a much more accurate portrayal of what the pattern will actually look like all knit-up.
- My preferred method is to begin by writing out the first row right-to-left, as the “right” side of the work and the first row of your pattern, and then write out the same row left-to-right, as the “wrong” side of the work and the second row of the pattern itself. Say your first row is all blue: you’ll knit the first right-side row, and do the opposite on the first wrong-side row by purling all of the stitches. Then, you’ll move onto the second row of the chart. This gives you two rows of knitting instructions per one row of chart. This helps to stretch your shapes out lengthwise.
Let’s use the heart chart as an example. There are fourteen cells horizontally and fourteen vertically, so we’ll be working in multiples of fourteen stitches over twenty-eight rows (unless you choose to use the first method, in which case, you’ll be working over fourteen rows). Written out, the pattern looks like this:
Row 1 (RS): p14
Row 2 (WS): k14
Row 3: p6, k2, p6
Row 4: k6, p2, k6
Row 5: p5, k4, p5
Row 6: k5, p4, k5
Row 7: p4, k6, p4
Row 8: k4, p6, k4
Row 9: p3, k8, p3
Row 10: k3, p8, k3
Row 11: p2, k10, p2
Row 12: k2, p10, k2
Row 13: p1, k12, p1
Row 14: k1, p12, k1
Row 15: p1, k12, p1
Row 16: k1, p12, k1
Row 17: p1, k12, p1
Row 18: k1, p12, k1
Row 19: p2, k4, p2, k4, p2
Row 20: k2, p4, k2, p4, k2
Row 21: p3, k2, p4, k2, p3
Row 22: k3, p2, k4, p2, k3
Row 23: p14
Row 24: k14
Row 25: p14
Row 26: k14
Row 27: p14
Row 28: k14
Notice how each even, or wrong-side row, is just the reverse of each odd, right-side row. This is made especially easier if your chart is symmetrical.
From there, you can choose to cast on any multiple of 14 stitches, or however many cells you had horizontally, and you can add more repeats of the same pattern across your work, or add different shapes. In my example, I worked only one heart at 14 stitches across and 28 rows high, plus 5 knit stitches on either end, and 3 knit stitches on either side to create a garter stitch border. If your panels of stockinette and reverse stockinette stitch are not evenly spread throughout your pattern, a garter, seed, or other evenly-weighted border might be necessary to keep the design laying flat.
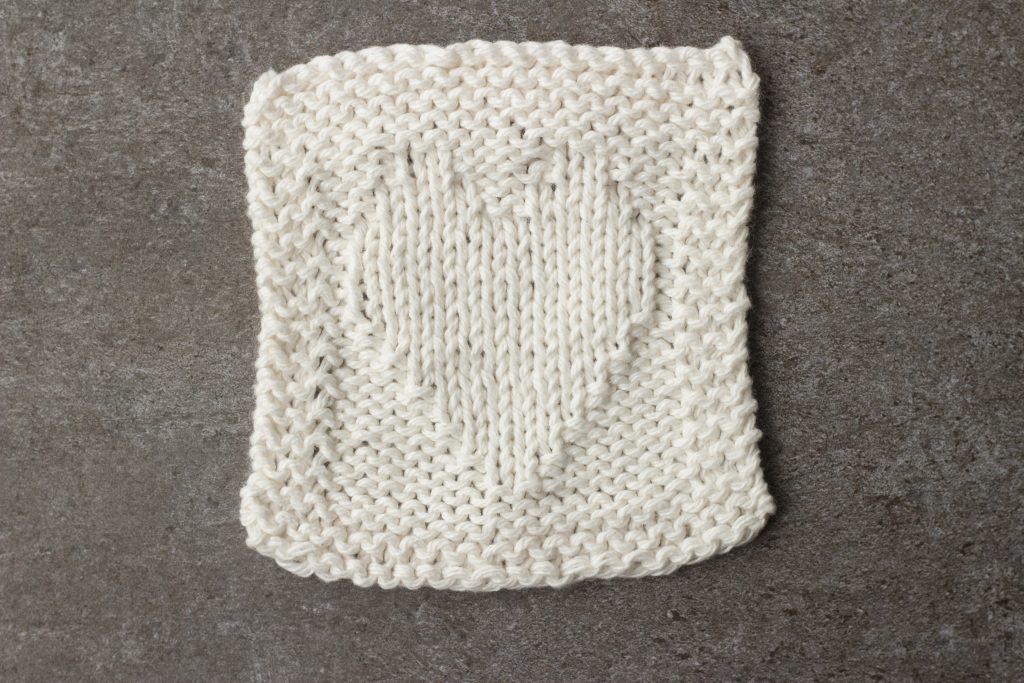
This was the finished product of the reversible heart design:
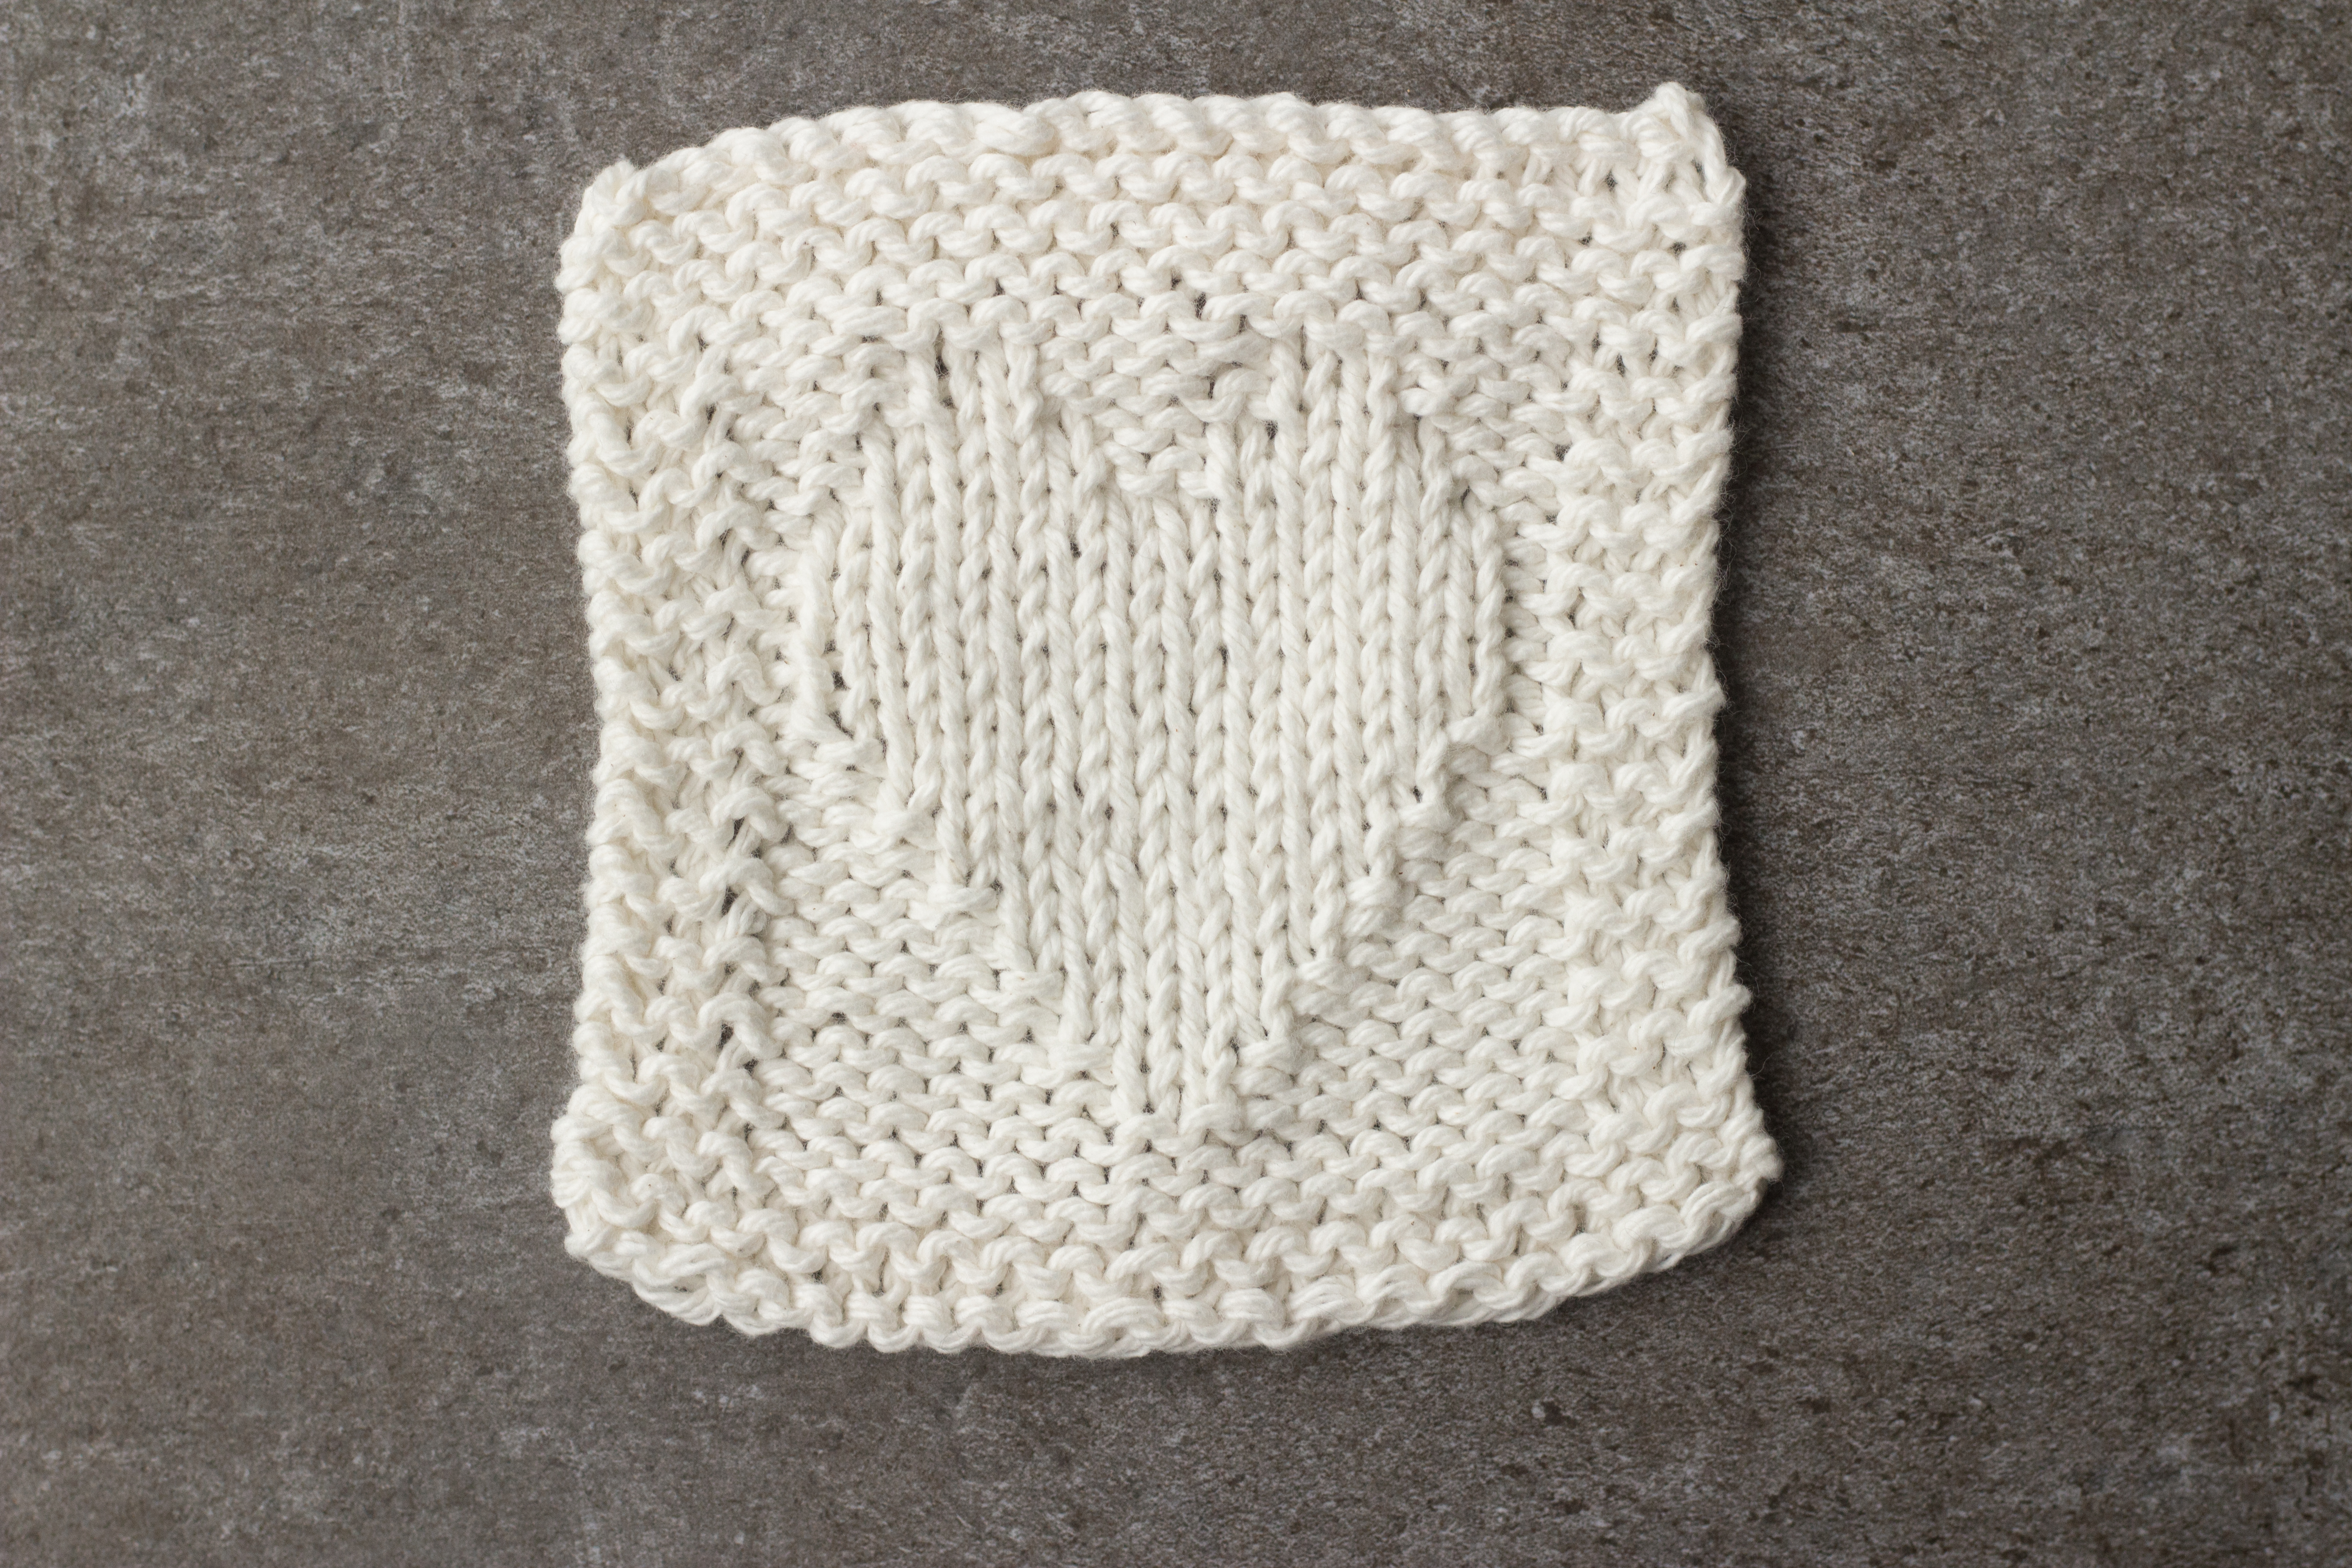
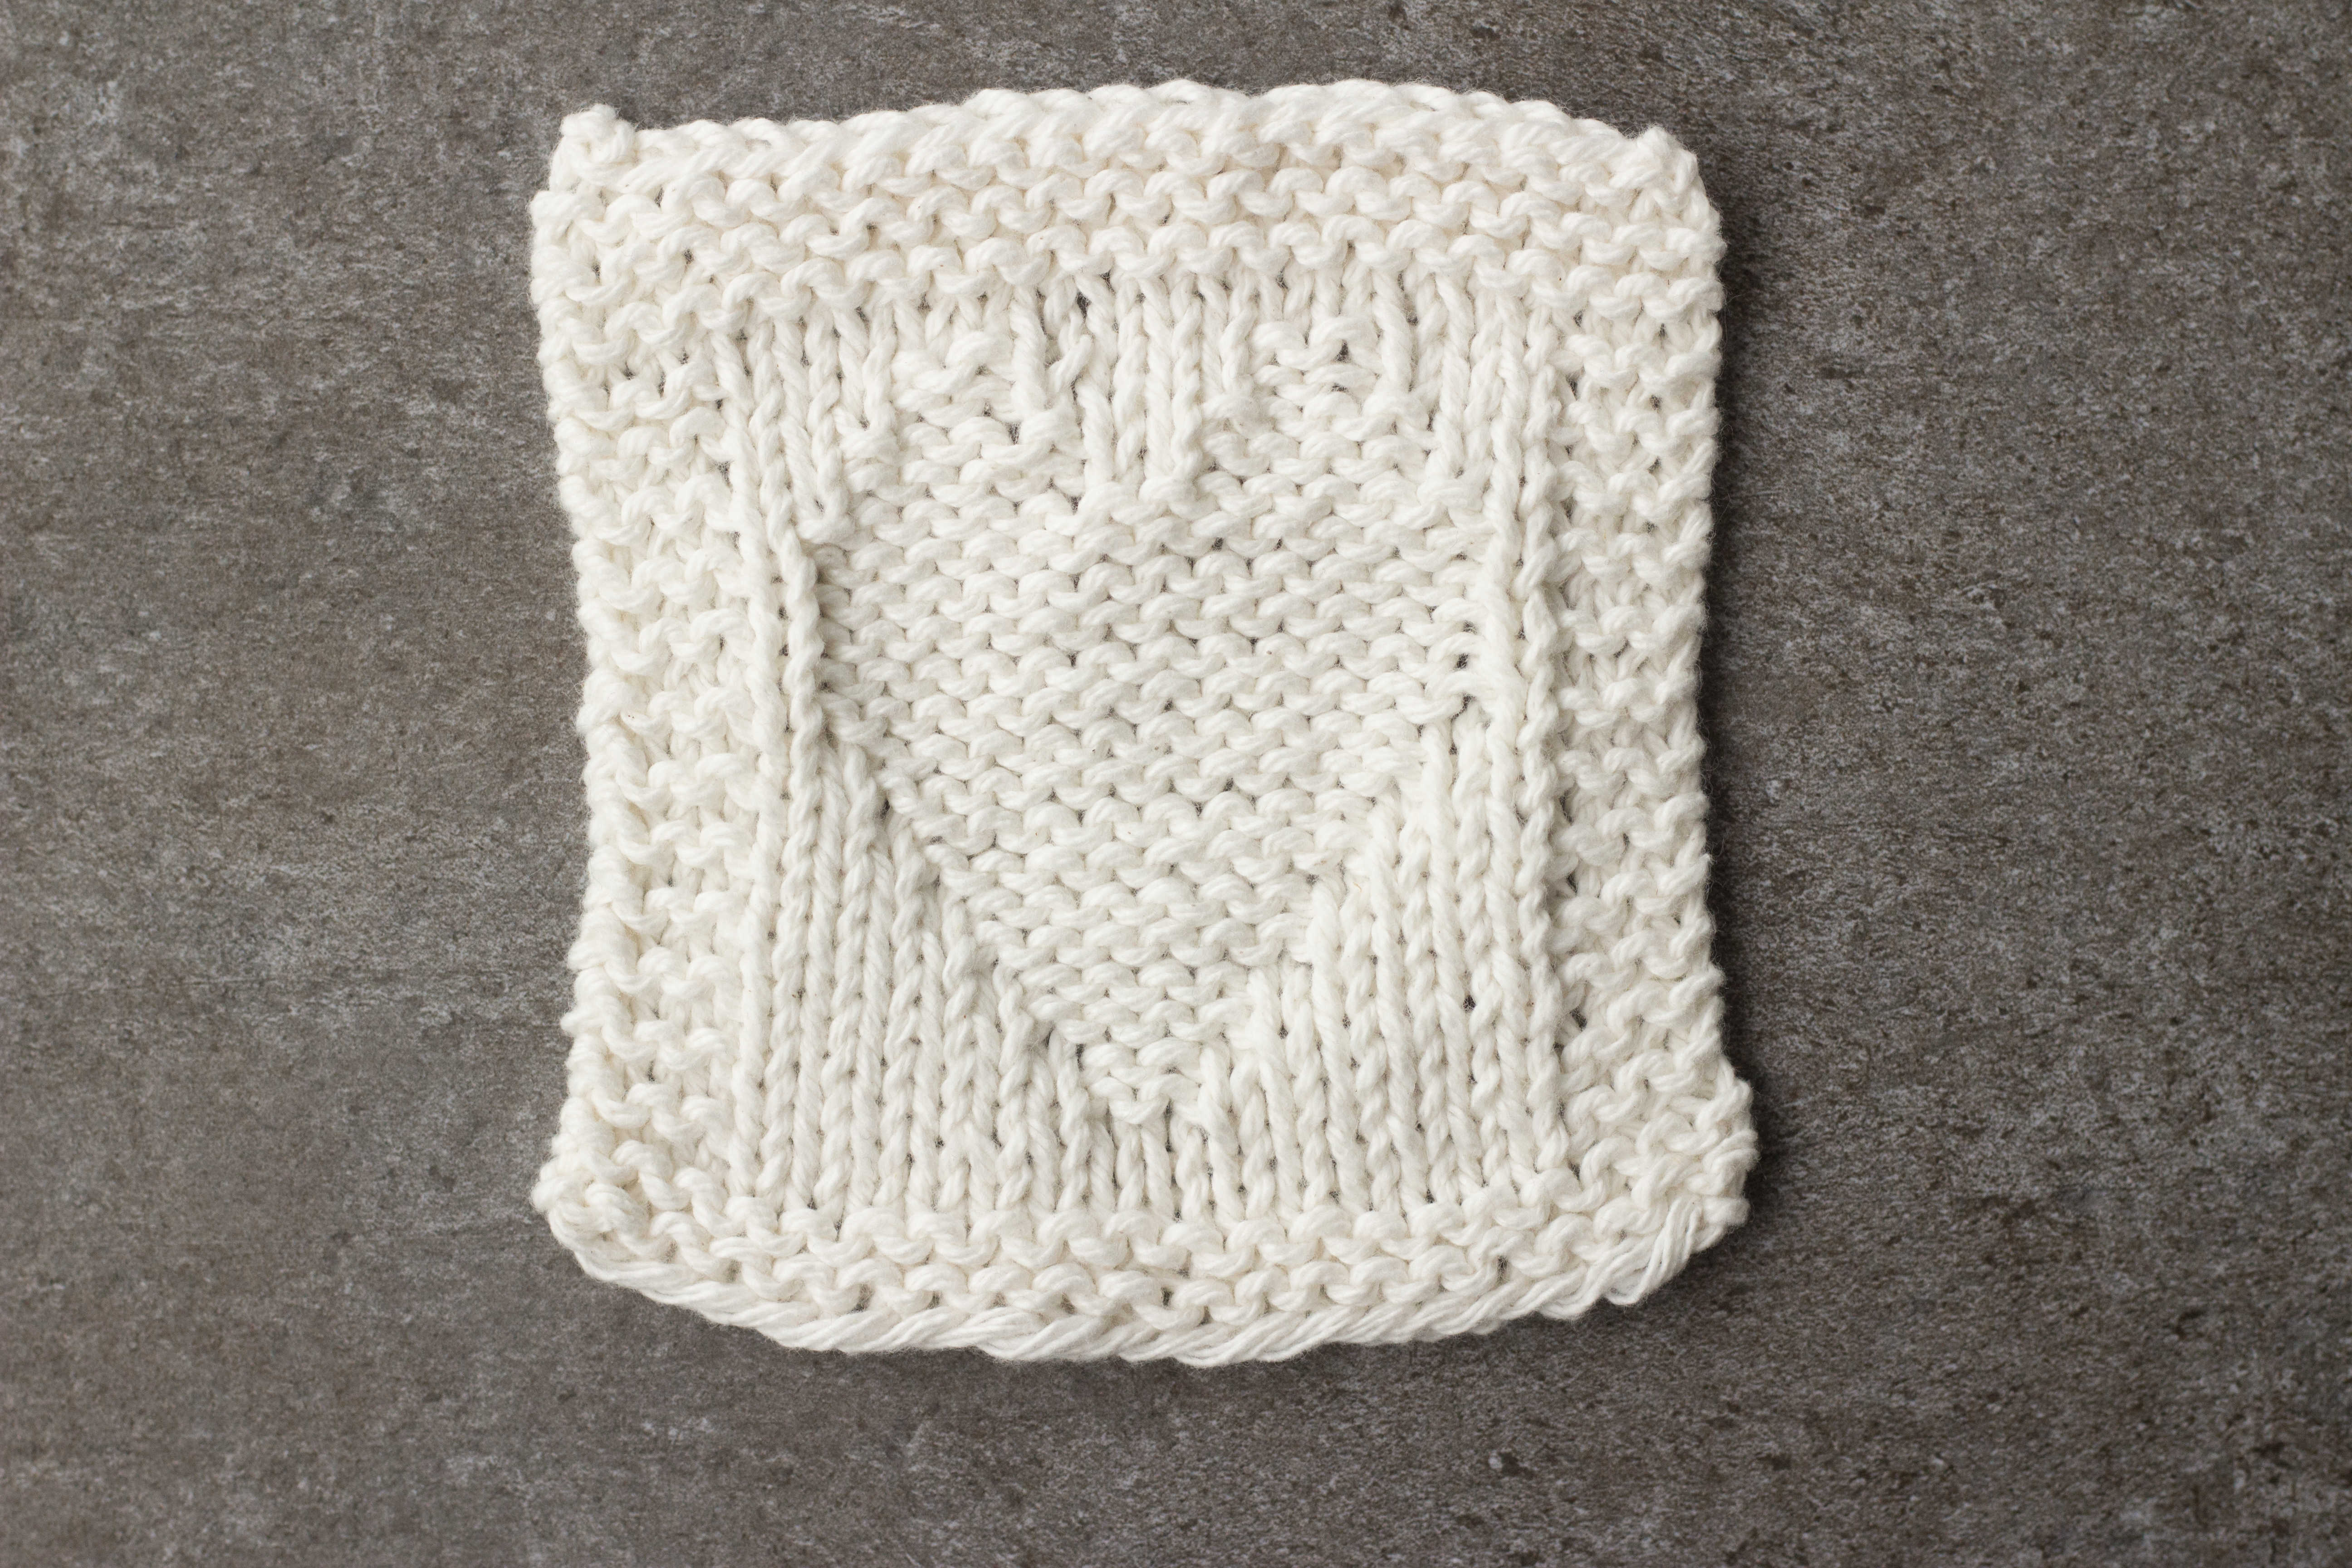
The heart shape is clear on both sides, but on the first side, it has the appearance of a right-side stockinette stitch on a wrong-side background, and the reverse is true on the other side.
Reverse stockinette stitch designs like this one make for lovely scarves, afghans, and dishcloths, but the possibilities are endless! Use your newfound knowledge to create a pattern with your favorite animal, motif, or any shape you desire. It’s easy to create your own reversible knitting patterns with a simple understanding of reverse stockinette stitch.