

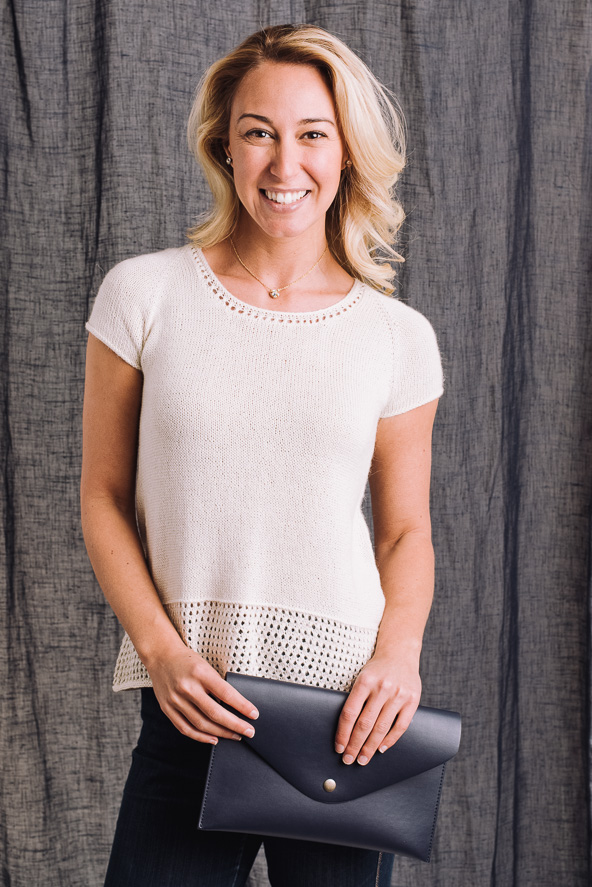
This is a slightly a-lined top with an eyelet lace border at the hem. The longer back is created with short rows for a uniquely stylish look we know you’re going to love. Pair it with colorful jewelry to make a simple and fun spring outfit.
Skill Level: Intermediate
Size: Finished Bust Size 32 (34, 36, 38, 40, 42)” to fit bust 32 (34, 36, 38, 40, 42)”
0” ease recommended.
Shown in size 34”
Gauge: 26 sts and 33 rows = 4” [10 cm] in St st after wet blocking
Materials
 Yarn: Garnstudio DROPS Baby Alpaca Silk (70% Alpaca, 30% Silk;183 yards [167 meters]/50 grams): 100 Ecru (4 (5, 5, 6, 7, 7) balls)
Needles: US size 4 (3.5 mm) circular, US size 2 (2.75 mm) 32” circular
Notions: Tapestry needle, waste yarn or stitch holder, crochet hook
Special Stitches
Eyelet Lace Pattern
Rnd 1: *Yo, k2tog; rep from * to the end of rnd.
Rnd 2 and all even rnds: Knit.
Rep Rnds 1-2 for patt.
Pattern Notes
This top is first worked flat until the neckline increases are finished and then in the round from the top down.
The Lateral Braid is worked with smaller needles. If your yarnovers are too big, go down with the needle size.
You can adjust the circumference of the hem by blocking the lace border moderately or more vigorously.
Pattern
With larger needle and using longtail Cast On, CO 76 (78, 82, 84, 86, 88) sts, placing markers as follows:
CO 1 st, PM, CO 2 sts, PM, CO 12 (12, 14, 14, 14, 14) sts, PM, CO 2 sts, PM, CO 42 (44, 44, 46, 48, 50) sts, PM, CO 2 sts, PM, CO 12 (12, 14, 14, 14, 14) sts, PM, CO 2 sts, PM, CO 1 st.
Row 1 (RS): K to M, m1r, sm, k2, sm, m1l, k to M, m1r, sm, k2, sm, m1l, k to M, m1r, sm, k2, sm, m1l, k to M, m1r, sm, k2, sm, m1l, k to end. (8 sts inc’d)
Row 2 and all WS rows: P all sts.
Rep last 2 rows 10 (10, 12, 12, 12, 14) more times. (12 (12, 14, 14, 14, 16) sts for Fronts, 2 sts for each raglan line, 34 (34, 40, 40, 40, 44) sts for Sleeves, 64 (66, 70, 72, 74, 80) sts for Back, 164 (166, 186, 188, 190, 208) sts total)
Row 3 (RS): k1, m1r, k to M, m1r, sm, k2, sm, m1l, k to M, m1r, sm, k2, sm, m1l, k to M, m1r, sm, k2, sm, m1l, k to M, m1r, sm, k2, sm, m1l, k to 1 st before end, m1l, k to end. (10 sts inc’d)
Row 4 and all WS rows: P all sts.
Rep last 2 rows 3 (3, 3, 3, 4, 5) more times. (20 (20, 22, 22, 24, 28) sts for Fronts, 2 sts for each raglan line, 42 (42, 48, 48, 50, 56) sts for Sleeves, 72 (74, 78, 80, 84, 92) sts for Back, 204 (206, 220, 226, 240, 268) sts total)
Row 3 (RS): K1, m1r, k to M, m1r, sm, k2, sm, m1l, k to M, m1r, sm, k2, sm, m1l, k to M, m1r, sm, k2, sm, m1l, k to M, m1r, sm, k2, sm, m1l, k to 1 st before end, m1l, k to end. (10 sts inc’d)
Row 4 and all WS rows: P1, m1rpw (purlwise), p to 1 st before end, m1lpw, p1.
Rep last 2 rows 1 (1, 1, 1, 1, 1) more times.
Size 32” only
Row 5 (RS): K to M, m1r, sm, k2, sm, k to M, sm, k2, sm, m1l, k to M, m1r, sm, k2, sm, k to M, sm, k2, sm, m1l, k to end.
Next Row: P 1 row, do not turn.
Sizes – (34, 36, 38, 40, 42)” only
Row 5 (RS): K to M, m1r, sm, k2, sm, m1l, k to M, m1r, sm, k2, sm, m1l, k to M, m1r, sm, k2, sm, m1l, k to M, m1r, sm, k2, sm, m1l, k to end, do not turn.
All Sizes
Joining to work in the rnd: Using Backwards Loop Method, CO 24 (26, 26, 28, 28, 28) sts, PM for beg of rnd and join to work in the rnd.
Work 1 rnd in St st. (2 sts for each raglan line, 46 (48, 54, 54, 56, 62) sts for Sleeves, 78 (80, 84, 86, 90, 198) sts for Front and Back, 256 (264, 284, 288, 300, 328) sts total)
Body
Rnd 1: K to M, m1r, sm, k2, sm, m1l, k to M, m1r, sm, k2, sm, m1l, k to M, m1r, sm, k2, sm, m1l, k to M, m1r, sm, k2, sm, m1l, k to end of the rnd.
Rnd 2: K all sts.
Rnd 3: K to M, m1r, sm, k2, sm, k to M, sm, k2, sm, m1l, k to M, m1r, sm, k2, sm, k to M, sm, k2, sm, m1l, k to end of the rnd.
Rnd 4: K all sts.
Rep last 4 rnds 3 (4, 4, 5, 5, 6) more times, then work Rnd 1 once more. (96 (102, 106, 112, 116, 128) sts for both Front and Back, 2 sts for each raglan line, 56 (58, 64, 68, 70, 78) sts for both Sleeves, 312 (328, 348, 368, 380, 420) sts total)
Next Rnd/Separating the Sleeves: Remove BOR, k to M, remove M, k1, place next 56 (60, 64, 68, 70, 78) sts to a holder removing markers as you come to them, CO 5 (5, 6, 6, 6, 6) sts, PM for beg of rnd, CO 5 (5, 6, 6, 6, 6) sts, k1, remove M, k to M, remove M, k1, place next 56 (60, 64, 68, 70, 78) sts on a holder removing markers as you come to them, CO 5 (5, 6, 6, 6, 6) sts, PM, CO 5 (5, 6, 6, 6, 6) sts, k1, remove M, k to end of the rnd. (108 (114, 120, 126, 130, 142) sts for both Front and Back, 58 (62, 66, 70, 72, 80) sts for both Sleeves)
Work Body in the rnd in St st until piece meas 4” / [10 cm] from underarm.
Increases
Next Rnd: SM, k1, m1l, k to 1 st before M, m1r, k1, sm, k1, m1l, k to 1 st before BOR M, m1r, k1.
Work Body in the rnd in St st for 11 rnds.
Rep Increases 3 (3, 4, 4, 5, 3) more times. (232 (244, 260, 272, 284, 300) sts)
Work Body in the rnd in St st until piece meas 12” / [30.5 cm] or desired length from underarm.
Short rows
Row 1: SM, k to M, sm, k 4, W&T.
Row 2: P to M, Sm, p to M, sm, p4, W&T.
Row 3: K to 4 sts before the wrapped st, W&T.
Row 4: P to 4 sts before the wrapped st, W&T.
Rep last 2 rows 2 more times.
Next Rnd: K to M picking up wraps as you come to them, sm, k to BOR, work 1 rnd even in St st picking up wraps as you come to them.
Lateral Braid
Rnd 1: With smaller needles, yo, k2tog-tbl, *slip stitch back to LH needle, yo, k2tog-tbl; rep from * to end. Insert crochet hook from WS under the first lateral st and pull the last st from LH needle under it and place it back to RH needle.
Rnd 2: With larger needles, k to end (the yo’s will be twisted).
Eyelet Lace Border
Work in Eyelet Lace Pattern for 4” / [10 cm] or desired length, ending with Rnd 2.
K 1 rnd.
P 1 rnd.
Bind Off
Make sure you don’t BO too tightly! K1, do not drop from L needle, k this st and the following st tog tbl, *sl2 sts back to LH needle, k1, k2tog tbl; rep from * to end until you have 2 sts left on RH needle. BO remaining sts, sew the ends of edging together.
Sleeves
Starting at the center of underarm CO sts, pick up and k5 (5, 5, 5, 6, 5) sts, 1 st from where the CO meets the body, knit the 58 (62, 66, 70, 72, 80) sleeve sts from the holder and pick up and k 1 st from where the CO meets the Body, then pick up and k5 (5, 5, 5, 6, 5) sts from the underarm CO, PM.
Next Rnd: K1, k2tog, k to 3 sts before end, ssk, k1. (68 (72, 76, 80, 84, 90) sts)
Work 6 (6, 6, 8, 8, 10) rnds in St st.
Purl 1 rnd.
BO as the body.
Neckline
Start at the Right Back raglan on RS. Pick up and knit 2 sts from raglan line, 42 (44, 46, 46, 48, 50) sts from Back, 2 sts from raglan line, 8 (8, 10, 10, 10, 10) sts from shoulder, 2 sts from raglan line, 14 (14, 14, 16, 16, 16) sts from the neck edge, 24 (26, 28, 28, 28, 30) sts from Front, 14 (14, 14, 16, 16, 16) sts from neck edge, 2 sts from the raglan line and 8 (8, 10, 10, 10, 10) sts from Sleeve. (118 (122, 130, 134, 136, 140) sts)
Rnd 1: *yo, k2tog; rep from * to end of the rnd.
Rnds 2-3: K all sts.
Rnd 4: P all sts.
BO as Body.
Finishing
Weave in ends. Block to measurements.
pattern errors at next rnd/separating the sleeves… the number of stitches placed on holders for sleeves is incorrect. The number of stitches to be placed on holders should be equal to final sleeve count, so it should state .. place next 58 (62, 66, 70, 72, 80) its on holder …
4-7-24 – Tried to open the schematic file but was informed it needed an app. I’m not the best with computers so didn’t know how to correct.
Hi! Just added the schematic as a PDF instead, hopefully that helps! – Nicola, Editor
I think there the stitch count is off for the 42″. After you have joined in the round you start with 62 stitches for the sleeves and then repeat the next 4 rounds 7 times. You are increasing the sleeve 4 stitches for each repeat of the 4 rounds. That would be 28 stitches total 62+28= 90. Unless I am doing something wrong.
Hello Janet! I’ve reached out to the designer for advice and she or I will reply as soon as possible. Thanks! – Nicola, Editor
no schematic picture, is just black for me. thanks
Hello! Thank you for bringing this to our attention! A new schematic has been added. Happy knitting! – Nicola, Editor
Difficult pattern to me anyway
Hi Kim! This pattern is labeled intermediate, but we are happy to reach out to the designer with any specific questions you may have. Let us know if there’s anything we can do to help! – Nicola