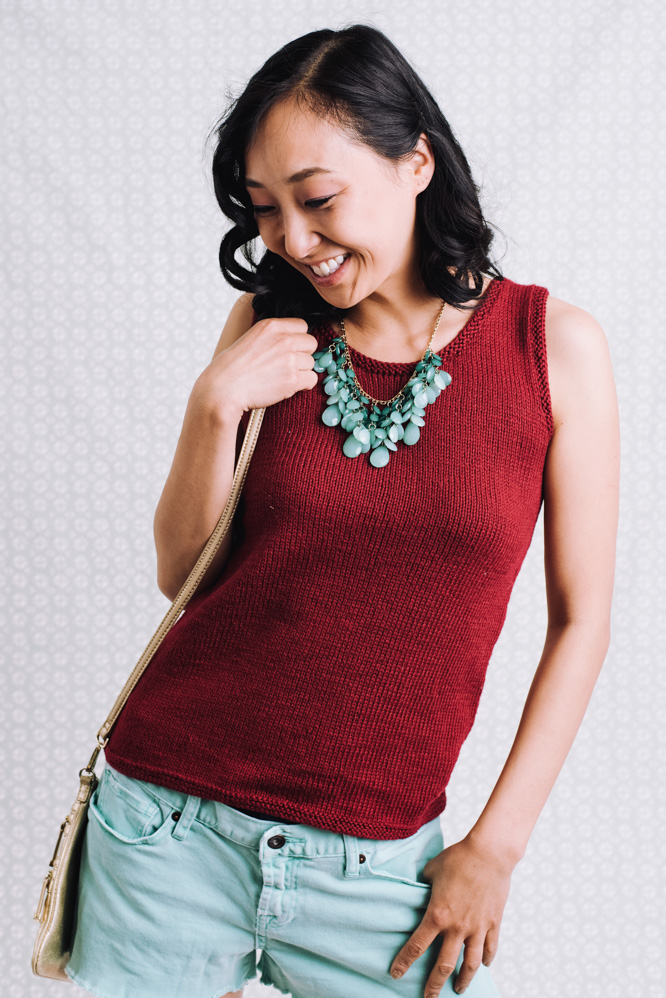
This tank top looks simple from the front, but the back is where the excitement is — it features an inset triangular lace panel! You won’t have to worry about being too warm in this tank top!
Skill Level: Intermediate
Size: Finished Bust Size 30 (32, 35, 39, 43, 48)” to fit bust 32 (34, 37, 41, 45, 50)”
2” negative ease recommended.
Shown in size 32”
Gauge: 20 sts and 32 rows = 4” [10 cm] in St st after wet blocking
Materials
 Yarn: Knit Picks Comfy Sport (75% Pima Cotton, 25% Acrylic; 136 yards [124 meters]/50 grams): 26978 Hollyberry (5 (6, 6, 7, 8, 9) balls)
Needles: US size 6 (4.0 mm) 16” and 24” circular
Notions: Markers, stitch holders, tapestry needle
Special Stitches
S2kp – sl 2 kwise, k1, p2sso
Pattern Notes
This tank top is worked from the top down, beginning with the front straps. The lace panel is worked separately and sewn into the back. If you choose to lengthen or shorten the tank top, add or subtract an equal amount of length from the initial work-even portion of the lace panel.
Pattern
Left Front
CO 11 (11, 12, 14, 15, 16).
Beginning and ending with a WS row, work in St st for 2”.
Inc Row: K1, M1L, k to end. (1 st inc’d)
Rep Inc Row every 4th row 2 (3, 3, 3, 3, 3) more times, then every RS row 3 (4, 4, 6, 6, 6) times.
Next Row (RS): Rep Inc Row.
Next Row (WS): P to last st, M1P, p1. (1 st inc’d)
Rep the last 2 rows 3 (3, 4, 4, 5, 6) more times. (25 (27, 30, 34, 37, 40) sts)
Put all sts on holder and put aside.
Right Front
CO 11 (11, 12, 14, 15, 16).
Beginning and ending with a WS row, work in St st for 2”.
Inc Row: K to last st, M1R, k1. (1 st inc’d)
Rep Inc Row every 4th row 2 (3, 3, 3, 3, 3) more times, then every RS row 3 (4, 4, 6, 6, 6) times.
Next Row (RS): Rep Inc Row.
Next Row (WS): P1, M1P, p to end. (1 st inc’d)
Rep the last 2 rows 3 (3, 4, 4, 5, 6) more times. (25 (27, 30, 34, 37, 40) sts)
Next Row: K to last st, M1R, k1, CO 6, join Left Front sts and k1, M1L, k to end. (58 (62, 68, 76, 82, 88) sts)
Work even in St st until piece meas 6.25 (6.5, 6.75, 7, 7.5, 8)”.
Armhole Inc Row: K1, M1R, k to last st, M1L, k1. (2 sts inc’d)
Rep Inc Row every RS Row 3 more times. (66 (70, 76, 84, 90, 96) sts)
Put all sts on holder or leave on needle and use a second needle for back.
Right Back
With RS facing, pick up 11 (11, 12, 14, 15, 16) sts from Left Front strap.
Beginning and ending with a WS row, work 5 rows in St st.
Next Row: K1, M1R, k to end. (1 st inc’d)
Next Row: P to last st, M1P, p1. (1 st inc’d)
Rep the last 2 rows twice more, then the RS row once more. (18 (18, 19, 21, 22, 23) sts)
Put all sts on holder.
Left Back
With RS facing, pick up 11 (11, 12, 14, 15, 16) sts from Left Front strap.
Beginning and ending with a WS row, work 5 rows in St st.
Next Row (RS): K to last st, M1L, k1. (1 st inc’d)
Next Row: P1, M1P, p to end. (1 st inc’d)
Rep the last 2 rows twice more, then the RS row once more. (18 (18, 19, 21, 22, 23) sts)
Next Row: K across, CO 22 (26, 34, 38, 46, 54), join to Right Back and k1, M1R, k to end. (58 (62, 72, 80, 90, 100) sts)
Work even in St st until Back meas 5”, ending after a WS row.
Divide for Back
Next Row: K29 (31, 36, 40, 45, 50), turn. Either place all unworked sts on holder or leave on needle while completing Left Back.
Work even in St st until Armhole meas 6.25 (6.5, 6.75, 7, 7.5, 8)”, ending after a WS row.
Next Row: K1, M1L, k to last 3 sts, k2tog, k1.
Next Row: Purl.
Next Row: K1, M1L, k to end. (1 st inc’d)
Rep the last 2 rows twice more, ending after a RS row. (32 (34, 39, 43, 48, 53) sts)
Break yarn and either place sts on holder or leave on needle while completing Right Back.
Right Back
Join yarn to work a RS row.
Work even in St st until Armhole meas 6.25 (6.5, 6.75, 7, 7.5, 8)”, ending after a WS row.
Next Row: K1, ssk, k to last st, M1R, k1.
Next Row: Purl.
Next Row: K to last st, M1R, k1. (1 st inc’d)
Rep the last 2 rows twice more, ending after a RS row. (32 (34, 39, 43, 48, 53) sts)
Break yarn.
Join Front and Backs
Join yarn to Right Back to work a RS row, k1, ssk, k across Right Back, CO 10 (11, 13, 15, 17, 19), k across Front sts, CO 10 (11, 13, 15, 17, 19), k to 3 sts from end of Left Back, k2tog, k1. (136 (146, 170, 190, 214, 238) sts)
Work 5 rows even.
Dec Row: K1, ssk, k to 3 sts from end, k2tog, k1. (2 sts dec’d)
Rep Dec Row every 6th row 5 more times, then every 10th row 3 times. (118 (128, 152, 172, 196, 220) sts)
Work even in St st until piece meas 17” from Underarm.
Switch to Garter Stitch and work for 1”.
BO all sts.
Lace Panel
CO 51.
Row 1 (WS): Purl.
Row 2: K2, *yo, ssk, k1, k2tog, yo, k1; rep from * to last st, k1.
Row 3: Purl.
Row 4: K3, *yo, s2kp, yo, k3; rep from * to end.
Work in est patt until piece meas 6” from CO, ending after a WS row.
Note: When decreasing within the lace, sometimes the tidiest decrease will be to omit a yo. Use your judgement to decrease within the patterning, and maintain patterning around the decreases as best you can. If there are not enough sts to work both a decrease and the corresponding yo, work those sts in St st.
Dec Row (RS): K1, ssk (or omit a yo), work in est patt to last 3 sts, k2tog (or omit a yo), k1. (2 sts dec’d)
Rep Dec Row every 4th row 24 more times. (1 st rem)
Break yarn and draw through st.
Finishing
Block pieces separately.
Sew lace panel into back opening.
Armhole Edgings
With 16” needle, begin at center of Underarm and pick up 1 st in every CO st of Underarm, then 2 sts for every 3 rows around Underarm. Exact st count is not crucial. Join to work in the round and PM for BOR.
Rnd 1: Purl.
Rnd 2: Knit.
Rnd 3: Purl.
BO kwise.
Neck Edging
Begin at Right Shoulder seam and pick up 2 sts for every 3 rows to Back Neck CO, then 1 st in every CO st of Back Neck, then 2 sts for every 3 rows to Front Neck CO, then 1 st in every CO st of Front Neck, then 2 sts for every 3 rows to Right Shoulder. Exact st count is not crucial. Join to work in the rnd and PM for BOR.
Rnd 1: Purl.
Rnd 2: Knit.
Rnd 3: Purl.
BO kwise.


Are patterns printable?
Yes! You are welcome to save this pattern by copying and pasting into a word document or by printing the pattern via the printer icon on the left hand side of your screen. Hope this helps! – Nicola, Editor
Are there schematics and a chart for this top? Thanks.
Hi Kimberly! At this time this pattern does not have a schematics/chart, but I can reach out to the designer if you have a specific question, just let me know! – Nicola, Editor