

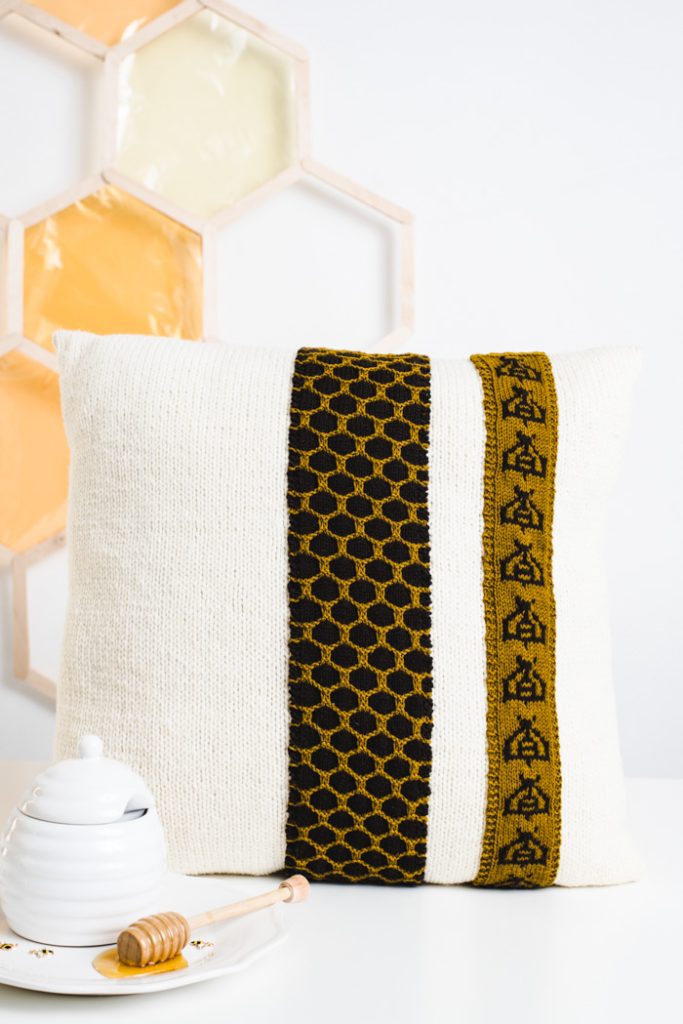
The Apiculture Pillow is a delightful celebration of nature’s busiest workers—our beloved bees. Just as a dollop of honey sweetens hot tea, this pillow brings warmth and charm to any room. The body of the pillow cover is worked in worsted-weight stockinette for a smooth, relaxing knitting experience, making it a quick and satisfying project for knitters of all levels.
Adding a touch of whimsy and texture, the honeycomb-patterned strips are knit separately and accented with adorable colorwork bees that bring the design to life. The combination of classic simplicity and playful detail makes this pillow a standout piece, whether nestled on your favorite chair, sofa, or bed.
Perfect for bee enthusiasts, nature lovers, or anyone seeking a touch of cozy charm, the Apiculture Pillow is as functional as it is beautiful. Knit it up in warm golds, creamy neutrals, or any colors that make your heart buzz with joy!
Skill Level: Intermediate
Size: 20” x 20”
Gauge: 17 sts and 21 rows = 4” [10 cm] in St st after wet blocking (with MC and larger needles for pillow), 30 sts and 34 rows = 4” [10 cm] in St st after wet blocking (with CC and smaller needles for colorwork strips)
Materials
 Yarn: Quince & Co Lark (100% American wool; 134 yards [123 meters]/50 grams): Egret (MC, 4 skeins)
 Quince & Co Finch (100% American wool; 221 yards [202 meters]/50 grams): Honey (CC1, 1 skein), Bark (CC2, 1 skein)
Needles: US Size 3 (3.25 mm) straight, US size 7 (4.5 mm) 36” circular
Notions: Tapestry needle, safety pins, a 20” square pillow insert
Abbreviations
Sl2wyib: slip two sts with yarn in back
Sl2wyif: slip two sts with yarn in front
Special Stitches
Honeycomb Stitch
Row 1: With CC2, k2, [sl2wyib, k6] to 4 sts before end of row, sl2wyib, k2.
Row 2: With CC2, k2, [sl2wyif, p6] to 4 sts before end of row, sl2wyif, k2.
Row 3: With CC2, rep Row 1.
Row 4: With CC2, rep Row 2.
Row 5: With CC2, rep Row 1.
Row 6: With CC2, rep Row 2.
Row 7: With CC1, knit.
Row 8: With CC1, knit.
Row 9: With CC2, k6, [s2wyib, k6] to 8 sts before end of row, sl2wyib, k6.
Row 10: With CC2, k2, p4, [sl2wyif, k6] to 8 sts before the end of row, sl2wyif, p4, k2.
Row 11: With CC2, rep Row 9.
Row 12: With CC2, rep Row 10.
Row 13: With CC2, rep Row 9.
Row 14: With CC2, rep Row 10.
Row 15: With CC1, knit.
Row 16: With CC1, knit.
Pattern Notes
The pillow cover is worked in the round from the bottom up.
The decorative detail strips are worked flat from the bottom up.
All slipped stitches should be slipped purlwise with the yarn on the wrong side.
On the Honeycomb Strip, carry both colors up the side to avoid having to cut and weave in more ends.
Sew your strips on your pillow after your cover has already been closed over your pillow insert.
Pattern
With MC and larger needles, CO 160 sts. Join to work in the round, be careful not to twist.
Note: You can use Judy’s Magic Cast On to have a closed bottom from the beginning or your preferred cast method for knitting in the round and later sew the bottom closed using mattress stitch.
Work in St st (knit every row) for 19”.
Slip your cover on your pillow insert to make sure it’s big enough, if not continue until it will cover your pillow insert. Place the pillow cover on your insert before binding off.
BO using either the 3 needle bind off or Kitchener stitch (sample pillow used Kitchener stitch). If you need to sew up the bottom of your pillow, do this now using mattress stitch.
Honeycomb Strip
With CC1 and smaller needles, CO 30 sts.
Knit 4 rows.
Work the Honeycomb Stitch until your strip is about 18.5” long, ending after Row 8 or Row 16.
Knit 2 rows in CC2
- Weave in ends.
Bees Strip
With CC1 and smaller needles, CO 17 sts.
Knit 4 rows.
Work 4 rows in St st (knit on the RS, purl on the WS rows).
Work the Bee Colorwork Chart 11 times.
Knit 6 rows in CC1.Weave in ends.
Finishing
Wet block the colorwork strips to about the following dimensions:
Honeycomb Strip: 4” x 19”
Bees Strip: 2.5” x 19”
Sew strips to pillow cover.
Start with the Bees Strip about 4” from the right edge of pillow. Use safety pins to pin the strip to the pillow to ensure you sew it on straight, using the pillow cover’s stockinette columns as a guide. The ends of your strip should be right at the top and bottom seam of your pillow cover. Use CC1 to sew the Bees strip to the cover along the garter stitch border. It should be very easy to hide your stitches.
Then pin your Honeycomb strip about 1.5” from the left edge of your Bees Strip. Use CC2 to sew the Honeycomb strip to the pillow cover along the garter stitch border.
Weave in any rem ends.

Where is the Bee Strip chart?
Hello! Charts are available for logged-in Gold Members at the bottom of the pattern and appear as a blue button to click and download. – Dana, Editor