

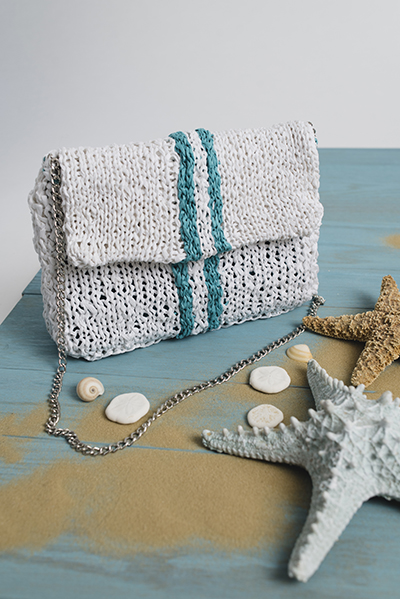
With a bold central stripe, this beach friendly clutch features a reinforced base making it ideal for any beachtime essentials. Plus, it uses one of our favorite new yarn types: raffia yarn.
Skill Level: Intermediate
Size: 1″ wide x 7″ high x 4″ deep at widest point, flap measures 11.25″ wide x 5″ high
Gauge: 12 sts and 16 rows = 4″ [10 cm] in St st in the rnd
Materials
 Yarn: Universal Yarn Yashi (100% Raffia; 99 yards [91 meters]/40 grams): 102 Rice (MC, 4 skeins), 105 Bright Aqua (CC, 1 skein)
Needles: US size 5 (4 mm), US size 7 (6 mm)
Notions: Tapestry needle, 3 stitch markers, 1 stitch marker in second color to denote EOR, 24″ length of chain or leather for strap, three ½” magnetic clasps, four 3/8” feet, 8″ zipper in MC, sewing thread in MC, sewing needle, fat quarter in coordinated colorway, 12″ cut of Pellon Peltex Single Sided Fusible Ultra Firm Stabilizer 71F, scissors, 20 round head pins, pressing cloth, 2 oz of water for pressing, iron.
2 bobbins (optional), pliers with round tips for attaching clasps and feet (optional)
Pattern Notes
The base of this bag is worked flat.
The sides are worked in the round with the corners turned using a single purl stitch through which a seam will be placed on the WS and RS of the bag to reinforce the corners and aid in the clutch shaping.
The stripe is worked in rounds, wrapping the CC around the MC during color transitions to minimize gapping where colors transition.
MC is always held double, CC is held single
When picking up the CC on each round, float CC behind MC such that the float remains on the WS of the work. This float will be covered up by the lining of the bag but should be kept at a consistent tension to ensure the width of the stripes remains consistent.
The last st of the flap is ssk to help maintain a more consistent line when the 3-needle bind off is done on the WS.
Before starting, take half the CC and place it on a bobbin.
Pattern
Base
Using MC, CO 16 sts.
Row 1: Purl.
Row 2: Knit.
Rep Rows 1-2 until piece meas 11″.
BO 15 sts, do not bind off last st, it will become the first st of the first rnd.
Setup Rnd: *Working along selvedge edge of Base, using MC with RS facing, pick up 12 sts, with CC, pick up 3 sts, switch to MC and pick up 2 sts, switch to CC, pick up 3 sts, with MC pick up 12 sts along selvedge edge, pm, turn work to pick up 12 sts along CO edge, pm; rep from * to EOR, picking up 11 sts on the final edge. (88 sts).
Slide 1 st from left to right needle, pm, for end of rnd, turn work so WS of Base is facing:
Rnd 1: *Using MC, p1, k10, p1, sm, k12, using CC k3, using MC k2, using CC k3, using MC k12, sm; rep from * around.
Rep Rnd 1, 8 times.
[Dec Rnd: *Using MC, p1, ssk, k to 3 sts from m, k2tog, p1, sm, k12, using CC k3, using MC k2, using CC k3, using MC k12, sm; rep from * around. (4 sts dec’d)
Rep Rnd 1, 3 times] 4 times.
Rep Rnd 1 a total of 6 times
Rep Dec Rnd once. (68 sts)
Rep Rnd 1 a total of 3 times.
Next Rnd (Dec): *Using MC, p1, ssk, p1, sm, k12, using CC k3, using MC k2, using CC k3, using MC k12, sm; rep from * around. (2 sts dec’d)
Next Rnd (Dec): *Using MC, k3tog, remove marker (rm), k12, using CC k3, using MC k2, using CC k3, using MC k12, rm; rep from * around. (4 sts dec’d; 62 sts rem)
Front
Move end of rnd marker to the last st so as to secure it to the work. Leaving the back 32 sts unworked, work the front i-cord BO flat as follow:
Using the knitted cast-on method and CC, CO 3 sts to left needle.
Row 1: K2, k2togtbl, do not turn work, return sts to left needle, pull working yarn taut.
Rep Row 1 across to m.
Secure m to work.
Cut the working yarn and that of the CC stripe on the Front, leaving 4″ tail, and weave tails into CC i-cord.
Flap
With WS facing and MC, using knitted cast-on method, CO 36 sts to the left needle. (68 sts)
Turn work such that the marked st is the first one on your left-hand needle and the right-hand needle holds the sts just CO, pass 1 CO st to the left needle and k2tog with marked st. (67 sts)
Return markers to the cable as follows:
MC 33 sts, m, 13 sts MC, 3 sts CC, 2 sts MC, 3 sts CC, 13 sts MC, end of rnd m.
Cont in rnd in patt maintaining the CC stripe on the outside of the bag until piece meas 5″ from CO edge of flap, on last round, ssk on first 2 sts of rnd. (66 sts)
Transition half of the sts to a second circular needle of same size.
Carefully turn flap inside out.
With WS facing, using 3-needle bind off, BO sts. Secure tails.
Turn flap again such that RS is facing.
Finishing
Turn body of bag such that WS is facing.
Using MC held doubled and tapestry needle, begin at CO edge of Base and sew a seam along the first purl ridge, using two whip sts per purl to form seam. Rep along each purl ridge. Weave in tails.
Turn work such that RS is facing.
Using MC held doubled and tapestry needle, begin at CO edge of Base and passing needle through one knit stitch on each side of the purl, sew along same seams from the RS.
Pin zipper in place such that one side is aligned to the first rnd of the WS of Flap and the other is aligned on the WS along CO selvedge edge.
Using sewing thread and sewing needle, secure zipper in place, remove pins.
Lining
Wash fat quarter per manufacturer directions, allow to dry and iron.
Cut interfacing into two rectangles measuring 10″ x 6¼ ” and one 33/8” x 10″.
With shiny side of interfacing facing, place the interfacing onto a hard heat proof surface or ironing board such that the 10″ sides are parallel to each other and the smaller piece is between the two larger ones with a 1/16” gap between each.
With RS facing, place fat quarter over the interfacing such that the interfacing is centered under the fat quarter.
Iron per Pellon instructions to adhere the interfacing to the fabric using dampened pressing cloth.
Remove pressing cloth, allow to cool.
Fold edges of fabric over the WS of the interfacing and iron into place such that the selvedge edge of the fabric is folded in upon itself, i.e: there are no raw edges showing on the RS of the lining.
Using sewing thread, tack the fabric into place on the WS of the interfacing. This face will be sandwiched against the WS of the knit bag and is the WS of the lining.
On the knit bag, attach the feet per manufacturer instruction approx. 1″ from the edges along each corner of Base.
With RS inside of Flap facing attach the three magnetic clasps evenly approx. ½” from the edge. Following manufacturer directions secure the clasps and attach the mating pieces to the RS of the front of the Body at the same interval down approx. 2½” from the i-cord bind off.
With the RS of the lining facing and RS of knit bag facing, insert lining into bag. The edges of the lining will rest along the seams formed by the sewn purl seams.
Using coordinated color of sewing thread and sewing needle, secure lining in place along the line formed by where the i-cord bind off wraps over itself along the WS of the bag.
Using coordinated color of sewing thread and sewing needle, secure lining along line formed by the line where the zipper meets the WS of the flap.
Secure chain inside the bag using sewing thread along the inside edge where the seams meet the i-cord bind off.
Enjoy your new bag.