

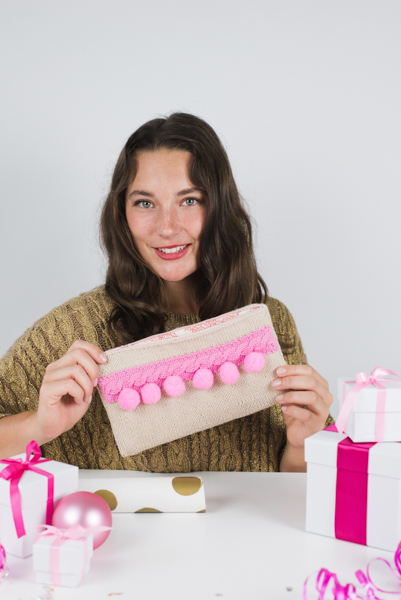
Clara is a clutch embellished with a simple cable row and pom poms. It makes a perfect accessory to tidy loose things into and place inside a larger handbag. The plush and bright pom poms turn this simple clutch into a statement accessory for the girl who is obsessed with roomy totes.
Skill Level: Easy
Size: 10” x 5.5”
Gauge: 23 sts and 32 rows = 4” [10 cm] in St st after wet blocking
Materials
Yarn: Nako Calico (50% Cotton, 50 % Acrylic; 267 yards [244 meters]/100 grams):
3777 Sand (MC, 1 ball), 6668 Medium Pink (CC, 1 ball)
Needles: US size 4 (3.5 mm) straight
Notions: Removable markers (6), cable needle, tapestry needle, thread in contrasting and matching colors, six 1” pom-poms in colors matching CC
Abbreviations
C4F: Sl 2 on cable needle and leave at front of work, k2, k2 from cable needle.
Special Stitches
Back stitch join: Using tapestry needle and yarn, bring needle 2 stitches ahead of edge, *insert it 2 stitches back (within row at the point where thread emerged for previous stitch), bring it out 2 stitches ahead of emerging thread; rep from * to end.
Slip stitch join: Insert needle at right angle under one purl stitch of clutch then under one strand of corresponding stitch on the edge of the cable strip, pull yarn through.
Pattern Notes
The clutch is worked flat and seamed with a back stitch join after attaching cable strip with a slip stitch join.
Pattern
Clutch
CO 60 sts using Cable Cast-On Method.
Work in St st for 11”.
BO all sts.
Cable Rib
CO 10 sts.
Rows 1 and 3 (RS): P3, k4, p3.
Rows 2 and all WS rows: K3, p4, k3.
Row 5: P3, c4F, p3.
Work Rows 1-5, 13 times or until piece meas is 11” from CO edge.
BO all sts.
Finishing
At a distance of 1” from the top, make a running stitch with a contrasting color along Clutch to use as a guideline to attach the Cable Rib strip. Place Cable Rib piece horizontally on Clutch piece 1” from the top. Attach Cable Rib piece with slip stitch join to the upper side of Clutch.
Sew a running st 12-sts below the first line of sts. Place stitch markers starting at 1” from the edge of Clutch for first stitch marker, then at a distance of 1.5” for the next 5 stitch markers.
Sew bottom of cable strip using slip stitch join. Attach pom poms at place of stitch markers, by sewing it at the center.
Fold clutch in to half with WS facing. Using tapestry needle, sew side seams with back stitch join starting from top corner. Rep on other side.
Follow instructions for lining Clutch.
Lining Clutch
Materials
Fabric (11″ long X 6″ wide), fusible interfacing (11″ long x 6″ wide), zipper (11” long), sewing pins, sewing needle, thread, scissors, iron
Method
Cut fabric and interfacing to required size.
Fuse interfacing to lining using iron.
Place zipper right side down. Place fabric right side down (interfacing side up) along upper edge of zipper and pin.
Sew along zipper teeth on front side of zipper taking care not to sew too close to the teeth.
Repeat on other side.
Iron flat.
Open and top stitch on both sides.
Keeping zipper half way open, fold bag right sides facing and sew along edge of bag on three sides.
Reinforce ends of zipper with extra stitches on both sides. Clip extra corners.
Pin lining to clutch and hand sew the lining with needle and matching thread.
Comments are closed.