

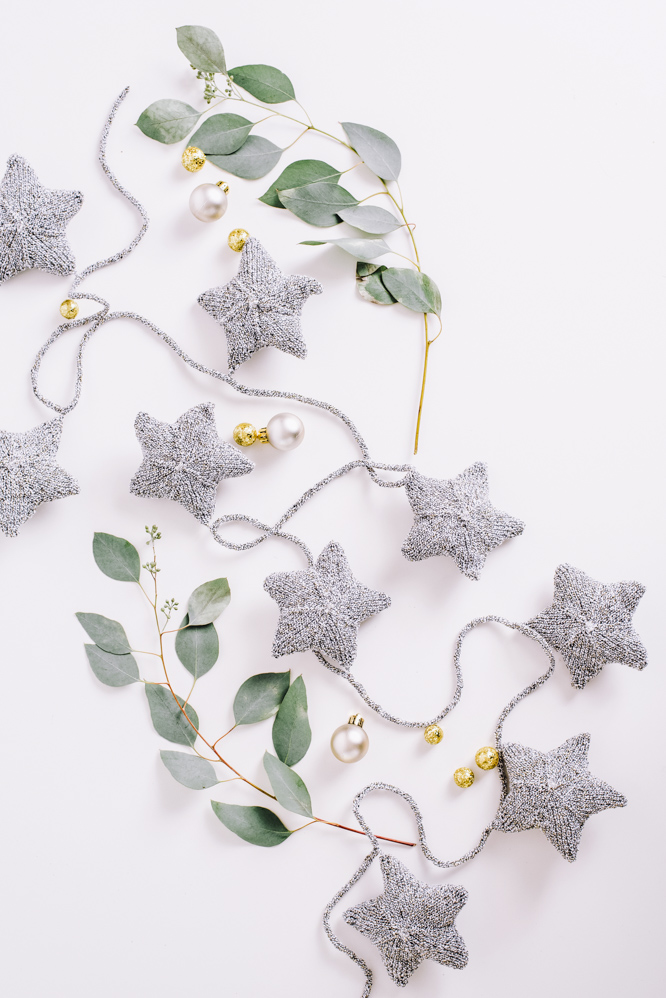
This garland of sparkly, three-dimensional stars will add a festive touch to any window, door frame or mantel. Once you’ve made your own garland, consider using individual stars to create ornaments, package decorations and more.
Skill Level: Easy
Size: Garland measures 80″ long. Each star measure 4.25″ across.
Gauge: 36 sts and 44 rows = 4” [10 cm] in St st
Materials
 Yarn: Universal Yarn Universe (42% Linen, 41% Combed Cotton, 9% Glitter, 8% Polyamide; 246 yards [225 meters]/50 grams): 10-19 Pottery (2 balls)
Needles: US size 2 (2.75 mm) circular or DPNs for working in the round
Notions: Stitch marker, tapestry needle, polyester fiberfill, 18 faceted round 6mm glass beads
Pattern Notes
Each star is made of two identical pieces, which are sewn together and stuffed.
The stars are worked from the points in to the center. Each point is worked separately, then they are joined to work in the round toward the center. After working a point, you’ll be instructed to “park” it on a spare needle. If you are using double pointed needles, slip the stitches to an unused needle. If you are using a long circular needle for the Magic Loop technique, simply slide the stitches onto the cord of your circular needle.
Pattern
Five-Pointed Star (make 18)
Points (make 4)
CO 3 sts.
Row 1 and all WS rows: Purl.
Row 2 (RS): Kfb, k1, kfb. (5 sts)
Row 4: Kfb, k3, kfb. (7 sts)
Row 6: Kfb, k5, kfb. (9 sts)
Row 8: Kfb, k7, kfb. (11 sts)
Row 10: Kfb, k9, kfb. (13 sts)
Row 12: Kfb, k11, kfb. (15 sts)
Cut yarn, leaving a tail 8″ long. Park on spare needle.
Make one more point, but do not cut yarn.
Join points to work in the round
With RS facing, slip first st of next point to needle holding last point. Pass last st of last point over first st of next point to join, then knit across point to last st. *Knit last st together with first st of next point, then knit across point to last st; rep from * twice more, knit last st together with first st of last point made, k7, place marker for beginning of rnd. (70 sts)
Rnd 1: Knit.
Rnd 2: K5, s2kp, *k11, s2kp; rep from * to last 6 sts, k6. (60 sts)
Rnd 3: Knit.
Rnd 4: K4, s2kp, *k9, s2kp; rep from * to last 5 sts, k5. (50 sts)
Rnd 5: Knit.
Rnd 6: K3, s2kp, *k7, s2kp; rep from * to last 4 sts, k4. (40 sts)
Rnd 7: Knit.
Rnd 8: K2, s2kp, *k5, s2kp; rep from * to last 3 sts, k3. (30 sts)
Rnd 9: Knit.
Rnd 10: K1, s2kp, *k3, s2kp; rep from * to last 2 sts, k2. (20 sts)
Rnd 11: Knit.
Rnd 12: S2kp, *k1, s2kp; rep from * to last st, k1. (10 sts)
Cut yarn, leaving a tail 8″ long.
Thread tail on a tapestry needle and draw through remaining sts. Pull tight to close center of Star. Use tail to sew a bead over center of Star, then weave in end on WS.
Do not weave in remaining ends – you’ll use them for sewing up the stars later.
Finishing
Cord
Make 4-st I-cord as follows:
CO 4 sts.
Row 1 (RS): Knit all sts. Do not turn work. Sl 4 sts just made back to left-hand needle.
Row 2 (RS): Bringing working yarn behind sts on left-hand needle, knit. Do not turn work. Sl 4 sts just made back to left-hand needle.
Rep Row 2 until cord measures 80″ long.
Cut yarn, leaving a tail 6″ long. Thread tail on a tapestry needle and draw through remaining sts. Pull tight to close end of cord.
Weave in ends.
Assemble Stars
Using the yarn tails at the points of Stars. Sew two stars together with WS facing. Not all tails will be needed for sewing. Just tuck the extra tails inside the star; there is no need to weave them in. Leave one tail at the tip of a point free – this tail will be used to sew star to cord. Before sewing final side of star, lightly stuff star with fiberfill. (9 finished stars)
Using remaining tail on each star, sew Stars to cord, spacing them evenly about 8″ apart.
Love the garland and stocking
They will be great around the house.
I find many of your instructions very difficult to follow. This one is marked as “easy” and the knitting of the individual pieces is easy but the instructions on how to join them with no video or pictorial illustrations is very difficult to follow. I’ve knit far more complicated projects that have better directions.
Hello Vicki! I’ve reached out to the designer for advice and she or I will reply as soon as possible. Thanks! – Nicola, Editor
You suggest printing the pattern. How do we print from the digital magazine?
You are welcome to save this pattern by copying and pasting into a word document or by printing the pattern via the printer icon on the left hand side of your screen. Hope this helps! – Nicola, Editor
Is there a video to see how to make this star garland. I don’t understand how to make.this.
Hello, there is not a video at this time but we will keep it in mind! – Nicola, Editor
How lovely! I am imagining these done as single stars with a loop for hanging as ornaments on my tree. Or small gifts to co-workers.
What a delightful garland. Thank you for the pattern ‼️
Love the stars pattern
How can I add this to my Library?
Hi Michal! At this time, we do not have a library feature that lets you store individual patterns — but it is something we are looking into! For now, I suggest printing the patterns, bookmarking them with your web browser’s tools, or using Pinterest. Hope that helps for now! – Nicola