


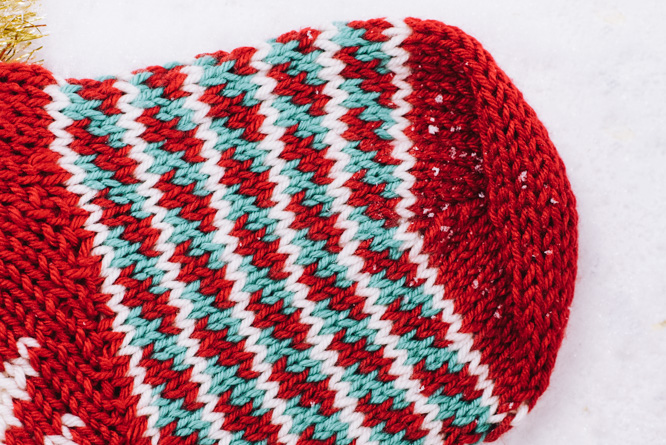
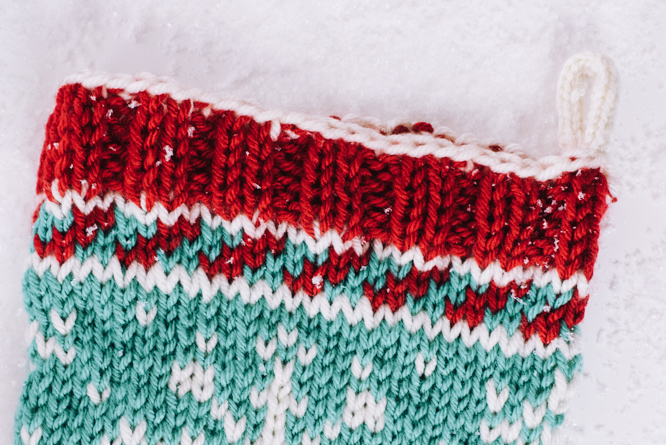
Santa will love stuffing gifts into this ornate stocking! Featuring a multitude of colorwork techniques including stranded knitting, intarsia and even a little bit of duplicate stitch — this project is bound to hold your interest. This stocking also uses the unique “hat heel” construction, which means you start the stocking at the heel rather than working from cuff to the toe. With delicate snowflakes and whimsical trees, this project will make Christmas morning fun for years to come!
Skill Level: Advanced
Size: 12.5″ finished leg/foot circumference, 13.5″ foot length, 18.5″ length from cuff to bottom of heel.
Gauge: 17 sts and 18.5-19 rows = 4” [10 cm] in Chart C (stranded knitting) after wet blocking
Materials
 Yarn: Universal Yarn Uptown Worsted (100% Acrylic; 180 yards [165 meters]/100 grams): 312 Race Car Red (MC, 1 ball), 303 Cream (CC1, 1 ball), 355 Mint Green (CC2, 1 ball)
Needles: US size 10 (6.0 mm) set of long DPNs (for stranded knitting at heel), US size 9 (5.0 mm) set of long DPNs (for remainder of stocking), US size 2.5 (3.0 mm) two short DPNs (for i-cord on hanging tab)
Notions: Stitch marker, tapestry needle, stitch holder, 2 safety pins, 3 bobbins (for working intarsia), two 10″ lengths of yarn of one color (which will be referred to as color X), two additional 10″ lengths of yarn in a different color from the first two (these will be referred to as color Y)
Abbreviations
Lli (Left lifted increase)
RS: Insert left-hand needle from left-to-right into the left leg of the st 2 rows down from the one you just knitted, then k this strand tbl. (1 st inc’d)
WS: Insert right-hand needle from top-to-bottom into the st immediately below the next st on the left-hand needle, transfer this strand to the ln and p it. (1 st inc’d)
Rli (Right lifted increase)
RS: Insert right-hand needle from right-to-left into the right leg of the st immediately below the next st on the left-hand needle, transfer this strand to the left-hand needle and k it. (1 st inc’d)
WS: Insert left-hand needle from bottom-to-top into the st 2 rows down from the one you just purled, then p this strand. (1 st inc’d)
Special Stitches
Judy’s Magic Cast-On
For best results casting on for a closed tube in the round, Judy’s Magic Cast-On is recommended.
Grafting
Grafting, also known as Kitchener Stitch, is used to close the toe once you’ve finished the foot.
I-cord
This is a method of knitting a narrow tube which can be used in your knitting for edging, ties, or, in this case, a loop which you can attached to the stocking so you can hang it up.
Instructional video: https://knittinghelp.com/video/play/i-cord-continental
Written instructions at Purl Soho: https://www.purlsoho.com/create/i-cord/
Chart A (worked in the rnd)
Rnd 1: (Rli with MC, k1 with CC1) twice. (4 sts)
Rnd 2: (K1 with MC, k1 with CC1) twice.
Rnd 3: (Rli with MC, k1 with MC, k1 with CC1) twice. (6 sts)
Rnd 4: (K2 with MC, k1 with CC1) twice.
Rnd 5: Rli with CC1, k2 with MC, k1 with CC1, rli with MC, k1 with MC, k2 with CC1. (8 sts)
Rnd 6: (K3 with MC, k1 with CC1) twice.
Rnd 7: M1 with MC, k2 with MC, k2 with CC1, rli with CC1, k3 with MC, k1 with CC1. (10 sts)
Rnd 8: (K4 with MC, k1 with CC1) twice.
Rnd 9: K1 with CC1, k3 with MC, k1 with CC1, k3 with MC, k1 with CC1, k1 with MC.
Rnd 10: K2 with MC, k5 with CC1, k2 with MC, k1 with CC1.
Rnd 11: M1 with MC, k4 with MC, k1 with CC1, lli with MC, k5 with MC. (12 sts)
Rnd 12: (K2 with MC, k1 with CC1) three times, k3 with MC.
Rnd 13: K4 with MC, k1 with CC1, k1 with MC, k1 with CC1, k4 with MC, k1 with CC1.
Rnd 14: K1 with MC, k1 with CC1, (k3 with MC, k1 with CC1) twice, k2 with MC.
Rnd 15: K with MC.
Rnd 16: (Rli with MC, k6 with MC) twice. (14 sts)
Rnd 17: Rep Rnd 15.
Rnd 18: Rep Rnd 15.
Rnd 19: (Rli with MC, k7 with MC) twice. (16 sts)
Rep Rnds 1-19 for patt.
Chart B (worked flat, short rows)
Row 1 (WS): With MC, sl1p, lli, p22, rli, turn.
Row 2 (RS): With MC, sl1k, k22, turn.
Row 3: With MC, p22, turn.
Row 4: With MC, sl1k, rli, k9, k2 with CC1, with MC, k9, lli, turn.
Row 5: Sl1p, p9 with MC, k2 with CC1, p9 with MC, turn.
Row 6: K5 with MC, k12 with CC1, k4 with MC, turn.
Row 7: With MC, sl1p, lli, p4, p10 with CC1, with MC, p4, rli, turn.
Row 8: Sl1k, k5 with MC, k8 with CC1, k5 with MC, turn.
Row 9: P6 with MC, p6 with CC1, p6 with MC, turn.
Row 10: With MC, sl1k, rli, k6, k4 with CC1, with MC, k6, lli, turn.
Row 11: Sl1p, p7 with MC, p2 with CC1, p7 with MC, turn.
Row 12: K3 with MC, k10 with CC1, k3 with MC, turn.
Row 13: With MC, sl1p, lli, p3, p8 with CC1, with MC, p3, rli, turn.
Row 14: Sl1k, k4 with MC, k6 with CC1, k4 with MC, turn.
Row 15: P6 with MC, p4 with CC1, p6 with MC, turn.
Row 16: With MC, sl1k, rli, k5, k2 with CC1, with MC, k5, lli, turn.
Row 17: S1p, p2 with MC, p8 with CC1, p2 with MC, turn.
Row 18: K3 with MC, k6 with CC1, k3 with MC, turn.
Row 19: With MC, sl1p, lli, p3, p4 with CC1, with MC, p3, rli, turn.
Row 20: Sl1k, k4 with MC, k2 with CC1, k4 with MC, turn.
Row 21: With MC, p10, turn.
Row 22: With MC, sl1k, rli, k8, lli, turn.
Row 23: With MC, sl1p, p8, turn.
Row 24: With MC, k8, turn.
Row 25: With MC, sl1p, lli, p6, rli, turn.
Row 26: With MC, sl1k, k6, turn.
Row 27: With MC, p6, turn.
Row 28: With MC, sl1k, rli, k4, lli, turn.
Row 29: With MC, sl1p, p4, turn.
Row 30: With MC, k4, turn.
Row 31: With MC, sl1p, lli, p2, rli, turn.
Row 32: With MC, sl1k, k2.
Chart C (worked in the rnd)
Rnd 1: K2 with MC, k2 with CC2.
Rnd 2: K1 with MC, k2 with CC2, k1 with MC.
Rnd 3: K2 with CC2, k2 with MC.
Rnd 4: K with CC1.
Rep Rnds 1-4 for patt.
Chart D (worked in the rnd)
Rnd 1: K with CC2.
Rnd 2: (K6 with CC2, k1 with CC1) four times.
Rnd 3: K2 with CC2, k1 with CC1, k6 with CC2, k1 with CC1, k2 with CC2, k1 with CC1, k1 with CC2, k1 with CC1, k2 with CC2, k1 with CC1, k6 with CC2, k1 with CC1, k2 with CC2, k1 with CC1.
Rnd 4: (K1 with CC1, k12 with CC2) twice, k1 with CC1, k1 with CC2.
Rnd 5: K1 with CC2, k2 with CC1, k5 with CC2, k2 with CC1, k3 with CC2, k1 with CC1, k3 with CC2, k2 with CC1, k5 with CC2, k2 with CC1, k1 with CC2, k1 with CC1.
Rnd 6: K1 with CC1, k7 with CC2, k2 with CC1, k2 with CC2, k3 with CC1, k2 with CC2, k2 with CC1, k7 with CC2, k1 with CC1, k1 with CC2.
Rnd 7: K4 with CC2, k1 with CC1, k5 with CC2, k1 with CC1, (k2 with CC2, k1 with CC1) twice, k5 with CC2, k1 with CC1, k4 with CC2, k1 with CC1.
Rnd 8: K11 with CC2, (k1 with CC1, k1 with CC2) twice, k1 with CC1, k11 with CC2, k1 with CC1.
Rnd 9: K6 with CC2, (k1 with CC1, k2 with CC2) twice, k3 with CC1, (k2 with CC2, k1 with CC1) twice, k7 with CC2.
Rnd 10: K1 with CC2, k1 with CC1, k3 with CC2, k1 with CC1, k1 with CC2, k6 with CC1, k1 with CC2, k6 with CC1, k1 with CC2, k1 with CC1, k3 with CC2, k1 with CC1, k2 with CC2.
Rnd 11: Rep Rnd 9.
Rnd 12: Rep Rnd 8.
Rnd 13: Rep Rnd 7.
Rnd 14: Rep Rnd 6.
Rnd 15: Rep Rnd 5.
Rnd 16: Rep Rnd 4.
Rnd 17: Rep Rnd 3.
Rnd 18: Rep Rnd 2.
Rnd 19: Rep Rnd 1.
Rep Rnds 1-19 for patt.
Pattern Notes
The “hat heel” construction is unique. The heel is worked first, very much like a top-down hat, starting at the center of the heel and increasing to make a hat shape. Then, triangular gussets are worked at each side of the “hat” – very much like earflaps on an actual hat, except that they are worked with short rows so that the sides of each gusset have live stitches along them. When finished, these gussets are joined at their tips with a three-needle bind-off. This leaves you with a kind of sling for your heel with two openings, one at either side of the “hat”. The stitches all around one of these openings are used to work the foot (which ends with toe decreases and the stitches are then grafted together to close the toe), and the stitches all around the other opening are used to work the leg.
All rows of all charts are to be read right-to-left unless otherwise stated in the pattern instructions.
Because of the nature of the type of cast-on used and the nature of the right-lifted increase with which you begin the stocking after the cast-on, please note that for the very first stitch that you work after setting up the cast-on, the strand that you “lift” will actually be the yarn tail from the cast-on. You will therefore want to keep that tail held snugly while you’re working it and give it a little tug afterwards to bring it down to the right size. Alternatively, if you find that it’s too difficult or awkward to work into the tail like this, then, for the first two stitches of the first round, you can ignore the “rli with MC, k1 with CC1” instructions and instead use “(k1 with MC, k1tbl with CC1) into the next stitch”.
Pattern
Heel
Using 6.0 mm needles and MC, CO 8 sts using the Judy’s Magic Cast-On method. Mark for beg of rnd.
Heel Rnd 1: Joining in CC1 when needed, work Row 1 of Chart A 4 times around. (16 sts)
Heel Rnd 2: Work Row 2 of Chart A 4 times around.
Heel Rnd 3: Work row 3 of Chart A 4 times around. (24 sts)
Cont in patt as set, working up the rows of Chart A until Row 14 has been completed. (48 sts)
Switch to 5.5 mm needles and break CC1. You will be working only with MC from this point until instructed to do otherwise.
Cont in patt as set, work up the rows of Chart A until all 19 rows have been completed. (64 sts)
K 3 rnds even.
You will now be working short rows flat with the first 32 sts of the rnd. Place the last rem 32 sts of the rnd onto a stitch holder.
Gusset #1
Gusset Row 1 (RS): K28, turn.
**Gusset Row 2 (WS): Reading chart left-to-right, work Row 1 of Chart B.
Gusset Row 3 (RS): Reading chart right-to-left, work Row 2 of Chart B.
Gusset Row 4 (WS): Reading chart left-to-right, work Row 3 of Chart B.
From this point on you will be working intarsia. You will require one bobbin of MC for the background to the right of the tree (this is the strand of MC you are already working with), one bobbin of CC1 for the tree, and a second bobbin of MC for the background to the left of the tree (this will be used to continue working MC after the tree is completed).
Gusset Row 5 (RS): Joining in new bobbins when needed and reading chart right-to-left, work Row 4 of Chart B.
Gusset Row 6 (WS): Reading chart left-to-right, work Row 5 of Chart B.
Gusset Row 7 (RS): Reading chart right-to-left, work Row 6 of Chart B.
Cont in patt as set, work up the rows of Chart B until all 32 rows have been completed. (54 sts)***
Place the 2 sts you just purl onto a safety pin.
With the RS facing, place the 26 sts which are to the left of the safety pin onto a length of yarn of color X and then place the 26 sts which are to the right of the safety pin onto a length of yarn of color Y.
Break all 3 bobbins, making sure to leave a 10″ tail of CC1.
Gusset #2
Transfer the 32 sts on the stitch holder back onto the 5.5 mm needles. You will again be working short rows flat, starting with the RS facing and using MC.
Gusset Row 1 (RS): (Sl1p) 4 times, k24, turn.
Rep Gusset instructions from ** to ***.
Place the 2 sts you just purl onto a safety pin.
With the RS facing, place the 26 sts which are to the left of the safety pin onto a length of yarn of color Y, and then place the 26 sts which are to the right of the safety pin onto a length of yarn of color X. Note that the colors of the yarn are in the opposite positions as what you did for Gusset #1.
Do NOT break MC, which is still attached to one of the safety pin stitches, but do break the other 2 bobbins, making sure to leave a 10″ tail of CC1.
Join Gussets
Turn the work inside-out.
Transfer the two Gusset #2 stitches which are on a safety pin onto a 5.5 mm needle so that the first st on the working tip of the needle is the one with the strand of MC still attached to the work. Transfer the two Gusset #1 stitches which are on a safety pin onto another 5.5 mm needle. The working tip of this needle should be pointing in the same direction as the working tip of the needle holding the Gusset #2 stitches.
Still with the work inside-out, hold the needle with the Gusset #2 stitches in front of the needle with the Gusset #1 stitches, making sure the gussets are lying flat against each other and are not twisted.
*Using a 3rd 5.5 mm needle as your right needle, insert it through both the first st on the front needle and the first st on the back needle, and k them tog; rep from * once more, then sl the 2nd st on the right needle over the first st on the right needle. Place remaining st on a safety pin. Do NOT break MC.
Turn the work right-side out again.
Foot
With RS facing and starting from the tops of the gussets, transfer the 52 sts which are on lengths of yarn of color X onto the 5.5 mm needles, then also place the st from the safety pin onto the needles so that it is the first st ready to work – note that MC is still attached to this st. (53 sts)
Join CC1 and mark for beg of rnd.
Foot Rnd 1: With CC1, k2tog, k7, puk1, k8, puk1, k19, puk1, k9, puk1, k8. (56 sts)
Foot Rnd 2: Using the strand of MC which is still attached to the work, join in CC2 when needed, work Row 1 of Chart C 14 times around.
Foot Rnd 3: Work Row 2 of Chart C 14 times around.
Foot Rnd 4: Work Row 3 of Chart C 14 times around.
Cont in patt as set, work up the rows of Chart C, repeating Rows 1-4 until you have worked a total of 5 vertical repeats of Chart C. (21 Foot Rnds worked in total)
Break CC1 and CC2. You will be working only with MC for the remainder of the foot.
Toe Setup Rnd: (K5, k2tog) 8 times. (48 sts)
Remove marker for beg of rnd, k12, then place marker for beg of rnd.
Toe Rnd 1: (K2tog, k20, ssk) twice. (44 sts)
Toe Rnd 2: K all sts.
Toe Rnd 3: (K2tog, k18, ssk) twice. (40 sts)
Toe Rnd 4: Rep Toe Rnd 2.
Toe Rnd 5: (K2tog, k16, ssk) twice. (36 sts)
Toe Rnd 6: Rep Toe Rnd 2.
Toe Rnd 7: (K2tog, k14, ssk) twice. (32 sts)
Toe Rnd 8: (K2tog, k12, ssk) twice. (28 sts)
Toe Rnd 9: (K2tog, k10, ssk) twice. (24 sts)
Toe Rnd 10: (K2tog, k10, ssk) twice. (20 sts)
Break MC, leaving an 18″ tail.
Graft the first 10 sts of the rnd to the last 10 sts of the rnd.
Leg
With RS facing and starting from the tops of the gussets, transfer the 52 sts which are on lengths of yarn of color Y onto the 5.5 mm needles.
Join CC1 and mark for beg of rnd.
Leg Rnd 1: With CC1, (k8, puk1) twice, k19, puk1, k9, puk1, k8. (56 sts)
On the next rnd, you will join in MC and CC2 when needed.
**Leg Rnd 2: Work Row 1 of Chart C 14 times around.
Leg Rnd 3: Work Row 2 of Chart C 14 times around.
Leg Rnd 4: Work Row 3 of Chart C 14 times around.
Leg Rnd 5: Work Row 4 of Chart C 14 times around.
Break MC.
Leg Rnd 6: Work Row 1 of Chart D twice around.
Leg Rnd 7: Work Row 2 of Chart D twice around.
Leg Rnd 8: Work Row 3 of Chart D twice around.
Cont in patt as set, work up the rows of Chart D until all 19 rows are complete.
K 1 rnd with CC1.***
On the next rnd you will join in MC as needed.
Rep Leg instructions from ** to ***.
On the next rnd you will join in MC as needed.
Rep Leg Rnds 2-5.
Break CC2 only.
With MC, k 1 rnd.
Ribbing Rnd: With MC, k1, (p2, k2) 13 times, p2, k1.
Rep Ribbing Rnd 4 more times.
Break MC only.
With CC1, BO in set rib patt.
Hanging Tab
With 3.0 mm needles and CC1, CO 4 sts.
Work i-cord on these 4 sts for 24 rnds.
BO, leaving a 12″ tail.
Fold the tab in half to make a loop and sew it securely to the BO edge of the stocking at the back of the leg.
Finishing
Using the 10″ tails of CC1 which were left after working the intarsia, create a pointy tip at the top of each tree by working one upside-down duplicate stitch on the row immediately above the CC1 treetop.
Block to given measurements.
Weave in all ends at inside of work.