

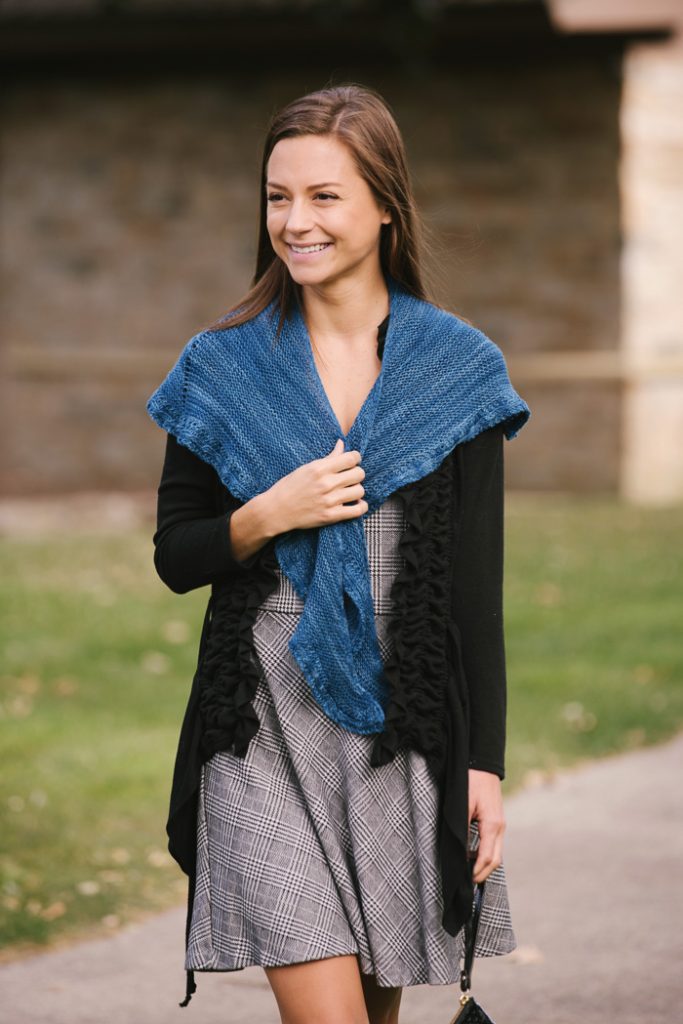
Take a brisk walk in the park with this stylish shawl. This is a fun little knit that is an easy to memorize pattern that is knit flat on a circular needle to accommodate the stitches as the piece is knit.
Skill Level: Beginner
Size: 58″ wingspan x 13″ deep at middle
Gauge: 20 sts and 28 rows = 4” [10 cm] in St st before blocking.
Materials
 Yarn: Urth Harvest Fingering (100% Extrafine Superwash Merino; 435 yards [398 meters]/100 grams yards): Indigo (1 skein)
Needles: US size 7 (4.5 mm) 30” circular
Notions: Tapestry needle, 4 stitch markers (two of each color), cable needle
Special Stitches
C1F (cable 1 front): Sl 1 st to cable needle, hold in front, k next st, k st from cn.
Pattern Notes
This shawl will form a “C” as it is worked from the center out to the edges from the top down.
The edge is added after the body of the shawl is completed by working along the edge in a 6-stitch pattern, picking up one live stitch from the body of the shawl as it is worked from one point of the wingspan to the other.
Markers are used to denote the two stitches which mark the top edge of the shawl as well as the positioning of the increases placed at intervals to form a shawl of three distinct sections that grow twice as quickly on the ends as in the middle.
To keep the work simple when knitting in a social setting, use two markers of one color and a second set of two in a contrasting color. Place the two of the first color in Row 6 and the second set when placing markers on Row 7.
To reduce the crescent-like shape and make the shawl into a triangle, execute the yarn overs on the outside of the center two markers rather than between them and replace the m1r and m1l with simple yarn overs. This will give the shawl a spine of 2 stitches with a row of yarn overs along the outside of the spine and a minimal curve to the top edge.
Pattern
Body
CO 4 sts.
Rows 1-3: Knit. (4 sts)
Row 4: K4, pick up 2 garter edges of sts along one side, turn work. (6 sts)
Row 5: K6, pick up 2 garter edges of sts along side, turn work. (8 sts)
Row 6: K3, pm, k2, pm, k3
Row 7: K2, pm, yo, k1, sm, yo, k2, yo, sm, k1, yo, pm k2. (4 sts inc’d; 12 sts)
Row 8: K2, sm, m1r, knit to last marker, m1l, sm, k2. (2 sts inc’d)
Row 9: K2, sm, m1r, k to marker, sm, yo, k to marker, yo, sm, k to marker, m1l, k2. (4 sts inc’d)
Rep Rows 8-9 until there are 288 sts on the needles, ending with a Row 9, do not turn work.
Do not bind off.
Cabled Edge
Using the knitted cast on method, CO 6 sts.
Row 1: K6, k1, k2tog, turn work (9 sts worked, the 6 sts cast on plus 3 sts from the left needle). (8 sts)
Row 2: K8, turn work. (8 sts)
Row 3: K7, k2tog, turn work. (8 sts)
Row 4: Rep Row 2.
Row 5: K2, p1, k2, p1, k1, k2tog, turn work. (8 sts)
Row 6: K3, p2, k3, turn work.
Rows 7-8: Rep Rows 1-2.
Row 9: K2, p1, C1F, p1, k1, k2tog using last st of row and live st from body.
Row 10: Rep Row 6.
Rep Rows 5-12 a total of 94 times.
Cont in patt until 2 sts rem on the left needle from the body of the work.
Rep Rows 2-3 twice.
BO sts.
Finishing
Weave in ends.
Place finished piece in basin.
Fill basin with warm water, approximately 110 degrees F.
Allow the piece to soak in lukewarm water until it sinks into the basin.
Roll piece between two towels, gently wring the towels to remove excess water.
Block to desired shape. The m1r and m1l will allow you some flexibility to create a more or less dramatic crescent shape to suit your preferences. For a smaller frame, make the crescent more dramatic. For a larger frame, block it with a less dramatic curve.
Allow to air dry.